NW.js, previously known as node-webkit, is among the community’s favorite Electron alternatives for native application development. Like its competitor, NW.js also enables the easy setup of cross-platform desktop applications simply by using the core trio of HTML, CSS, and JavaScript.
You code as if you’re creating any ordinary web application with your favorite tools (React, Angular, Less, webpack, etc.), and in the end, NW.js takes care of translating everything from the web techs to native ones.
Many apps have adopted NW.js already as their hybrid development framework. And all this is possible due to Chromium, the same open source browser owned by Google that powers not only the company’s web browser, but also dozens of other dependent projects out there.
Apart from that, NW.js offers a range of great integrations, including native OS-based hardware and file system access, integration with the shell, and many more.
In this article, I’m going to walk you through the first steps toward implementing a small web app running on NW.js. Let’s jump right into it!
Project setup
As mentioned before, since there’s no need for any specific installation or special setup, NW.js gives you the flexibility to opt for whatever environment and tech stack you’d prefer. You can have almost any sort of web application built on top of your favorite framework or library running alongside NW.js.
Plus, because the project doesn’t provide any type of scaffolding tool (except for some specific rules for manifest formats, for example), this tutorial explores how you’d create the project from scratch using the most basic setup: HTML, CSS, and JavaScript only.
So, as a first step, make sure to reproduce the same structure of folders and files demonstrated below:
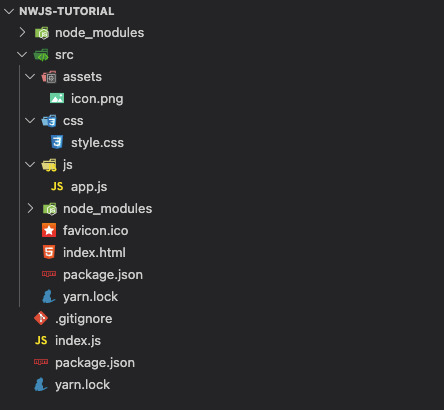
The most important folder here is the src, as you may have guessed. That’s where you separate the NW.js main files. Actually, everything related to NW.js belongs to this file.
For some of the auxiliary files such as images and favicons, you can add whatever you like.
Note also that there are two package.json files. That happens because a separate src/package.json may be created to store the manifest configs, as stated here. The other is just the ordinary package.json to handle the project dependencies and build commands.
Speaking of the package.json file, its contents are below:
{
  "name": "logrocket_nwjs_example",
  "version": "1.0.0",
  "description": "A demo app to show how NW.js works",
  "main": "index.html",
  "window": {
    "icon": "assets/icon.png",
    "height": 500,
    "width": 400,
    "resizable": true,
    "title": "Hello World, NW.js"
  },
  "dependencies": {
    "bootstrap": "^4.6.0",
    "jquery": "^3.6.0"
  }
}
You can change some of the information as you please, but make sure you always have name and version attributes since they’re obligatory.
Then, run the following command in the src folder to download the required dependencies:
yarn installThis command will download the Bootstrap and jQuery dependencies since you’ll need them to create a better look and feel.
The width and height correspond to the dimensions of your app screen when it first starts up, while the resizable property is important to configure if you allow users to resize the app window.
The next stop is the index.html content. Ddd the following HTML code into it:
<!DOCTYPE html>
<html>
  <head>
    <meta charset="utf-8" />
    <title>NW.js-example | main</title>
    <link rel="stylesheet" href="css/style.css" />
  </head>
  <body class="text-center">
    <form>
      <img
        class="mb-4"
        src="https://res.cloudinary.com/practicaldev/image/fetch/s--TXdRGx5X--/c_fill,f_auto,fl_progressive,h_320,q_auto,w_320/https://dev-to-uploads.s3.amazonaws.com/uploads/organization/profile_image/1506/e0a84c58-6a79-4f06-9149-87a38b84afa8.png"
        alt=""
        width="72"
        height="72"
      />
      <h2>Temperature Converter</h2>
      <p>
        Type the value you want to convert from Fahrenheit to Celsius and vice versa:
      </p>

      <div class="form-group row">
        <label for="fahrenheit" class="col-sm-2 col-form-label"
          >Fahrenheit:</label
        >
        <div class="col-sm-10">
          <input
            id="fahrenheit"
            class="form-control"
            type="number"
            placeholder="Fahrenheit"
          />
        </div>
      </div>
      <div class="form-group row">
        <label for="celsius" class="col-sm-2 col-form-label"
          >Celsius:</label
        >
        <div class="col-sm-10">
          <input
            id="celsius"
            class="form-control"
            type="number"
            placeholder="Celsius"
          />
        </div>
      </div>
    </form>

    <script src="../js/app.js"></script>
    <script src="node_modules/jquery/dist/jquery.min.js"></script>
    <script src="node_modules/bootstrap/dist/js/bootstrap.min.js"></script>
  </body>
</html>
That’s a basic Bootstrap structure for a form component, with the two temperature fields to convert from Fahrenheit to Celsius and vice versa.
Pay attention to the CSS import at the beginning of the file, and the JavaScript corresponding to Bootstrap, jQuery, and the app’s main JS file, respectively.
The following code belongs to the js/app.js file:
const celsius = document.getElementById("celsius");
const fahrenheit = document.getElementById("fahrenheit");

fahrenheit.addEventListener("change", (e) => {
  convertToCelsius(e.target.value);
});

celsius.addEventListener("change", (e) => {
  convertToFahrenheit(e.target.value);
});

function convertToCelsius(valNum) {
  valNum = parseFloat(valNum);
  celsius.value = (valNum - 32) / 1.8;
}

function convertToFahrenheit(valNum) {
  valNum = parseFloat(valNum);
  fahrenheit.value = valNum * 1.8 + 32;
}
They correspond to each of the event listeners for when the fields change their value. They will then trigger the proper conversion and update the field at the end.
The styles are important for the example, too. Aside from those imported from Bootstrap, you need some basic CSS rules to display the content in a centralized way. The following corresponds to the content you should add to the style.css file:
@import url("../node_modules/bootstrap/dist/css/bootstrap.min.css");

html,
body {
  height: 100%;
}

body {
    display: flex;
    align-items: center;
}

form {
  padding: 15px;
  margin: 0 auto;
}
Testing
Before testing this implementation as a real NW.js desktop application, it’s worth running the app as an ordinary web app on your browser. You can easily do so by adding the following content to your index.js file:
const express = require("express");
const path = require("path");

const app = express();

const PORT = process.env.PORT || 3000;
app.use(express.static(path.join(__dirname, "src")));

app.listen(PORT, () => {
  console.log("Server listening on port: %d", PORT);
});
Since it is located at the root folder of your project, you can start an Express.js server and serve the static files naturally.
Finally, let’s take a look at the other package.json file, which is also located in the root project folder. This is the content you should add to it:
{
  "name": "logrocket_nwjs_example",
  "version": "1.0.0",
  "description": "A demo app to show how NW.js works",
  "private": true,
  "scripts": {
    "start": "node index.js",
    "start-nw": "nw src/",
    "build-nw": "nwbuild --platforms win64,osx64,linux64 --buildDir dist/ src/"
  },
  "dependencies": {
    "express": "^4.17.1",
    "nw": "^0.52.0",
    "nw-builder": "^3.5.7"
  }
}
Here, you can see the dependencies related to NW.js itself and the nw-builder, which is a powerful plugin to help with the generation of OS-specific installers.
Make sure to also run the yarn install command on the root folder to download these npm packages.
After that, run the following command to start the application via the Express server:
yarn startThe app will be available at http://localhost:3000/. You’ll see the following screen when you access it:
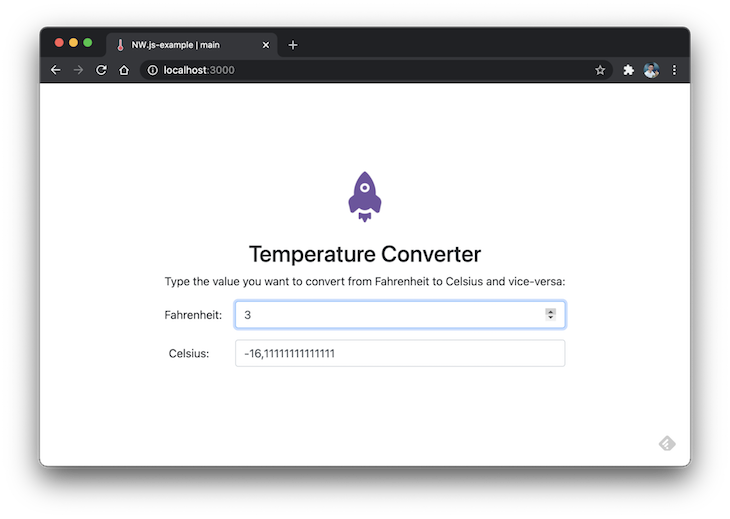
Go ahead and test both fields to check if they’re properly converting and updating the temperatures.
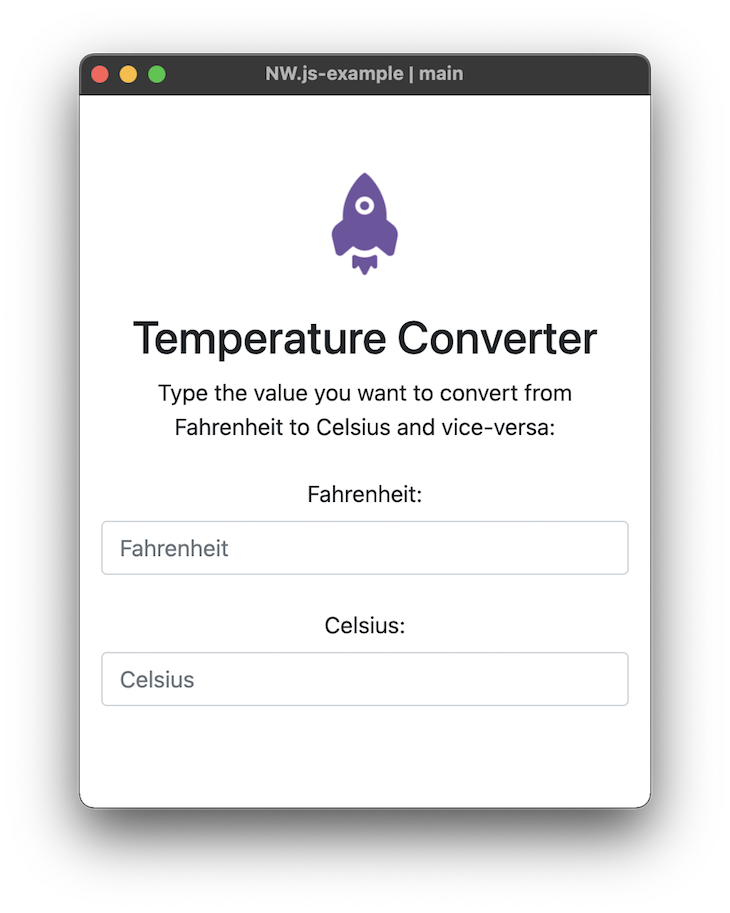
To run the app in NW.js mode, simply execute the following command:
yarn start-nwThis will trigger the NW.js library to generate everything needed for the following screen to show up:
And, finally, in order to generate any OS-specific installer you can run the following command:
yarn build-nwThis command may take a while because it’ll download and install all the required dependencies.
Note that based on the configs of this command — which we set up in the package.json file — it’ll generate installers for Windows, Linux, and macOS (64 bits) and store them under the dist/ folder of your project.
You mustn’t change any of the project files during the execution of this command; this can lead to further inconsistencies.
Take a look at the output in the image below:
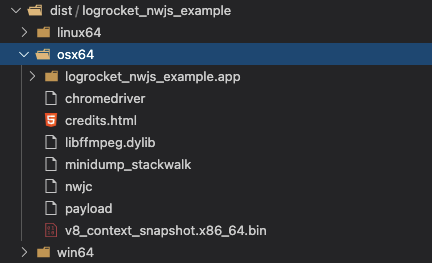
If you access the folder via Finder (on macOS) and execute the logrocket_nwjs_example.app file, you’ll see the same application start up.
Conclusion
NW.js gives you the flexibility to freely choose whatever tools you’d like to work with. It’s truly great to be able to create hybrid applications by focusing only on the web implementation you’re already familiar with.
Of course, NW.js is not the only Electron alternative out there, but it’s a powerful one if you’re willing to extract the web capabilities into a desktop app. I can’t finish without emphasizing the importance of going through the official docs to learn more about what NW.js is capable of.
Comments
Post a Comment