Understanding Device Groups
Device groups work by collecting the registration tokens for all of the app clients that are to be included and assigning this group a notification key. This key is then used when sending messages to the group in much the same way that messages are sent to topic subscribers. Once created, registration tokens may be added to or removed from the group as needed.
A device group can be created on the server (for example using Node.js) or within the client app. In both cases, the process essentially involves using HTTP to post a request to the Google cloud messaging servers containing information relating to the device group.
Requirements for Creating a Device Group
Before a device group can be created the following information will need to be gathered:
• Registration tokens for all device group members
• The cloud messaging server key for the Firebase project
• The cloud messaging sender ID for the Firebase project
• A notification key name for the device group
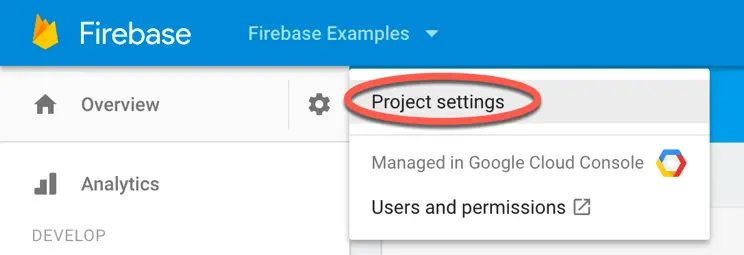
Both the cloud messaging server key and sender ID for the project are available within the Firebase console. Within the console, select the Firebase Examples project, click on the gear icon next to the Overview heading (Figure 28-1) and select the Project settings menu option:
Figure 28-1
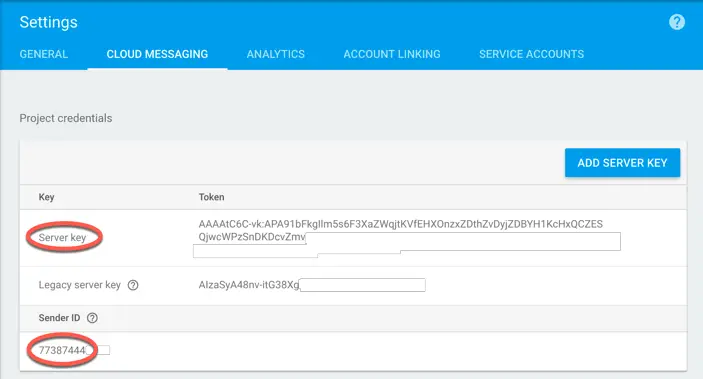
On the Settings screen, select the Cloud Messaging tab and locate the Server key and Sender ID fields in the Project credentials section as highlighted in Figure 28 2 below:
Figure 28-2
This information will be required later in this chapter so keep this page open in the browser window for convenience.
== Creating a Device Group using HTTP
As previously mentioned, much of the interaction with the Firebase cloud messaging servers relating to device groups involves the use of HTTP post requests. The format for a request to create a new device group is as follows:
https://android.googleapis.com/gcm/notification
Content-Type:application/json
Authorization:key=<your server key here>
project_id:<your sender id here>

{
   "operation": "create",
   "notification_key_name": "<notification key name here>",
   "registration_ids": ["token 1", "token 2", "token 3", …]
}
The notification_key_name value can be any string value that uniquely identifies the group within the context of the Firebase project. Given that device groups are intended for targeting the devices owned by a single user this is often set to the user’s email address.
Creating a Device Group using Node.js
To see device groups in action, begin by obtaining the registration IDs for two app/device instances by running the Messaging app (created in the chapter entitled Integrating Firebase Cloud Messaging Support to an Android App) on any combination of devices or emulator sessions. After the registration tokens have been recorded, place both apps in the background ready for message testing later in the chapter.
Next, change directory to the filesystem location containing the Node.js examples from the previous chapter. In order to post an HTTP request, the code is going to make use of the Node.js request module which will need to be installed using the following command:
npm install request --save
With the Node.js request module installed, create a new file named group.js and add the following code to it, substituting your sender ID and server ID where indicated and your email address for the notification name key. Also replace the token 1 and token 2 registration IDs with the two registration tokens obtained above:
var request = require('request');

var token1 = '<token one here>';
var token2 = '<token two here>';

var headers = {
     'Authorization': 'key=<your server key here>',
     'project_id': '<your sender id here>',
     'Content-Type':     'application/json'
         }

var options = {
     url: 'https://android.googleapis.com/gcm/notification',
     method: 'POST',
     headers: headers,
     json: {'operation': 'create',
                'notification_key_name': 'you@example.com',
                'registration_ids': ['token 1 here', 'token 2 here']}
}

request(options, function (error, response, body) {
                  console.log(body)
})
The above code imports the request module and declares the header information for the HTTP post. Options are then defined indicating the URL of the Google cloud messaging server and that this is a POST request. Next, the previously declared headers are included and a set of key/value pairs declared as a JSON object.
Finally the request() method is called passing through the options and the response displayed to the console.
Review the code to make sure all of the IDs, keys and tokens are correct before running the code:
node group.js
Assuming the successful creation of the group, the response will contain the notification key for the group with output similar to the following: { notification_key: 'WPX91bFxpiCMFe5p6JjypsOSgXn2lCVHMrX5Q1d-fjYqFoHMMc-DjE8S97GJiCs0lw0DPGnckSGe_AQhhOViV5MF67Rodb9bNlCPmYt2UUi2-vPmrwncYJs7NqdZE7DyuO3sZ0e_b98c' } This is the key that will be used to send a message to the device group in the next section of this chapter, so be sure to keep a copy of it.
Sending a Message to a Device Group
To send a message from a server using Node.js, a call needs to be made to the sendToDeviceGroup() method of the Admin SDK, passing through both the notification key for the destination group and the message payload. To send a message to the newly created group, edit the send.js file and modify it to use the sendToDeviceGroup() method:
var admin = require("firebase-admin");

var serviceAccount = require("path/to/serviceAccountKey.json");;

admin.initializeApp({
  credential: admin.credential.cert(serviceAccount),
  databaseURL: "<your database URL>"
});

var notificationKey = "<YOUR NOTIFICATION KEY HERE>";

var payload = {
  notification: {
    title: "NASDAQ News",
    body: "The NASDAQ climbs for the second day. Closes up 0.60%."
  }
};

admin.messaging().sendToDeviceGroup(notificationKey, payload)
  .then(function(response) {
    console.log("Successfully sent message:", response);
  })
  .catch(function(error) {
    console.log("Error sending message:", error);
  });
Make sure that both instances of the app launched earlier in the chapter are still running and in the background then run the send.js script as follows:
node send.js
Check the devices and/or emulators on which the apps are running and note that the notification has been delivered to both.
Managing Device Group Members in Node.js
Once a device group has been created, devices may be added or removed via HTTP POST requests. When the group was created, the operation value was set to create. To add one or more devices, send the same request, replacing create with add, including the notification key and referencing the registration tokens of the devices to be added:
.
.
     json: {'operation': 'add',
		'notification_key_name': 'you@example.com',
		'notification_key': '<notification key here>',
                'registration_ids': ['token 1 here', 'token 2 here']}
.
.
To remove devices from a group, repeat the above step, this time specifying remove as the operation value. When all devices have been deleted from a group, the group itself is also deleted.
Summary
Firebase Cloud Messaging device groups allow multiple devices to be grouped together and assigned a registration token. This token can then be used to send messages targeted only to those device/app combinations that are group members. Before a device group can be created, the Sender ID and Server ID for the project must be obtained from the Firebase console.
A device group may be created either on the server or from within the client app. This chapter has demonstrated the creation and targeting of device groups from a server using Node.js code.


Comments
Post a Comment