How to perform a DoS attack "Slow HTTP" with SlowHTTPTest (test your server Slowloris protection) in Kali Linux
Most of web administrators that doesn't care properly about the security of the servers, are often target of attacks that a lot of black hat hackers know how to perform in mass. One of those tricky attacks are the Slow HTTP attacks that target any kind of web server. Let's explain quickly graphically what the attack looks like:

It's just, pretty simple right? However for a bad configured server this can be the doom, the hardware won't be pushed up to the limits, however it hangs basically for education ... (bad example i know). Didn't get it ? Imagine sending 100 old grandmas to a store, with all of them trying to tell a story from their childhood to the cashier so that no other customers can buy anything. For education, the cashier won't kick the grandmas out of the store until they end up telling the story.
So, how you can perform such attack easily to a server and don't die trying ? The SlowHTTPTest is a highly configurable tool that simulates some Application Layer Denial of Service attacks by prolonging HTTP connections in different ways. Use it to test your web server for DoS vulnerabilites, or just to figure out how many concurrent connections it can handle. SlowHTTPTest works on majority of Linux platforms, OS X and Cygwin - a Unix-like environment and command-line interface for Microsoft Windows, and comes with a Dockerfile to make things even easier.
Currently, the supported attacks by the slowhttptest library are:
- Slowloris
- Slow HTTP POST
- Apache Range Header
- Slow Read
In this article, we'll teach you how to install slowhttptest on your Kali Linux system and how to use it to perform this attack on your servers.
1. Install slowhttptest
The Slowhttptest library is available from the repositories, so you can easily install it from the command line with the following command:
For more information about this tool, please visit the official repository at Github here.
2. Running test
Slowloris and Slow HTTP POST DoS attacks rely on the fact that the HTTP protocol, by design, requires requests to be completely received by the server before they are processed. If an HTTP request is not complete, or if the transfer rate is very low, the server keeps its resources busy waiting for the rest of the data. If the server keeps too many resources busy, this creates a denial of service. This tool is sending partial HTTP requests, trying to get denial of service from target HTTP server.
Slow Read DoS attack aims the same resources as slowloris and slow POST, but instead of prolonging the request, it sends legitimate HTTP request and reads the response slowly. The command to run the attack to check if the server is the following one:
Note that this will make the server hang if there's not protection against this attack implemented on the target server.
The command is described as next:
-c: Specifies the target number of connections to establish during the test (in this example 500, normally with 200 should be enough to hang a server that doesn't have protection against this attack).-H: Starts slowhttptest in SlowLoris mode, sending unfinished HTTP requests.-g: Forces slowhttptest to generate CSV and HTML files when test finishes with timestamp in filename.-o: Specifies custom file name, effective with-g.-i: Specifies the interval between follow up data for slowrois and Slow POST tests (in seconds).-r: Specifies the connection rate (per second).-t: Specifies the verb to use in HTTP request (POST, GET etc).-u: Specifies the URL or IP of the server that you want to attack.-x: Starts slowhttptest in Slow Read mode, reading HTTP responses slowly.-p: Specifies the interval to wait for HTTP response onprobe connection, before marking the server as DoSed (in seconds).
Now if we run the command with the target server, we get a similar output in the terminal:
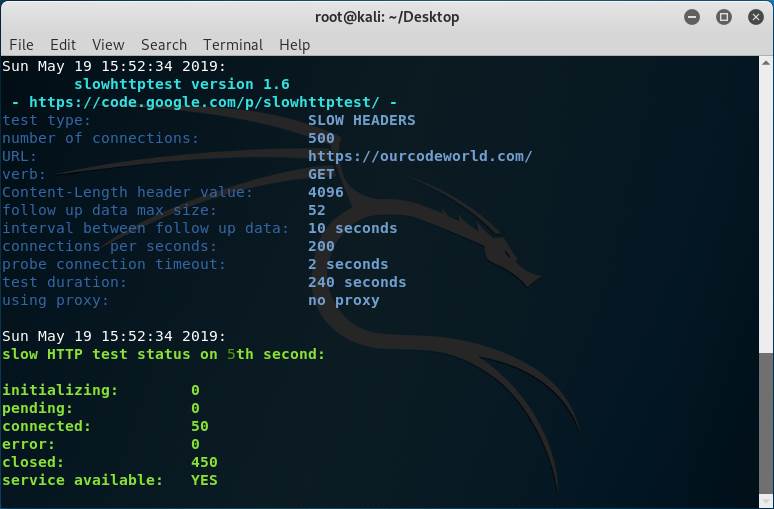
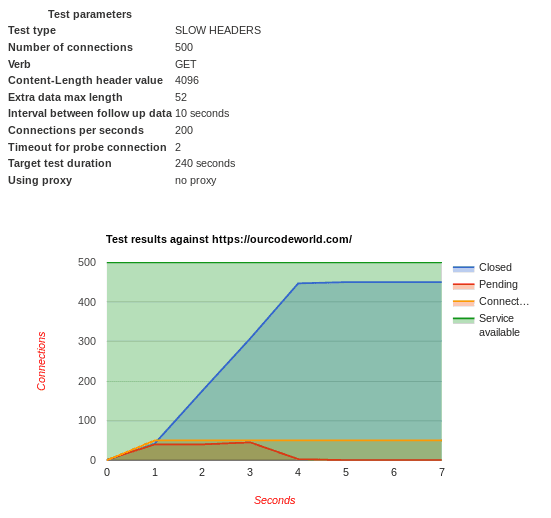
As you can see, our target is our own website, however even with 500 connections, our server doesn't hang at all because we do have protection against this kind of attacks. The service available will be always YES if the target is reachable. You can test with another computer/network if the website is still up indeed. The generate output in HTML created by our options, will be the following one:
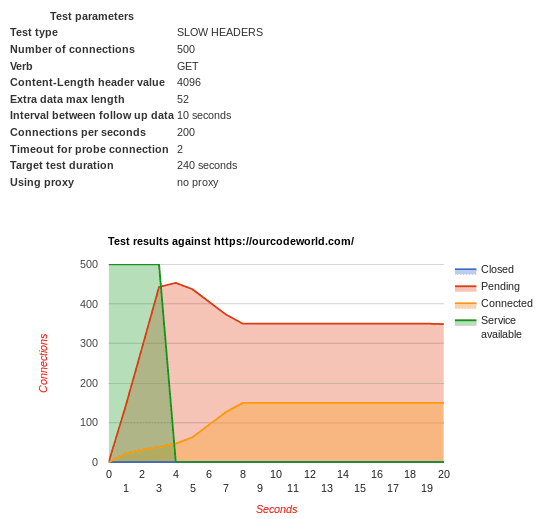
But, what if we disable the protection against Slow HTTP attacks in our server? Well, the output should be different and the website on the target server won't be reachable:
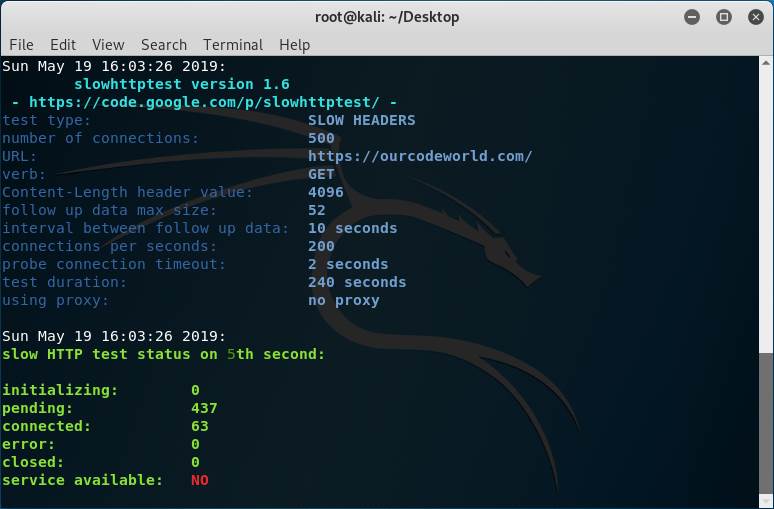
Don't trust always the service available message, just try accessing the real website from a browser and you will see if it works or not. The generated output this time is different because of the unreachable website:
Note that the Slow HTTP test needs to be executed on one of your own servers, do not run this kind of test on any third party server without its consent because this could get you in a lot of trouble (this is kind of illegal). This tool is meant to be used to test your own servers and implement protection against it. We wrote a pretty nice article about how to protect your Apache Server against this attack here using QoS.
Besides, do not try to run this attack on our website (ourcodeworld.com) as we do obviously have protection against this attack and your IP may get banned if we trace an intent of yours , thank you!.
Happy coding !
Comments
Post a Comment