Imagine Google had to use Mailchimp to send email to 2 billion Android users. How much would Mailchimp charge them?
Hint: Way too much.
Now how much would it cost if Google sent 2 billion emails themselves?
You can follow me on Twitter to get updates on my free coding tutorials, or just check out this page with my coding books on JavaScript and CSS if you need a copy.
Exactly the same amount you are going to pay after setting up secure email running from your own Linux web server: $0.
(Note: This tutorial is only for setting up outgoing mail.)
Every time I get stuck setting things up for the first time (SSL certificates, for example), I later realize that it's because I didn't understand how something worked.
After installing and configuring something new for the first time, I often develop a pattern to follow so it's a lot easier next time. These patterns become the subjects for my tutorials. In this tutorial we'll set up a mail server.

To send a Transport Layer Security (TLS) email, you need to understand how to properly enable TLS and set up SPF records in your web hosting company's DNS settings and on your Linux server.
I've gone through the process several times and found out what the key issues and common pitfalls are. I wanted to share it with everyone so you can save time setting up your own mail server. It's a lot simpler if you know the exact steps to follow.
Note: Setting up a mail server is not simple. Even if you follow all steps listed in this tutorial, chances are you will still need to tweak one or two settings to bring your configuration to the finish line. This entire process might take 2-3 days if you are doing it for the first time. But hopefully this article will help you get there faster.
Why Do You Need This Tutorial?
For me it was because I thought services like Mailchimp and ConstantContact charge way too much just for a handful of subscribers. Many people who are just starting out with a newsletter list can't really afford those services until their business gains more traction.
When it comes to email I had to learn from multiple tutorials. I learned TLSPostfix configuration separately from SPF and DKIM. I've yet to see a tutorial that explained everything in one article. So I decided to write one for future learners.
Sending email using paid services has its benefits.
A common claim paid newsletter providers have been making since 1990s is that they protect you from being black listed by your ISP. This is always a concern, even after properly setting up a mailing server, which itself is a huge ordeal.
But how do they do it? It almost seems like they've struck some sort of a pact with other companies - a magic trick not available to us mere mortals who just want to send email.
How does Amazon do it? Nintendo? freeCodeCamp? How does any company send email without using MailChimp?
Every developer should know how to install, configure and send email from the web server they are already paying for.
Sure it's possible to just get the mailer functionality from AWS as a microservice. But if you can figure out how to do it yourself, you can send email for free.
There is a way to send clean email from your own server
In this tutorial we will use Postfix to set up encrypted TLS email server running from your own domain's hostname. This means when your email arrives that annoying red lock icon in the recipient's Gmail will be gone.
Installing Postfix
Login to your remote server and run postfix:
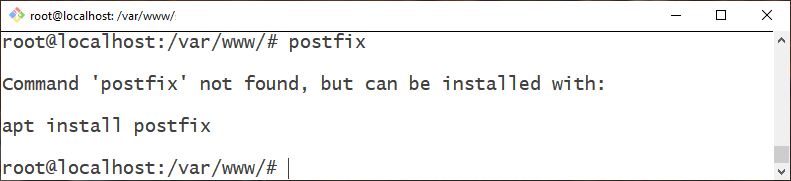
Whoops – we can't. It's not installed.
How To Install Postfix On Your System
Just run the following command in your Linux cli/bash:
apt install postfix --yes--yes helps us automatically answer "Yes" to all installation questions.
Once installed we're greeted by the Postfix Configuration screen:
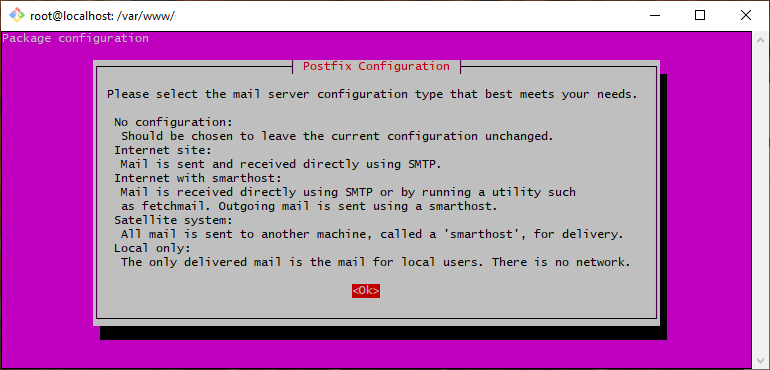
Hit Enter.
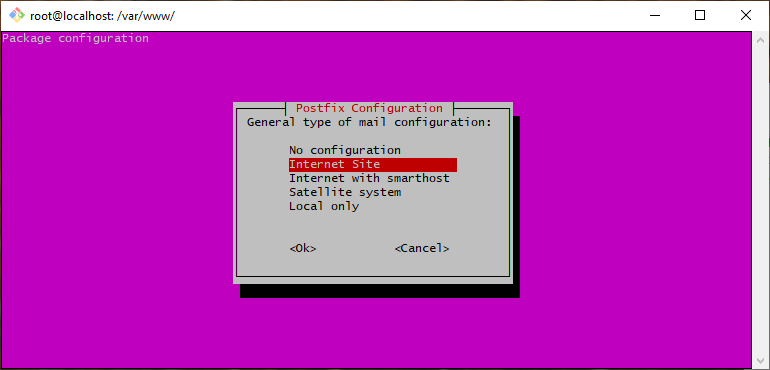
Press Enter again to choose Internet Site (default option.)
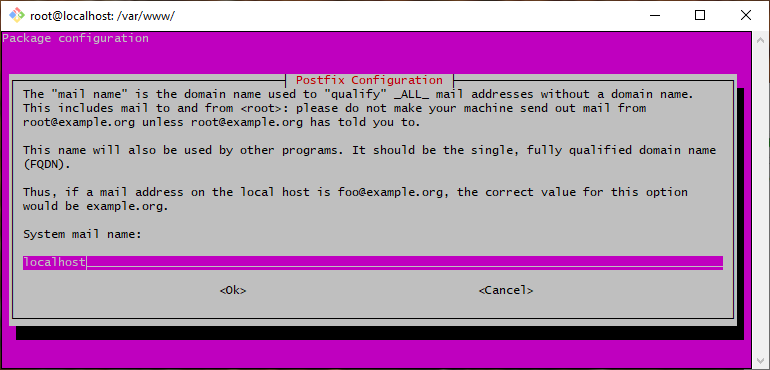
Replace localhost with yourdomain.com (skip the www part) and press Enter.
At this point the installation process will continue. Once it's done, main.cf and master.cf will be created. The file main.cf contains the default Postfix configuration and master.cf contains additional settings.
You can find both of those files in the /etc/postfix/ directory.
In this tutorial we will edit both files to configure our mail server. But we won't need to modify all settings, only the important parts.
Just remember to run the service postfix reload or service postfix restartcommand every time you change the Postfix configuration files.
How To Configure Postfix
First we need to edit /etc/postfix/main.cf, the default configuration file:
nano /etc/postfix/main.cfThis will open it in the nano editor, but you can use your favorite editor! This is what the default main.cf file looks like (with all comments removed for clarity):
smtpd_banner = $myhostname ESMTP $mail_name (Ubuntu)
biff = no
append_dot_mydomain = no
readme_directory = no
compatibility_level = 2

# TLS parameters
smtpd_tls_cert_file=/etc/ssl/certs/ssl-cert-snakeoil.pem
smtpd_tls_key_file=/etc/ssl/private/ssl-cert-snakeoil.key
smtpd_use_tls=yes
smtpd_tls_session_cache_database = btree:${data_directory}/smtpd_scache
smtp_tls_session_cache_database = btree:${data_directory}/smtp_scache

smtpd_relay_restrictions = permit_mynetworks permit_sasl_authenticated defer_unauth_destination
myhostname = localhost.members.linode.com
alias_maps = hash:/etc/aliases
alias_database = hash:/etc/aliases
myorigin = /etc/mailname
mydestination = $myhostname, example.com, localhost, localhost.localdomain, localhost
relayhost =
mynetworks = 127.0.0.0/8 [::ffff:127.0.0.0]/104 [::1]/128
mailbox_size_limit = 0
recipient_delimiter = +
inet_interfaces = all
inet_protocols = all
In this file, make sure that myhostname = mail.mydomain.com. Again, here just replace mydomain.com with your actual domain name.
Note that example.com on the line that starts with mydestination = should alsobe set to your own domain name without the www part.
Add the following line just above where it says # TLS parameters:
tls_random_source = dev:/dev/urandomThen also add or make sure following entries exist in main.cf:
smtp_tls_security_level = may
smtp_tls_note_starttls_offer = yes
smtp_tls_mandatory_protocols=!SSLv2,!SSLv3
smtp_tls_protocols=!SSLv2,!SSLv3
smtp_tls_loglevel = 1
smtpd_tls_session_cache_database = btree:${data_directory}/smtpd_scache
smtp_tls_session_cache_database = btree:${data_directory}/smtp_scache

# Enable TLS
smtpd_tls_security_level = may
smtpd_tls_ask_ccert = yes
#smtpd_tls_session_cache_timeout = 3600s
Save the file and exit back to the command line. Then run following command:
sudo service postfix restartCongratulations. You've just earned yourself the following badge.
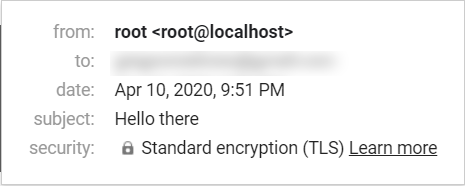
Google now considers your emails encrypted with Standard Encryption (TLS).
But you've only won the battle and not the war. If you try sending an email from your server now it's likely the message would still go to the spam folder.
There are a few other things we need to do. Follow all the instructions below to prevent emails from your server from being treated as spam by Gmail and other inboxes.
Locating the Snake Oil Key Pair Under # TLS parameters
Go down the file a bit and locate the following two lines – notice that they are currently setup with a default snakeoil SSL certificate key pair:
smtpd_tls_cert_file=/etc/ssl/certs/ssl-cert-snakeoil.pem
smtpd_tls_key_file=/etc/ssl/private/ssl-cert-snakeoil.key
What Is Snake Oil?
Snake Oil is a substance with no real medicinal value sold as a remedy for all diseases. Snake Oil Certificates are intentionally fake certificates that exist by default. All this means is they should not be trusted.
They are temporary placeholder certificates that encrypt the data, but they cannot be trusted because they lack root authority. Ideally these certificates need to be reconfigured with a proper signed key by an authentic CA (Certificate Authority).
Generating Self-Signed Key Pair
For my setup I created a pair of self-signed keys using openssl, and I replaced the snake oil certificates with a path to the new certificates.
Create new directory in /postfix just for the certificates:
mkdir /etc/postfix/sslNow navigate to that directory:
cd /etc/postfix/sslRun following command to generate the keys:
openssl req -new -nodes -keyout smtp.site.com.key -out smtp.site.com.csr(Note: Replace site.com with yourdomain.com.)
Answer the questions that appear on the screen. For most of them you can simply hit Enter. Important ones are:
- Common Name (e.g. server FQDN): smtp.yourdomain.com
- A challenge password[]: (enter something you can remember.)
Enter smtp.yourdomain.com for Common Name, substituting yourdomain.comwith the actual name of your domain.
Now enter ls command in Bash to verify the keys were generated.
You should see the smtp.domain.com.csr and smtp.domain.com.key files there.
The way I understand it is you are supposed to submit this .csr file to SSL certificate providers (Certificate Authority) and they will send you back a zip archive containing a file called caroot.crt which becomes your TLS CA file.
You then need to copy it to the SSL directory and also include a path to it in main.cf file.
Edit your /etc/postfix/main.cf file by replacing the snake oil certificates with the keys we generated and in addition to that add the link to caroot.crt:
smtpd_tls_cert_file=/etc/ssl/certs/ssl-cert-snakeoil.pem
smtpd_tls_key_file=/etc/ssl/private/ssl-cert-snakeoil.key
smtpd_tls_CAfile=/etc/postfix/ssl/caroot.crt
Edit /etc/postfix/master.cf
The master.cf file contains the Postfix process configuration rules. I won't go into the details behind each line. After some research I came up with this configuration that works for my server. I highlighted important parts:
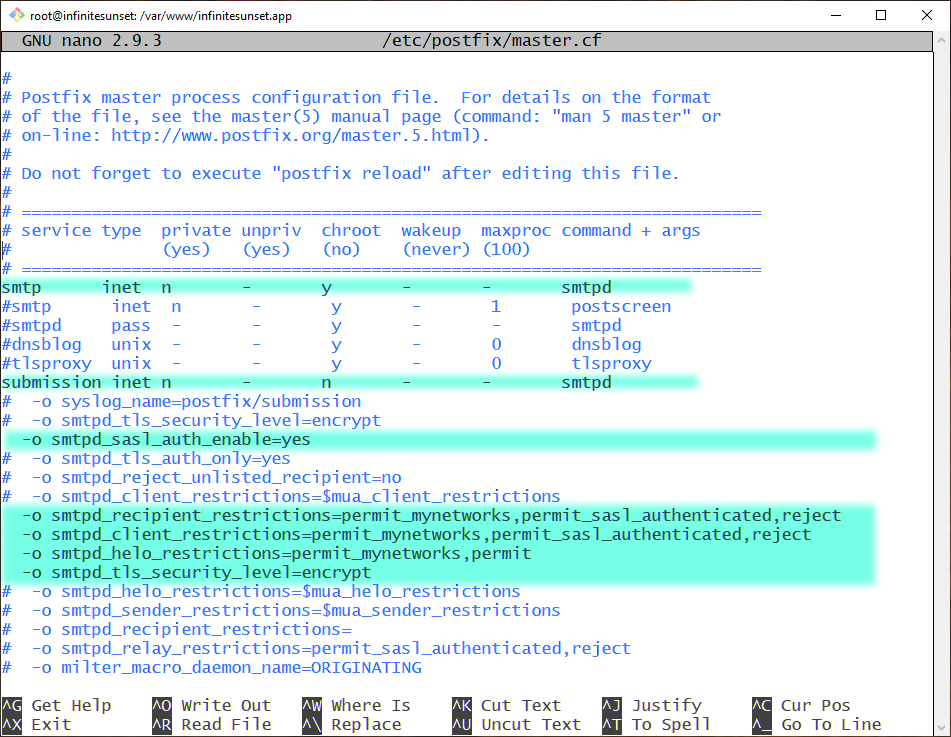
Important: You must have at least 2 leading spaces before each -o command. If you don't include them your Postfix server will not start.
Adding SPF Records
Now we need to create 2 SPF records, one for your IP address in the IPv4 format, and one for IPv6. To find those you need to log into your web hosting account.
Go to your web hosting control panel and create a new TXT record. A TXT record will have hostname, value, and TTL properties. For IPv4 fill them out as follows:
- Hostname: yourdomain.com
- Value: v=spf1 ip4:xx.xx.xx.xx mx a ~all
- TTL: 5 minutes
Just replace xx.xx.xx.xx with your remote IP address for your server.
Now create a second TXT record for your IP address in IPv6 format and enter:
- Hostname: yourdomain.com
- Value: v=spf1 ip6:xxxx:xxxx::xxxx:xxxx:xxxx:xxxx mx a ~all
- TTL: 5 minutes
Note that some hosts will automatically remove yourdomain.com and replace that with an empty space under Hostname. It is assumed that a blank hostname refers to your domain name.
So if you see it disappear from your DNS settings it means it's properly set up. This is to be expected, especially on Linode.
Replace xxxx:xxxx::xxxx:xxxx:xxxx:xxxx with your server's IPv6 address. Your web hosting company should be able to tell you what it is on the dashboard. If not, contact customer support or create a help ticket.
Save the settings and they should kick in after about 5 to 30 minutes.
Merging SPF records
Even though Gmail won't see it as a problem, it is generally recommended not to use more than one SPF record.
Some mail servers will reject both SPF records (even if they are both correct) if they find more than one SPF record in your DNS settings. Even so, we need to make sure both IPv4 and IPv6 addresses are included.
To deal with this issue we can simply merge them into one SPF record (separated by space):
v=spf1 ip4:xx.xx.xx.xx ip6:xxxx:xxxx::xxxx:xxxx:xxxx:xxxx mx a ~allJust make sure to replace x's with your actual IPv4 and IPv6 IP addresses. Save this TXT record in your web host's DNS settings and we're done!
Note: You have to wait a few minutes for the new SPF records to actually register in your DNS after they are saved.
Testing if the SPF records were properly installed
Wait for SPF records to finish propagating. Only then move on to this next step.
Sending an Email From the Linux Command Line
Our mail server is ready for testing. But first we need to install mailutils which is a mailer utility to help us send mail directly from the command.
apt install mailutilsType the following line (your message may be different) into your Linux bash:
echo "Hi" mail -s "My Subject Line" recipient-001@gmail.com
Simply replace recipient-001@gmail.com with the email address you want to send the message to.
Hit enter and watch your inbox for the message. Chances are this first email will end up in the spam folder.
Now when you send an email from your server to a Gmail address (and if you analyze header of the message), you want the recipient mail header say spf=pass. This indicates that SPF record is properly saved in your DNS settings.
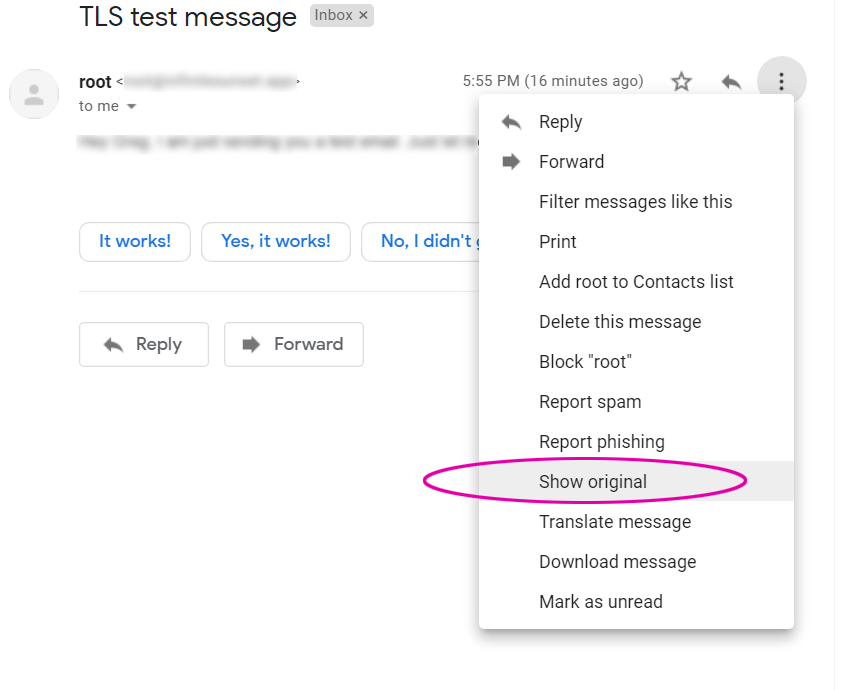
To check the complete header go to "Show original" option in Gmail:
Make sure that both spf=pass and dkim=pass messages appear here:
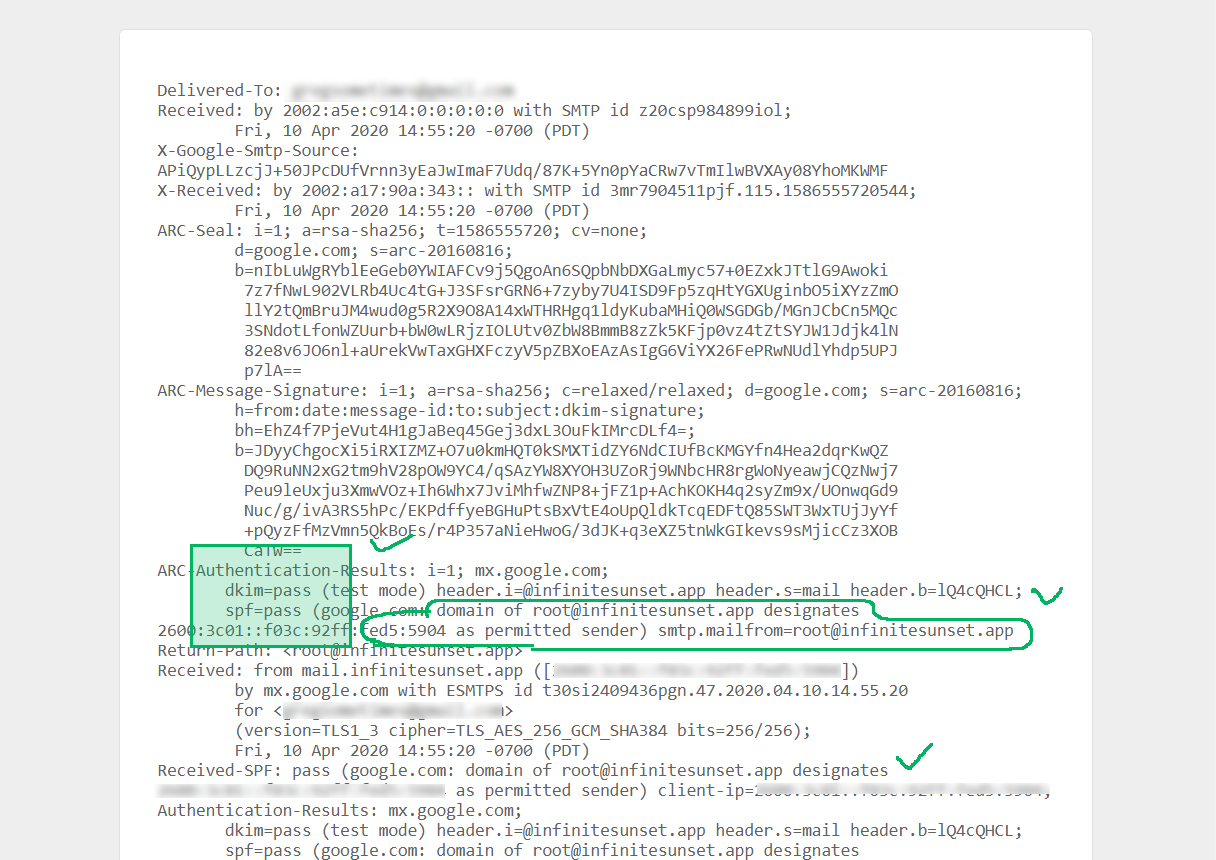

spf=pass (google.com: domain of root@yourdomain.com designates xx.xx.xx.xx as permitted sender.)The message designates xx.xx.xx.xx as permitted sender is important. If that's not what you get you have to keep configuring your mail server until it says that! And that's what the rest of this Postfix tutorial is about.
In the Gmail header seen above the x'es will be replaced with IP address of server from which email was sent. Also, yourdomain.com will be your hostname.
This is important. If you want to properly configure your email, you need to make sure your hostname is your domain name. That's the next step.
Hostname
On Linux you have something called hostname. This is the name that identifies your server by a unique name. If this hostname does not match your domain name and you send an email to a Gmail inbox, Gmail will complain with:
spf=neutral (google.com: xx.xx.xx.xx is neither permitted nor denied by best guess record for domain of root@hostname)It might say spf=neutral, which is something you don't want to happen. Also the "neither permitted nor denied" message isn't what we want. It should say designated.
Go to your Linux command line and type:
hostname yourdomain.comYou just set your hostname to match your domain name. To verify type:
hostnameIt should log yourdomain.com which is what will appear in email headers as your root@hostname.
Restart your Postfix server and send an email. This time around it should generate the spf=pass message which means you've successfully set up SPF.
To make our emails even less spammy, we need to also set up a DKIM record.
Adding a DKIM Record
How does DKIM work? Like many security systems, DKIM is based on there being one public key and one private key. The public key is added to your DNS settings as a TXT record. Your email message is signed with a private key.
When the email message is sent, the recipient server (Gmail, for example) checks your DNS setting for the public key which has the name of mail._domainkey and verifies the DKIM value in it.
Now we just need to actually generate DKIM keys.
The fastest way to generate your DKIM keys
If you just want to get this done fast, go to an online DKIM generator tool such as https://dkimcore.org/tools/keys.html, type in your domain name, and hit Enter. It will give you two parts.
You can also verify current DKIM at https://dkimcore.org/c/keycheck.
One is your Private Key and it will look something like this:
-----BEGIN RSA PRIVATE KEY-----
MIICXQIBAAKBgQCv6a4bE2OWezjAk4/SmG+a+M+STPv5rid/teTjw/HknGrNFalt
c0nvW5FTiwoiofm7lG0C8OHQo0PVkXVGsrizVYShJMDfQk39/WyICxIHYt3XBB+1
ELC4bexsE8JYGJ9RwazO4otIOHBk+XPLEvNWeSx3Cj8dcVqRYPnQDv4cYwIDAQAB
AoGBAJ/d51s14LB2JVpmADOsUujsF39StT/wdHcMsAoKHf/b4vekcwhD2PJNLiJV
Xo2g1FsThYpBrYa1iUVC3ui0LUNRmOgPQfySkPSIoM3hm0HhkEfMLIwRNXHqfNT5
ayewCvsnuYGrAiwTqf5S9klsYHRlM6AD4uVR1yLDAwMQZvlxAkEA6m1PbVI610U0
om4LM0P+v7nQ3GzgtsqovPXZaTUHwgnI/zDWfH/b+0jPghjagwtIzVLqObMKvbh5
GaKrYcf96wJBAMAZ4M4LjiNKMVYfahi1Ow5+S2Xn4Kh7Rlo+GkDzqvUiqqyacGDE
XRaWBxURkRc1I6zw/0iZV0TGW0FaP9/MJWkCQQCLOYQ0fuOnOdi6pvRL7BP9tdOP
NbJ3nQB9yNzoGLCU0s7mkBCyPBVftaxXrX8I2MjR+G5W+jhk2IxDZ1K1bdslAkAT
u5TIFY/IODrRKfDwEM28M2TzVtpQ9DjJGE9GFMGe5Ky7hjG8/u7A/zBDDcblp2O+
xBK1FmtMeUOvxiqBhqrhAkApJFLcyl3mSV2hXnansn+hmJ4m7KTX1XivPk9gZUfb
j0mYWHMxhWsWCcS65XNpBn5G1ucerFKJWRtQRgm3D/q8
-----END RSA PRIVATE KEY-----
Save it into dkim-private.pem as a text file and store it somewhere on your server, perhaps under /etc/postfix/.
Note, you have to include the -----BEGIN RSA PRIVATE KEY----- and -----END RSA PRIVATE KEY----- separators. Technically they are not part of the key, but if these separators are missing from the file it's not going to work.
Later when we use the sendmail package to actually send email from Node we will link to this file via dkim.privateKey property in sendmail options object.
Your Public Key will look like this:
v=DKIM1;t=s;p=MIGfMA0GCSqGSIb3DQEBAQUAA4GNADCBiQKBgQCv6a4bE2OWezjAk4/SmG+a+M+STPv5rid/teTjw/HknGrNFaltc0nvW5FTiwoiofm7lG0C8OHQo0PVkXVGsrizVYShJMDfQk39/WyICxIHYt3XBB+1ELC4bexsE8JYGJ9RwazO4otIOHBk+XPLEvNWeSx3Cj8dcVqRYPnQDv4cYwIDAQABMake sure this value does not contain double quotes when entering it into your DNS settings.
In your DNS settings it should go under the property mail._domainkey.domainname.com. My web host Linode automatically shortens it to mail._domainkey and assumes domainname.com.
If your host is not Linode you might have to use mail._domainkey.domainname.com.
The value should be one continuous string of text. When actually entering the DKIM value into your DNS settings we generated above it would be entered as:
v=DKIM1; h=sha256; k=rsa; t=y; p=MIGfMA0GCSqGSIb3DQEBAQUAA4GNADCBiQKBgQCv6a4bE2OWezjAk4/SmG+a+M+STPv5rid/teTjw/HknGrNFaltc0nvW5FTiwoiofm7lG0C8OHQo0PVkXVGsrizVYShJMDfQk39/WyICxIHYt3XBB+1ELC4bexsE8JYGJ9RwazO4otIOHBk+XPLEvNWeSx3Cj8dcVqRYPnQDv4cYwIDAQAB
Save this as a new TXT entry in your DNS settings.
We need to do one more thing. Modify /etc/postfix/main.cf by adding following 4 lines. Simply copy them from here and paste them toward the end of file:
#DKIM
milter_default_action = accept
milter_protocol = 2
smtpd_milters = inet:localhost:8891
non_smtpd_milters = inet:localhost:8891
You may think we need to open port 8891 via IPTABLES on your Linux server. Wrong! This is only for the Postfix socket. There is nothing else you need to do.
Side note: Milter is an extension to the widely used open source mail transfer agents Sendmail and Postfix. It allows administrators to add mail filters for filtering spam or viruses in the mail-processing chain.
Save the file and run postfix stop command then postfix start. This will restart the Postfix server with new configuration.
Verifying if your DKIM is properly installed with DIG
It's possible to successfully add DKIM record with a wrong public key. The email header will contain the dkim=neutral (invalid public key) note. This is a silent fail and your email will still be sent. What you want it to say is dkim=pass.
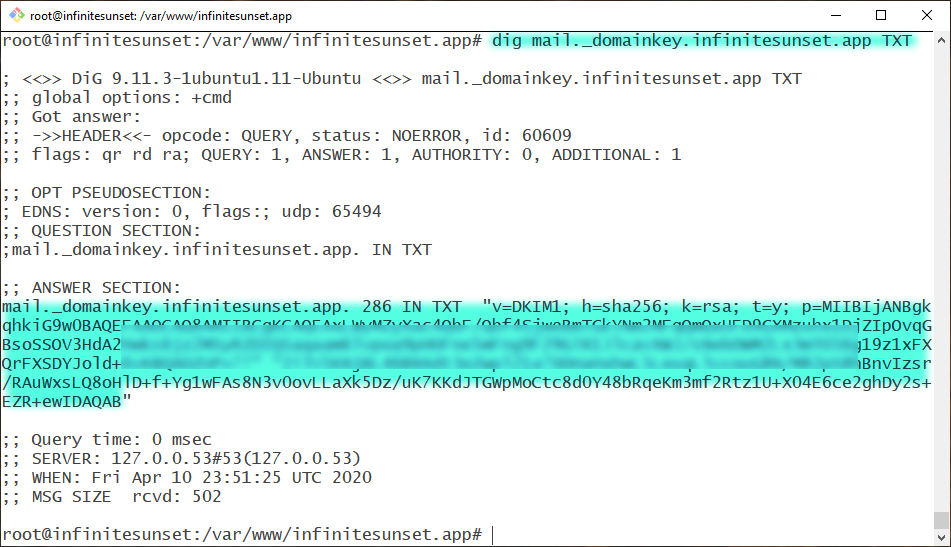
There is a way to verify the actual value of the DKIM record. After changing DKIM record in your DNS, wait 5-10 minutes or so and run the following command in your bash:
dig mail._domainkey.yourdomain.com TXTReplace yourdomain.com with your actual domain name. This will output your current TXT records on the console.
Keep in mind changing DNS records takes time to take effect. It's possible to see an older record here. Just give it time to propagate.
For my domain name I had this output:
Installing the DKIM package
Adding a DKIM record to our DNS is only the first step. To put it all together, we need to match the public domain key with our private key.
To install the dkim package, run the following command:
sudo apt-get install opendkim opendkim-toolsInstalling the opendkim-tools package has also created /etc/opendkim.conf file. Open it with:
nano /etc/opendkim.confLocate the following two lines:
#Socket                  inet:8891@localhost
Socket                 local:/var/run/opendkim/opendkim.sock
And change them to:
Socket                  inet:8891@localhost
#Socket                 local:/var/run/opendkim/opendkim.sock
Type Ctrl-X and hit Y and Enter to save the file.
Socket is the address Milter will listen to. Posfix will send messages to opendkim for signing and verification through this socket – 8891@localhost defines a TCP socket that listens on the localhost:8891 port.
Now edit the default opendkim settings file:
nano /etc/default/opendkimAnd change the line that starts with SOCKET to:
SOCKET=inet:8891@localhostSave and exit the editor.
Edit main.cf Postfix configuration file:
nano /etc/postfix/main.cfAnd add to the bottom of the file:
milter_protocol = 2
milter_default_action = accept
smtpd_milters = inet:localhost:8891
non_smtpd_milters = inet:localhost:8891
Execute the following commands:
sudo service postfix restart
sudo service opendkim restart
Congratulations! At this point you should be able to send secure email from your server.
In next part of the tutorial we'll take a look at how to send email from command line and then install the sendmail package so they can be sent directly from your Node server with the proper sender's name.
Rewriting the From: header.
You will notice that your email arrived from root@domain. This isn't exactly what you want. As a legitimate business, you want it to be reflected in the name of the email address from which you're sending your news, updates, and so on.
Postfix has extensive configuration that allows you to change pretty much everything you can think of. It also allows you to rewrite email headers. It actually gives you ability to use regular expressions to do that.
But it's best to set From: value using an email client,rather than directly messing with Postfix header rewrites. Gmail and other email servers are pretty strict about even slightly malformed headers because it's often a sign that a spammer has made a clumsy attempt at faking the message.
To do that we will use Node's sendmail module.
Using Node sendmail To Send Email
Sending email from the command line is nice, but you also want to be able to send email directly from your Node server. This is especially useful if you want to send multiple emails and properly rewrite the sender's name, reply-to address, and so on.
Installing sendmail
Just run the following command from your project's directory:
npm install sendmail --saveAnd now we can use sendmail in our Node program!
// Bread and potatoes Express server
const express = require('express');
const https = require('https');
const fs = require('fs');
const path = require('path');
const app = express();
const port = 80;

// Send email to one or multiple recipients:
const sendmail = require('sendmail')({
  logger: {
    debug: console.log,
    info: console.info,
    warn: console.warn,
    error: console.error
  },
  silent: false,
  dkim: { // Default: False
    privateKey: fs.readFileSync('/etc/postfix/dkim-private.pem', 'utf8'),
    keySelector: '._domainkey'//'mydomainkey'
  },
  devPort: 25, // Default: False
  devHost: 'localhost', // Default: localhost
  smtpPort: 25, // 2525, // Default: 25
  smtpHost: 'localhost' // Default: -1 - extra smtp host after resolveMX
});

const error = function(err, reply) {
    console.dir(reply)
};

// Create email body message
const body  = '<p>You activation code is <b>10-' + Math.floor(Math.random()*10000) + '</b> enter it into code confirmation box within next hour to finish registering your account.</p>' +
'<p><b>Glorious Chimpanzee</b><br/>Thanks from all of our team!</p>';

// Recipient list
const emails = ["recip-1@gmail.com",
                "recip-2@other.com",
                "FelixTheCat@catmail.com"];

const from_addr = 'Glorious Chimpanzee <hello@gloriouschimp.com>';
const subj = 'Please Confirm Your Glorious Chimpanzee Account';

emails.forEach(email => {
    sendmail({from: from_addr,
                to: email,
           subject: subj,
              html: body}, error);
});

// Run basic Express server:
// You don't need to do this if you just want to send email
let site = 'gloriouschimp.com';

const certificates = {
    "key": fs.readFileSync(`/etc/letsencrypt/live/${site}/privkey.pem`),
    "cert": fs.readFileSync(`/etc/letsencrypt/live/${site}/fullchain.pem`)
};

const server = event => {
    console.log(`${site} is listening on port ${port}!`);
};

// Launch Node server with Express "app"
https.createServer(certificates, app).listen(port, server);
This script sends an email to 3 made up email addresses. To send it to just one, simply modify emails[] array by deleting the other two.
node mailer.jsRun this command to execute the script and send email to 3 imaginary recipients. (Replace with your own email addresses to actually test it!)
Note: You don't need the Express code just to send email. Here it's included for reference to show how sendmail can be used alongside Express.
Just make sure to replace gloriouschimp.com with your own domain name. Also generate SSL certificates and pass them to https.createServer method as options – you can learn how to do that by following my LetsEncrypt tutorialhere.
Your SSL certificates that run the server via the https protocol are not required to send TLS mail with Postfix. But it's a good idea to set it up. The http protocol still exists, but it's quickly becoming extinct and obsolete. Do not use it when setting up a new server.
Ideally, if you followed all instructions in this tutorial, at this point you will have a properly set up TLS mail server. However, it's possible that due to differences in Linux operating systems, outdated software and so on, you might still trip up on some parts of the setup.
Keep tweaking each part of the Postfix configuration one at a time. Send test emails. Also, check out additional resources online.
Good luck!
Comments
Post a Comment