Let’s create a folder graphql/mutations and inside the folder create addGadget.js, updateGadget, and removeGadget files..
We simply place the mutation objects into the files and export them.
Moving addGadget mutation to separate file
graphql/mutations/addGadget.js
const { GraphQLObjectType, GraphQLString } = require('graphql');
const gadgetGraphQLType =  require('./../gadgetType');
const Gadget = require('./../../models/gadget');

module.exports = {
  type: gadgetGraphQLType,
  args: {
    name: { type: GraphQLString },
    release_date: { type: GraphQLString },
    by_company: { type: GraphQLString },
    price: { type: GraphQLString }
  },
  resolve(parent, args) {
    const newGadget = new Gadget({
      name: <a href="http://args.name" class="link link-url" target="_blank" rel="external nofollow noopener noreferrer">args.name</a>,
      release_date: args.release_date,
      by_company: args.by_company,
      price: args.price,
    })

    return newGadget.save();
  }
};
Update mutation;
graphql/mutations/updateGadget.js
const { GraphQLObjectType, GraphQLString } = require('graphql');
const gadgetGraphQLType =  require('./../gadgetType');
const Gadget = require('./../../models/gadget');

module.exports = {
  type: gadgetGraphQLType,
  args: {
    id: { type: GraphQLString },
    name: { type: GraphQLString },
    release_date: { type: GraphQLString },
    by_company: { type: GraphQLString },
    price: { type: GraphQLString }
  },
  resolve(parent, args) {
    return Gadget.findById(<a href="http://args.id" class="link link-url" target="_blank" rel="external nofollow noopener noreferrer">args.id</a>)
      .then(gadget => {
        <a href="http://gadget.name" class="link link-url" target="_blank" rel="external nofollow noopener noreferrer">gadget.name</a> = <a href="http://args.name" class="link link-url" target="_blank" rel="external nofollow noopener noreferrer">args.name</a>
        gadget.release_date = args.release_date,
        gadget.by_company = args.by_company,
        gadget.price = args.price

        return gadget.save()

      })
      .then(updatedGadget => updatedGadget)
      .catch(err => console.log(err))
  }
};
And finally the delete mutation.
graphql/mutations/removeGadget.js
const { GraphQLObjectType, GraphQLString } = require('graphql');
const gadgetGraphQLType =  require('./../gadgetType');
const Gadget = require('./../../models/gadget');

module.exports = {
  type: gadgetGraphQLType,
  args: {
    id: { type: GraphQLString }
  },
  resolve(parent, args) {
    return Gadget.findOneAndDelete(<a href="http://args.id).exec(" class="link link-url" target="_blank" rel="external nofollow noopener noreferrer">args.id).exec(</a>)
      .then(gadget => gadget.remove())
      .then(deletedGadget => deletedGadget)
      .catch(err => console.log(err))
  }
};
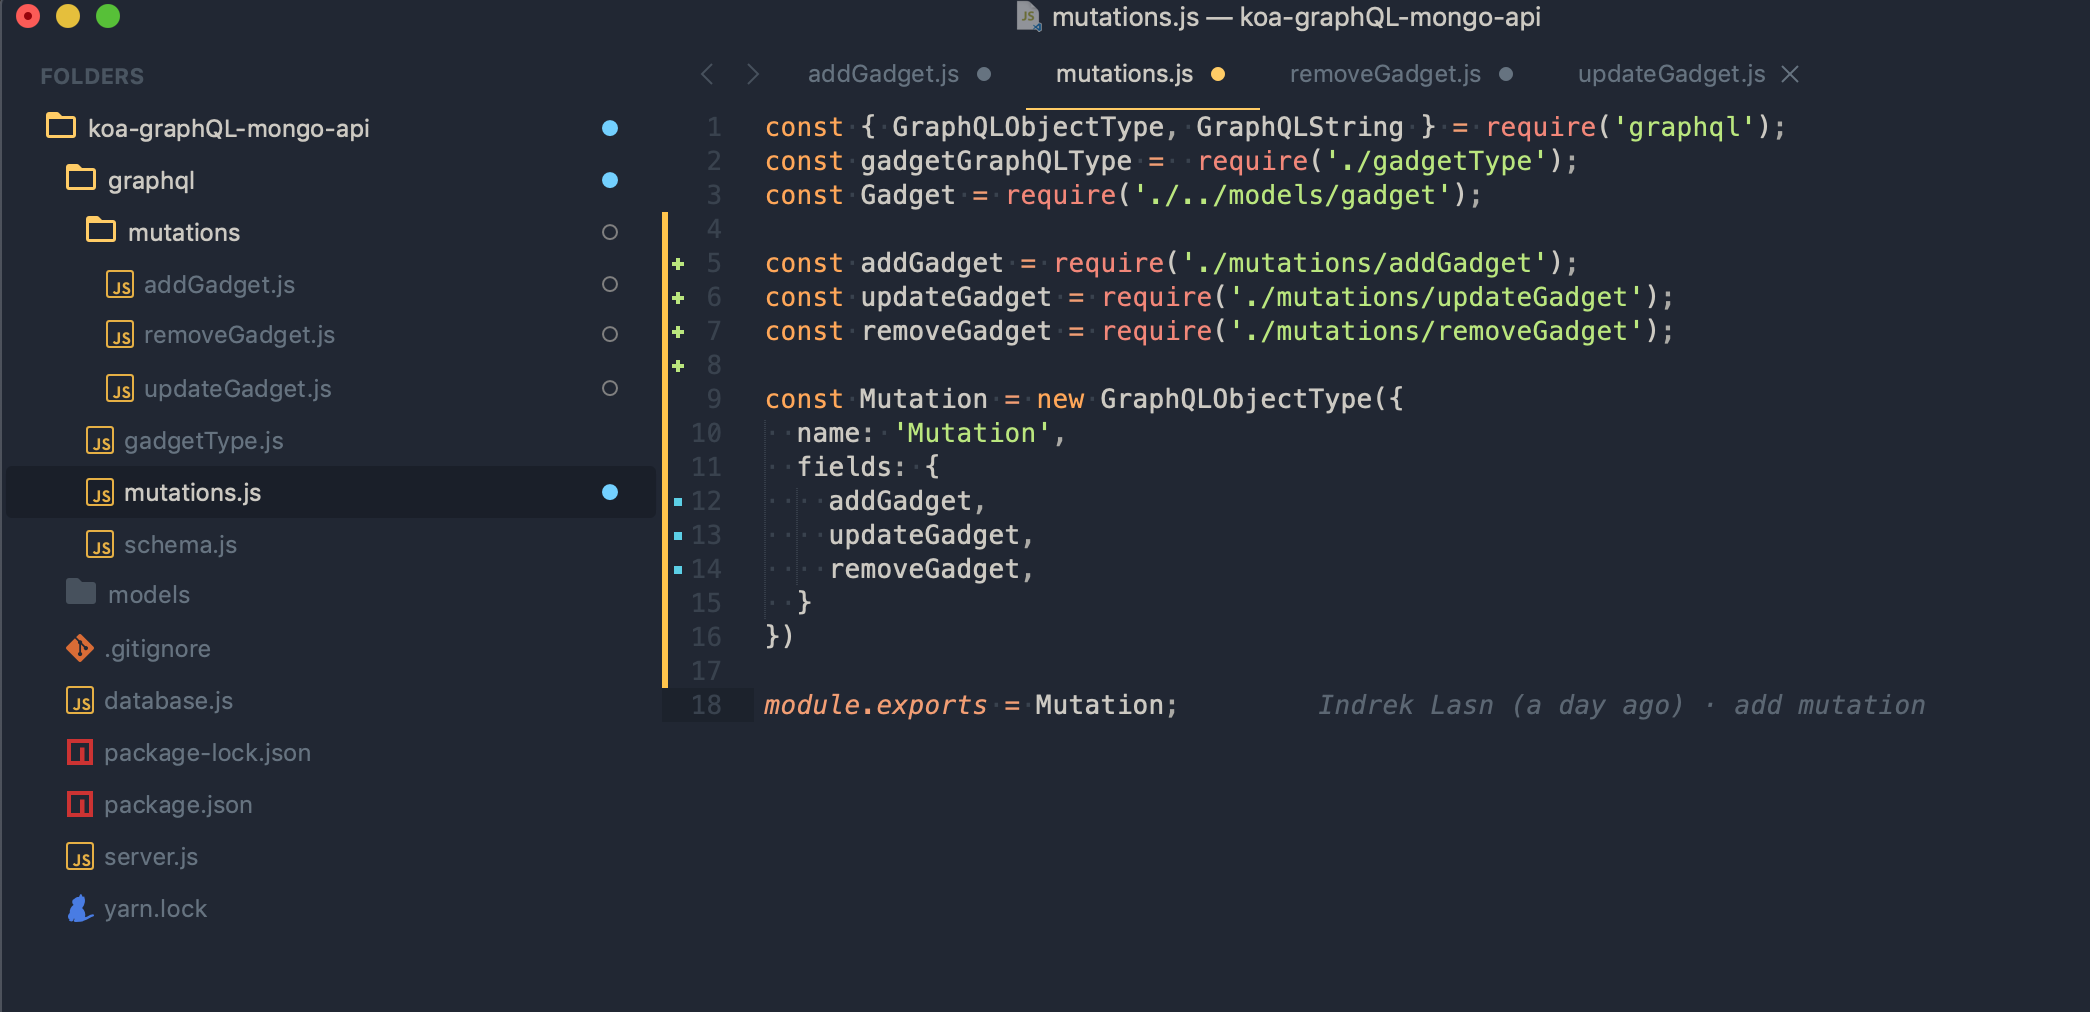
After we have them in separate files, we’re ready to change our graphql/mutations.js file.
const { GraphQLObjectType, GraphQLString } = require('graphql');

const addGadget = require('./mutations/addGadget');
const updateGadget = require('./mutations/updateGadget');
const removeGadget = require('./mutations/removeGadget');

const Mutation = new GraphQLObjectType({
  name: 'Mutation',
  fields: {
    addGadget,
    updateGadget,
    removeGadget,
  }
})

module.exports = Mutation;
Lovely – much cleaner!
Here’s how our projet should look like now;
Our GraphQL API is getting into great shape. So far we have a dedicated folder for mutations. Let’s do the same for queries.
Create a folder for the queries – graphql/queries and place the rootQuery.js file there.
Inside the rootQuery.js file we place all the queries which just fetch data. This way we have separate folders for queries and mutations. The difference between queries and mutations is simple–queries just read data from the database, mutations change the state of our database.
graphql/queries/rootQuery.js
const { GraphQLObjectType, GraphQLString, GraphQLList } =  require('graphql');

const gadgetGraphQLType =  require('./../gadgetType');
const Gadget = require('../../models/gadget');
const queryAllGadgets = require('./queryAllGadgets')

const RootQuery = new GraphQLObjectType({
  name: 'RootQueryType',
  fields: {
    gadget: {
      type: gadgetGraphQLType,
      args: { id: { type: GraphQLString }},
      resolve(parent, args) {
        return Gadget.findById(<a href="http://args.id" class="link link-url" target="_blank" rel="external nofollow noopener noreferrer">args.id</a>)
      }
    },

  }
})

module.exports = RootQuery;
Import the rootQuery to our schema.js
const { GraphQLSchema } = require('graphql');

const RootQuery = require('./queries/rootQuery');
const Mutations = require('./mutations');


module.exports = new GraphQLSchema({
  query: RootQuery,
  mutation: Mutations
});
Now inside the rootQuery we specify all the queries. Create a file for fetching all gadgets and fetching gadgets by id.
graphql/queries/queryAllGadgets.jsgraphql/queries/queryGadgetById.js
Place the following logic inside graphql/queries/queryGadgetById.js
const { GraphQLString } =  require('graphql');
const gadgetGraphQLType = require('./../gadgetType');
const Gadget = require('../../models/gadget');

module.exports = {
  type: gadgetGraphQLType,
  args: { id: { type: GraphQLString }},
  resolve(parent, args) {
    return Gadget.findById(<a href="http://args.id" class="link link-url" target="_blank" rel="external nofollow noopener noreferrer">args.id</a>)
  }
},
And for fetching all gadgets – graphql/queries/queryAllGadgets.js
const { GraphQLList } =  require('graphql');
const gadgetGraphQLType = require('./../gadgetType');
const Gadget = require('../../models/gadget');

module.exports = {
  type: new GraphQLList(gadgetGraphQLType),
  args: {},
  resolve() {
    return Gadget.find({})
  }
}
Notice the new type GraphQLList – this is used if we want to return a list of objects–all gadgets in this case.
Now we have to import the queries to our rootQuery
const { GraphQLObjectType } =  require('graphql');

const Gadget = require('../../models/gadget');
const queryAllGadgets = require('./queryAllGadgets')
const queryGadgetById = require('./queryGadgetById');

const RootQuery = new GraphQLObjectType({
  name: 'RootQueryType',
  fields: {
    queryGadgetById,
    queryAllGadgets,
  }
})

module.exports = RootQuery;
Voila!
Now, Let’s query all the gadgets from our database.
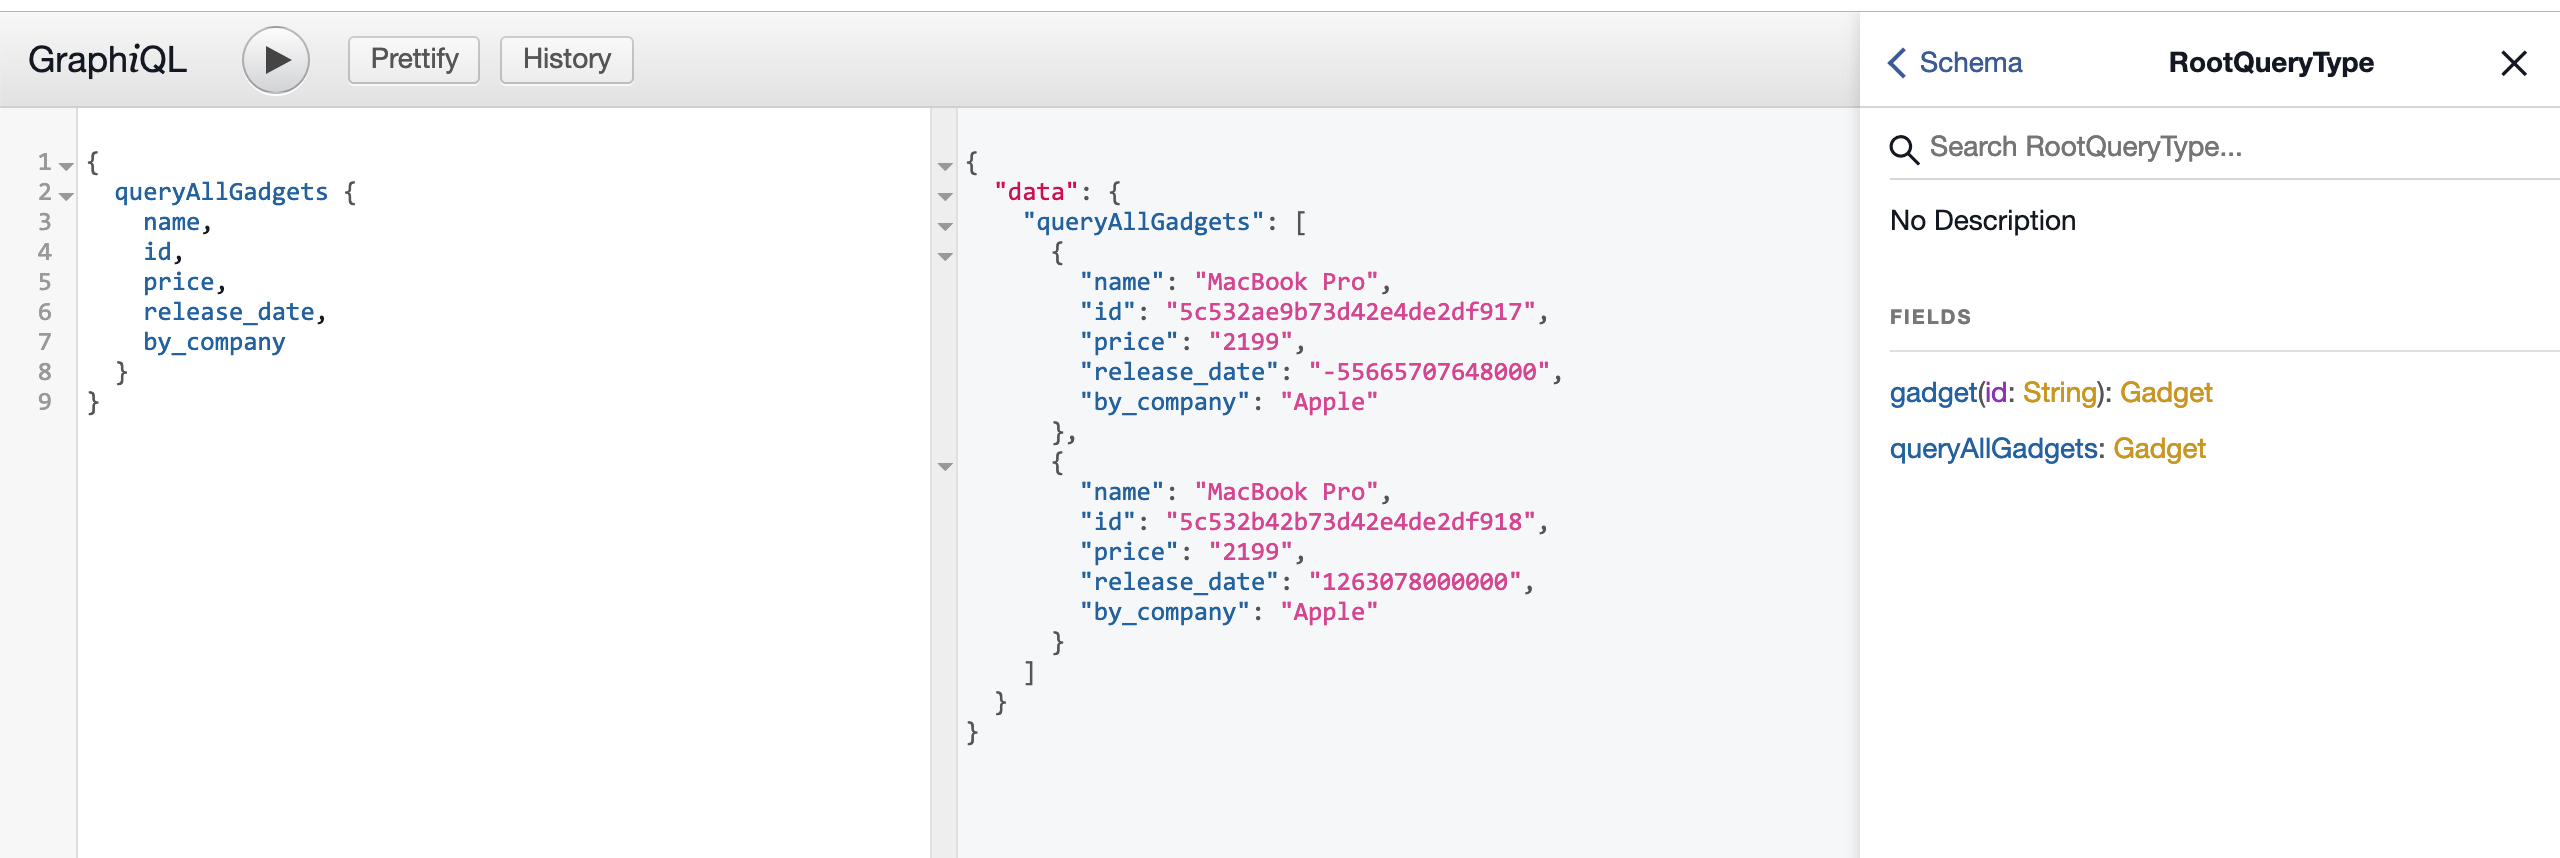
Here’s the GraphQL query;
{
  queryAllGadgets {
    name,
    id,
    price,
    release_date,
    by_company
  }
}
Our project structure should look like the following;

Now we have dedicated folders for querying and mutating.
Types Folder
Ideally, we want to have a folder for GraphQL types as well. So let’s move our gadgetType.js there.
graphql/types/gadgetType.js
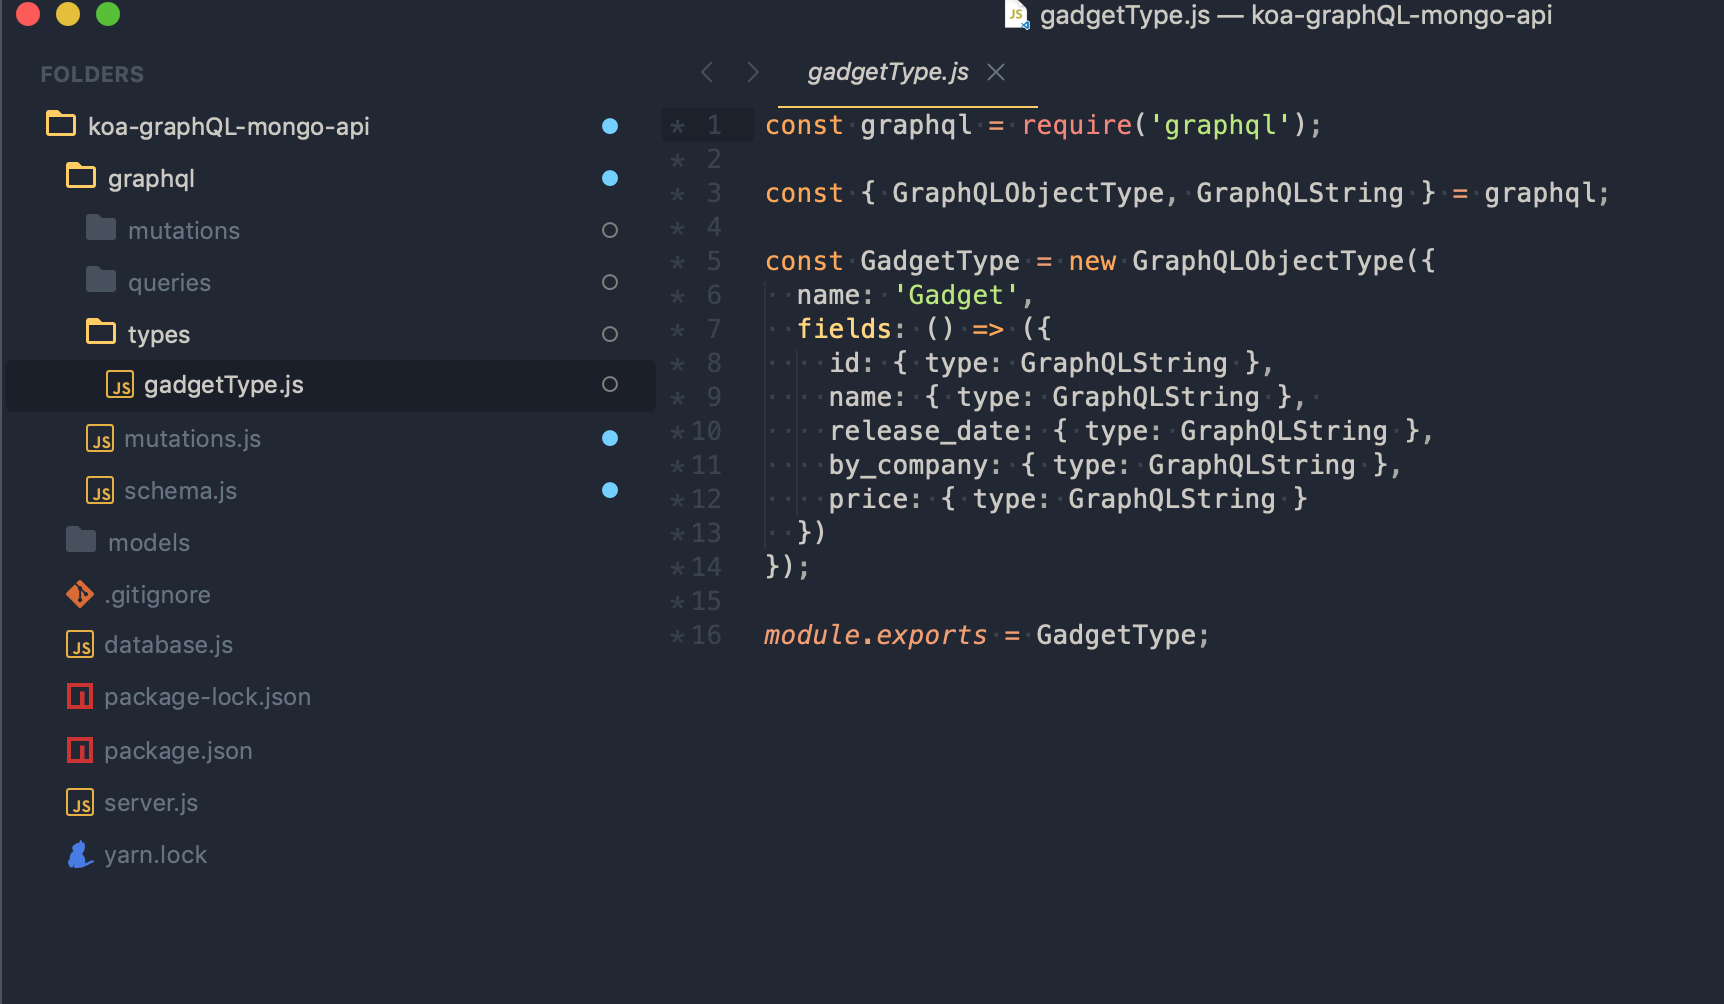
Don’t forget to update the paths where we use the gadgetType (mutations and queries)
const gadgetGraphQLType = require('./../types/gadgetType');
Testing our queries
Before moving to more advanced concepts, I’d like to show you a tool which lets us query graphql queries, if you ever used postman or insomnia you feel at home.
Head over to insomnia.rest and download the client. I use Insomnia since it’s free, has great functionality out of the box, and is open sourced.
Disclaimer: I’m not affiliated with Insomnia– I just like the tool.
Open the tool, create a new request called queryAllGadgets. At the top place our localhost address (http://localhost:9000/graphql) and specify that the body is graphQL.
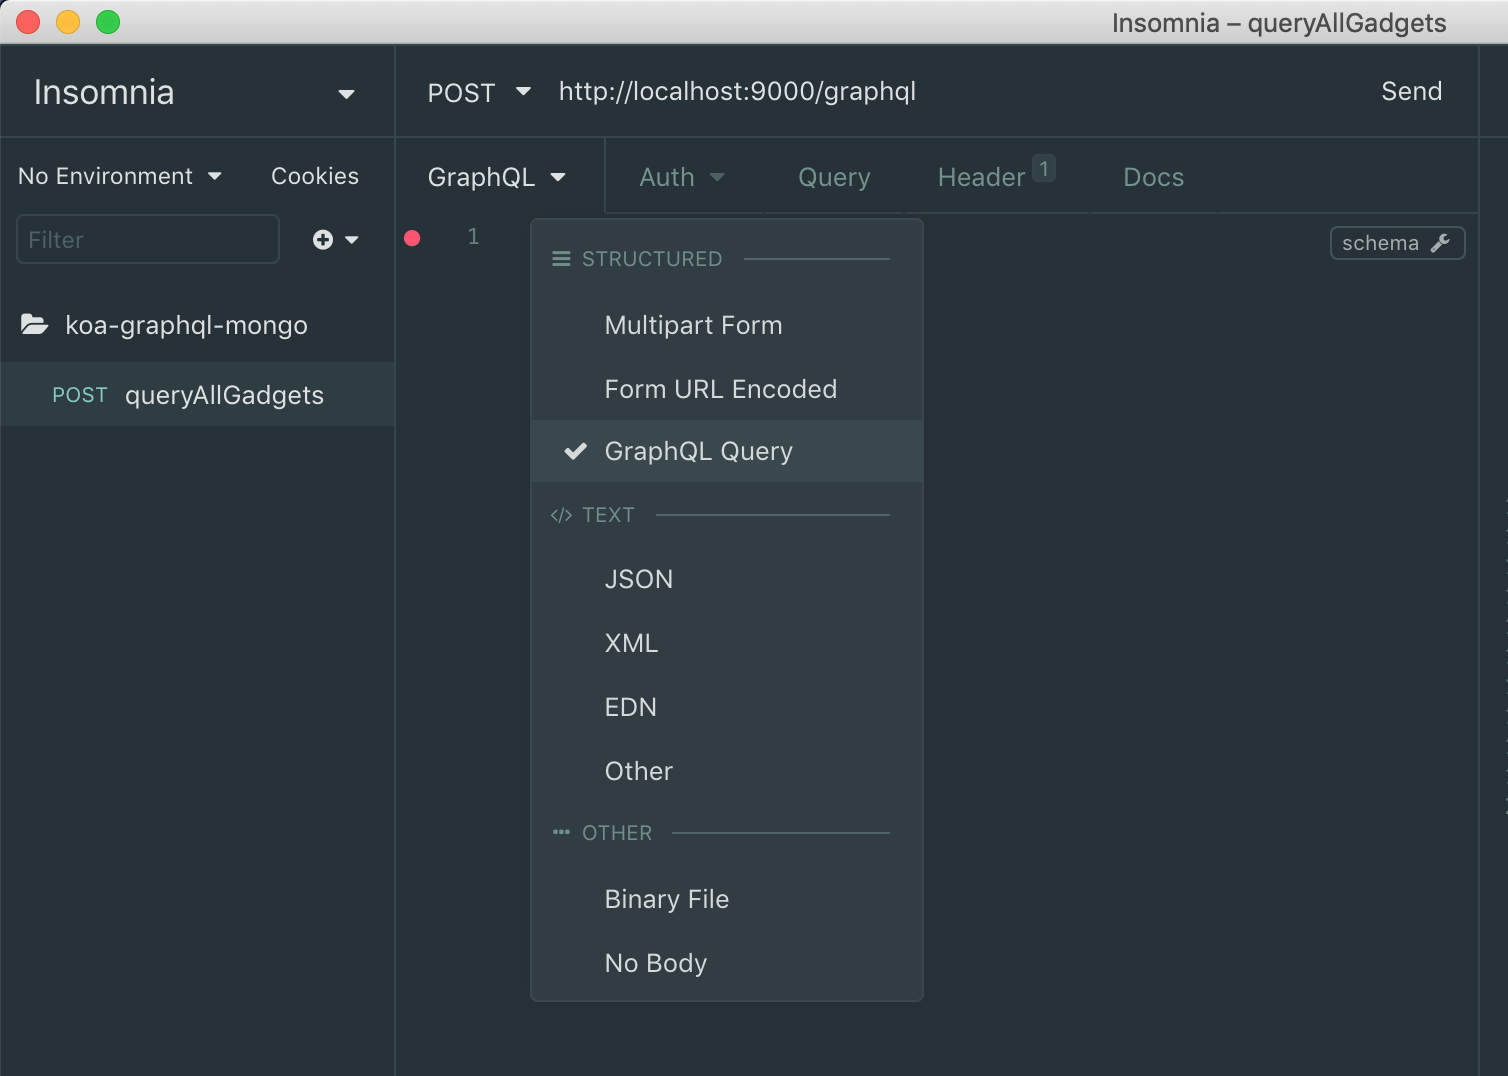
And finally, place the graphQL query inside the body request.
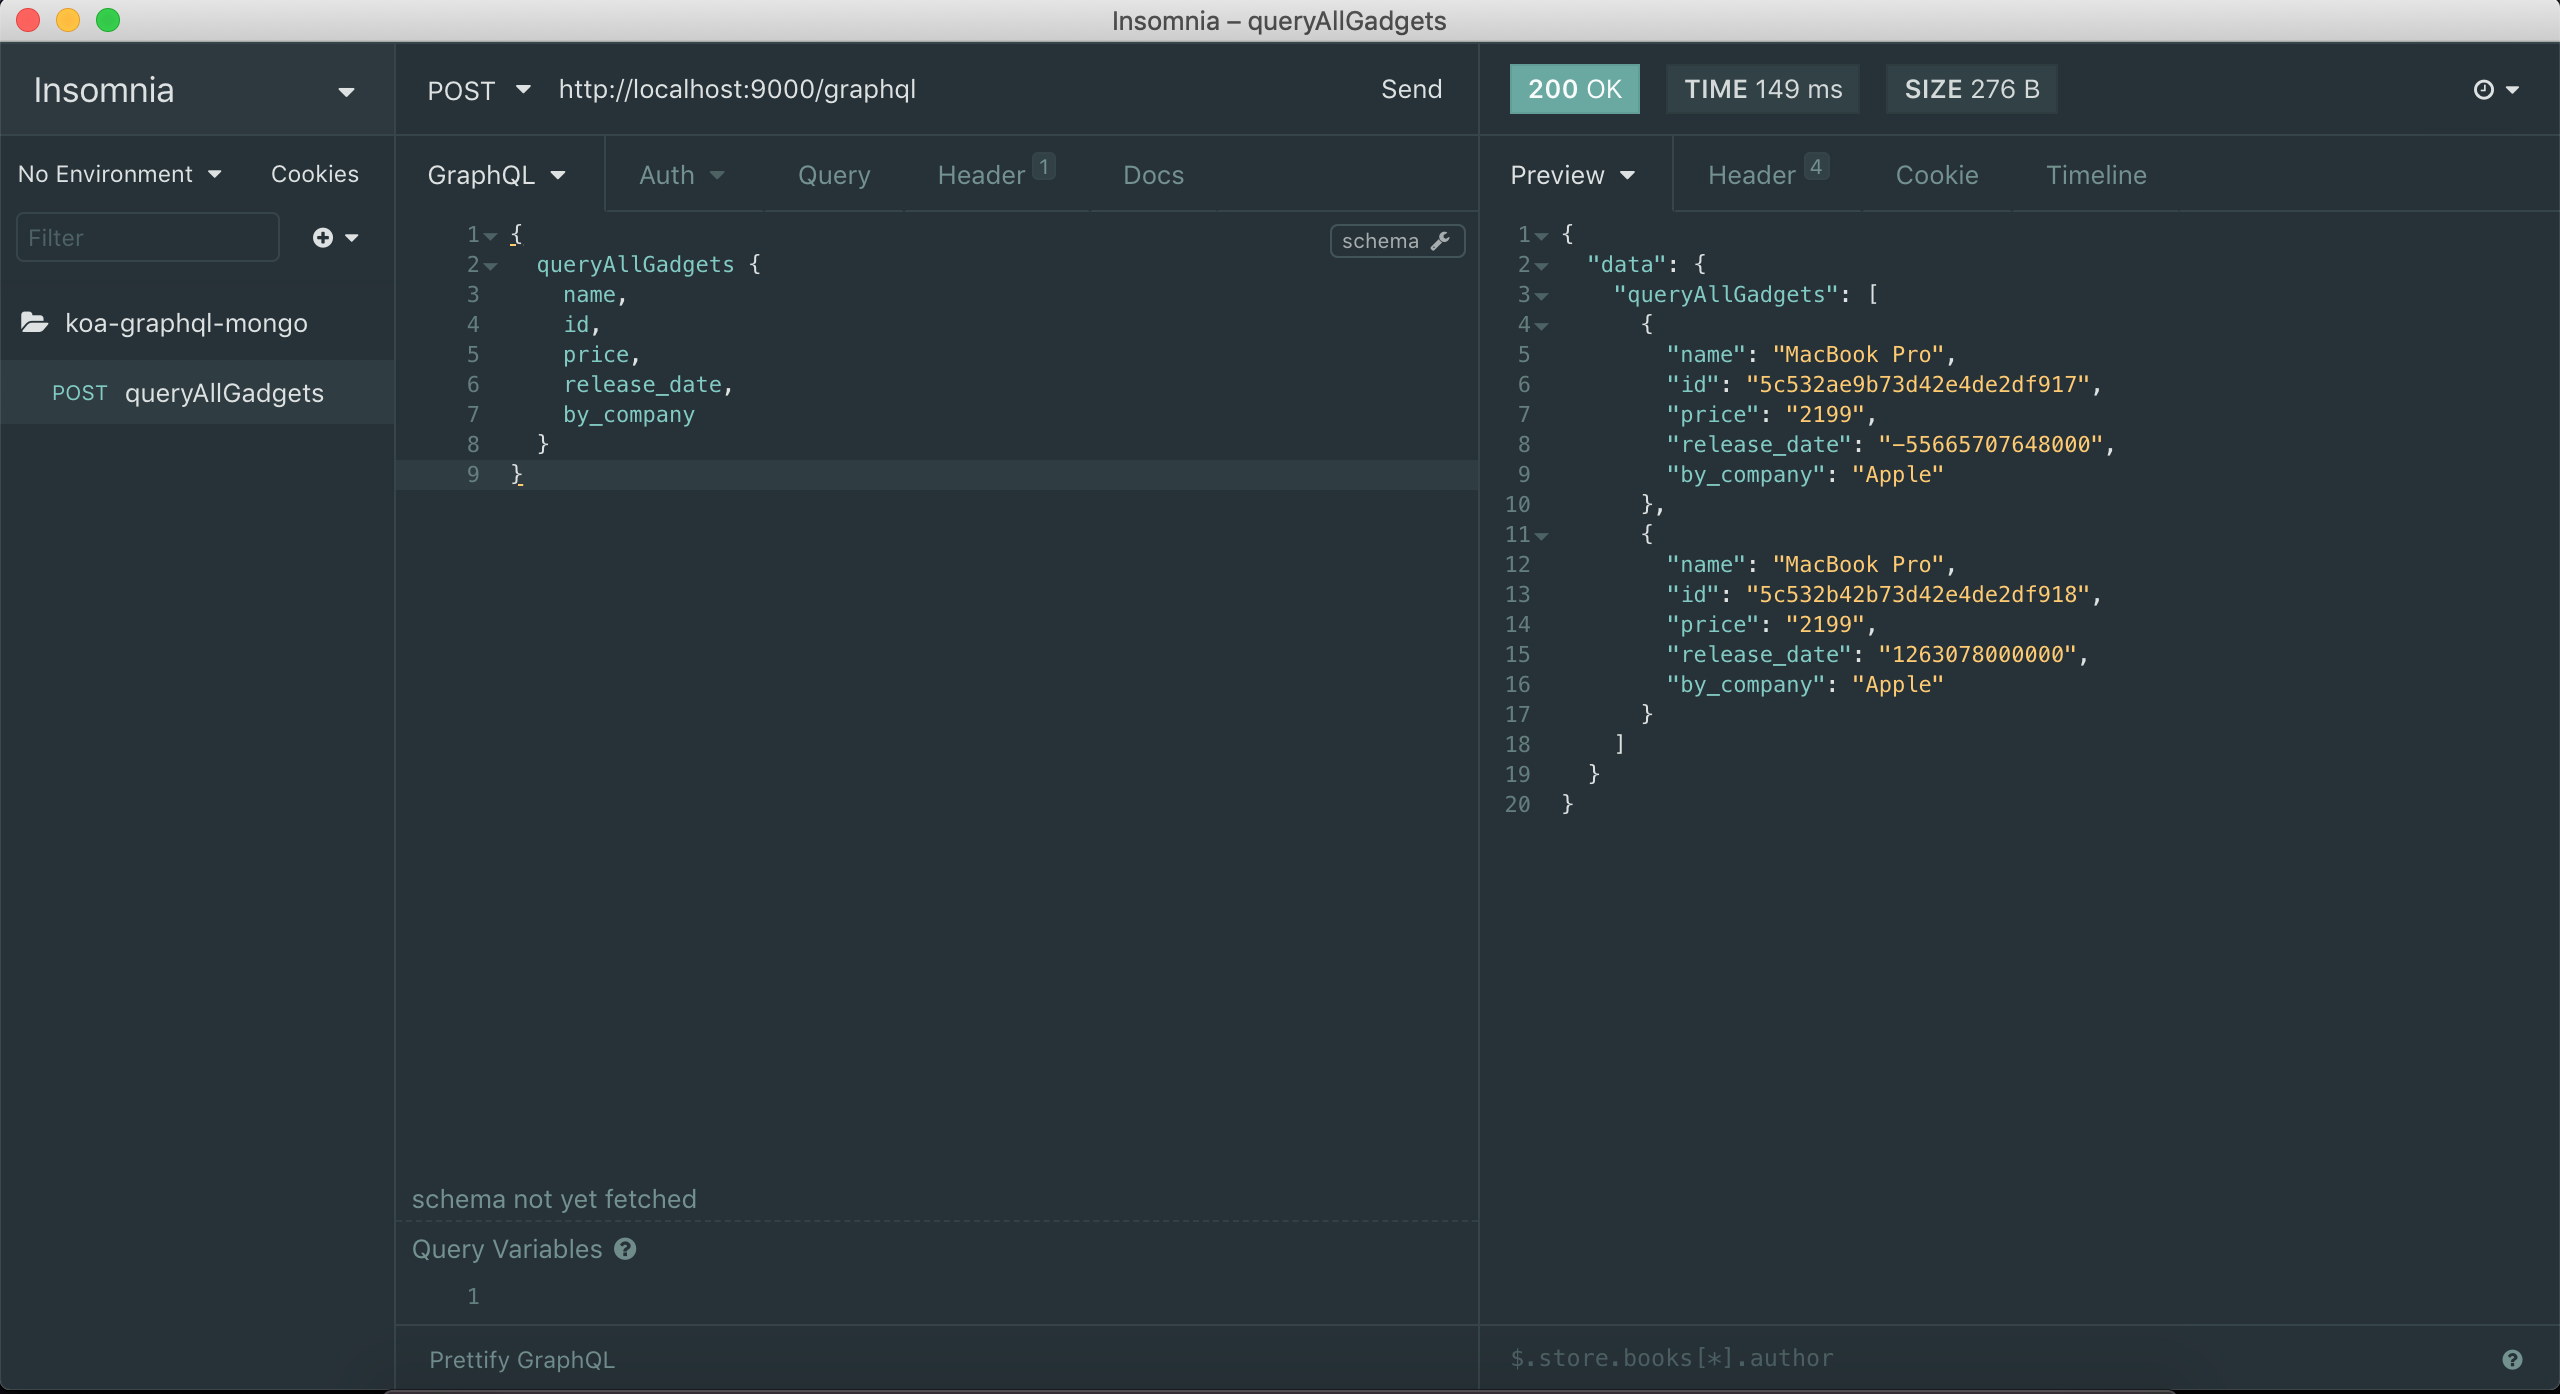
Voila! We can query our graphQL in a headless manner now, just like we do with REST. If REST can do it, so can GraphQL.
Finishing touches
Adding all our queries to insomnia and hitting save. This way we have quick access to our queries.


Save the project. We’ll need it for later
Beautiful! We have successfully refactored our graphQL to a scalable version with headless testing.
Comments
Post a Comment