
How To Resume Partially Transferred Files Over SSH Using Rsync

What is Rsync?

For those wondering, Rsync is a fast, versatile file copying utility that can be used to copy and transfer files or folders to and from remote and local systems. It offers a large number of options that control every aspect of its behavior and permit very flexible specification of the set of files to be copied. It is famous for its delta-transfer algorithm, which reduces the amount of data sent over the network by sending only the differences between the source files and the existing files in the destination. Rsync is widely used for backups and mirroring and as an improved copy command for everyday use.

Just like SCP, rsync will also copy files over SSH. In case you wanted to download or transfer large size files and folders over SSH, I recommend you to use rsync utility as described below.

Resume Partially Transferred Files Using Rsync

Please that the rsync utility should be installed on both sides (i.e. remote and local systems) in order to resume partially transferred files. Rsync is available in the official repositories of most Linux distributions, so you can install it using the distribution’s default package manager.

On Arch Linux and its variants, install Rsync using command:

$ sudo pacman -S rsync

On DebianUbuntuLinux Mint:

$ sudo apt-get install rsync

On Fedora:

$ sudo dnf install rsync

On RHELCentOS:

$ sudo yum install rsync

On SUSE/openSUSE:

$ sudo zypper install rsync

Now let us see an example. I am going to copy Ubuntu 18.04 ISO from my local system to remote system with command:

$ scp ubuntu.iso sk@192.168.225.22:/home/sk/

Here,

  • sk is my remote system’s username
  • 192.168.225.22 is the IP address of the remote machine.
  • /home/sk/ is the remote destination.

Now, I terminated the copy process forcibly by pressing CTRL+C.

Sample output:

sk@192.168.43.2's password: 
ubuntu-16.04-desktop-amd64.iso 26% 372MB 26.2MB/s 00:39 ETA^c

Copy file using scp command on Linux

As you see in the above output, I terminated the copy process when it reached 33%.

If I re-run the above command, it will simply overwrite the existing file. In other words, the copy process will not resume where I left it off.


In order to resume the copy process to copy the partially transferred ISO file, use rsynccommand as shown below.

$ rsync -P -rsh=ssh ubuntu.iso sk@192.168.225.22:/home/sk/

Sample output:

sk@192.168.225.22's password: 
sending incremental file list
ubuntu.iso
834.00M 100% 14.81MB/s 0:00:56 (xfr#1, to-chk=0/1)

Resume Partially Transferred Files Using Rsync Over SSH On Linux

See? Now, the copying process is resumed where we left it off earlier.

You can also use “–partial” instead of parameter “-P” like below.


$ rsync --partial -rsh=ssh ubuntu.iso sk@192.168.225.22:/home/sk/

Here, the parameter “–partial” or “-P” tells the rsync command to keep the partial downloaded file and resume the process.

Check if the file is really copied or not to the remote system using command:

$ ssh sk@192.168.225.22 ls -lh
sk@192.168.225.22's password: 
total 835M
-rw-rw-r-- 1 sk sk 834M Jul 26 2019 ubuntu.iso

Run commands remote systems over SSH

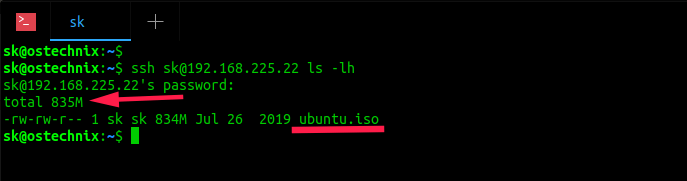
As you see in the above output, the file Ubuntu.iso is copied to the remote system and its size is 835MB.

Comments

Popular posts from this blog

Understand Angular’s forRoot and forChild

  forRoot   /   forChild   is a pattern for singleton services that most of us know from routing. Routing is actually the main use case for it and as it is not commonly used outside of it, I wouldn’t be surprised if most Angular developers haven’t given it a second thought. However, as the official Angular documentation puts it: “Understanding how  forRoot()  works to make sure a service is a singleton will inform your development at a deeper level.” So let’s go. Providers & Injectors Angular comes with a dependency injection (DI) mechanism. When a component depends on a service, you don’t manually create an instance of the service. You  inject  the service and the dependency injection system takes care of providing an instance. import { Component, OnInit } from '@angular/core'; import { TestService } from 'src/app/services/test.service'; @Component({ selector: 'app-test', templateUrl: './test.component.html', styleUrls: ['./test.compon...

How to use Ngx-Charts in Angular ?

Charts helps us to visualize large amount of data in an easy to understand and interactive way. This helps businesses to grow more by taking important decisions from the data. For example, e-commerce can have charts or reports for product sales, with various categories like product type, year, etc. In angular, we have various charting libraries to create charts.  Ngx-charts  is one of them. Check out the list of  best angular chart libraries .  In this article, we will see data visualization with ngx-charts and how to use ngx-charts in angular application ? We will see, How to install ngx-charts in angular ? Create a vertical bar chart Create a pie chart, advanced pie chart and pie chart grid Introduction ngx-charts  is an open-source and declarative charting framework for angular2+. It is maintained by  Swimlane . It is using Angular to render and animate the SVG elements with all of its binding and speed goodness and uses d3 for the excellent math functio...

How to solve Puppeteer TimeoutError: Navigation timeout of 30000 ms exceeded

During the automation of multiple tasks on my job and personal projects, i decided to move on  Puppeteer  instead of the old school PhantomJS. One of the most usual problems with pages that contain a lot of content, because of the ads, images etc. is the load time, an exception is thrown (specifically the TimeoutError) after a page takes more than 30000ms (30 seconds) to load totally. To solve this problem, you will have 2 options, either to increase this timeout in the configuration or remove it at all. Personally, i prefer to remove the limit as i know that the pages that i work with will end up loading someday. In this article, i'll explain you briefly 2 ways to bypass this limitation. A. Globally on the tab The option that i prefer, as i browse multiple pages in the same tab, is to remove the timeout limit on the tab that i use to browse. For example, to remove the limit you should add: await page . setDefaultNavigationTimeout ( 0 ) ;  COPY SNIPPET The setDefaultNav...