
JavaScript is a really versatile and platform-agnostic language — and that includes the Node.js runtime. You can build anything you want with it. Admittedly, some things are easier than others, but I enjoy finding some nonstandard projects I can dive into just for the fun of it.
A little while ago, I often listened to a couple online radio stations that I followed. Sometimes I wondered how difficult it would be to implement my own radio server. Well, maybe you’ve already guessed, but I stopped wondering and decided to take some action. I will share with you my adventure.
What are we building today?
The goal is to implement a Node.js HTTP server that will have an endpoint intended for streaming songs, i.e., audio data. A client could then start consuming the data by making a request to that endpoint.
We also need to implement some kind of a control panel so we can manage what song will be streamed next. On top of that, we will implement a simple webpage with a play button, similar to how most the online radios look.
We will put all of this into a single application, which would not be so smart for a real-world solution, but hey, we are just having fun. The entire code from this article can be found on my GitHub repo here.
Let’s begin!
Control panel
Since I love meddling with the terminal, and Node.js has a built in CLI, we will implement the control panel in the form of a terminal GUI. After a little bit of research, I discovered that neo-blessed is a library made for this task.
neo-blessed has a concept of boxes. Those are basically windows that you can create, stylize, and position in the terminal, like components in a browser using HTML and CSS.
Let’s first define the main screen that will wrap everything else. We will put it inside the View class:
class View {
    constructor() {
        const screen = NeoBlessed.screen({ smartSCR: true });
        screen.title = 'Node Radio Mini';
        screen.key(['escape', 'C-c'], () => process.exit(0));
        this._screen = screen;
    }
    appendBoxes(boxes) {
        for (const box of boxes) {
            this._screen.append(box);
        }
    }
    render() {
        this._screen.render();
    }
}
Here we create a main screen of the view layer, with a rendermethod that we will use periodically to render the entire view. We attach some keys (Ctrl+C, Esc), which we could press to terminate the app if we wanted.
Next, we need to implement the different sections of the view. Each section will be a neo-blessed box, like mentioned earlier. We will implement a basic class for this, which will be extended by other classes later:
class TerminalBox {
    constructor(config) {
        this.box = NeoBlessed.box(config);
    }
}
Four main sections (I will call them boxes) are necessary for a simple but convenient control panel. Those are:
Playlist– list of all available songsQueue– list of queued-up and ready-to-be-played songsNowPlaying– name of the song that is streaming at the momentControls– keyboard keybindings instructions
Let’s go with the simpler ones first. The Controls box will contain a hardcoded list of keyboard keybindings. Here’s the code:
class Controls extends AbstractClasses.TerminalBox {
    constructor(config) {
        super(config);
        this.setPlaylistTips();
    }
    setPlaylistTips() {
        this.box.content =
            `${keys.FOCUS_QUEUE} - focus queue | ${keys.SCROLL_UP} - go up\n` +
            `${keys.QUEUE_ADD} - enqueue song | ${keys.SCROLL_DOWN} - go down\n`;
    }
    setQueueTips() {
        this.box.content =
            `${keys.MOVE_UP} - move song up | ${keys.SCROLL_UP}-go up\n` +
            `${keys.MOVE_DOWN} - move song down | ${keys.SCROLL_DOWN}-go down\n` +
            `${keys.FOCUS_PLAYLIST} - focus playlist | ${keys.QUEUE_REMOVE} - dequeue son`;
    }
}
As I said, these boxes can be stylized according to our needs, and this is done on the instantiation of this class by passing configoptions (line 3). Here are the configuration options for the Controls box:
{
    config: {
        label: 'Controls',
        border: { type: 'line' },
        top: '85%',
        left: '50%',
        width: '50%',
        height: 5,
        style: {
            fg: 'grey',
            bg: 'black',
            border: {
                fg: '#000000'
            }
        }
    }
}
All the other boxes have similar configuration options, so I will not show them all. With the passed configuration options, the box will look like this:

The other three boxes will contain one or more child items. For that, we need to make another extendable class similar to the first one (i.e., like the TerminalBox):
class _FocusIndexer {
    constructor({ getIndexLimit }) {
        this._index = 1;
        this._getIndexLimit = getIndexLimit;
    }
    get() {
        return this._index;
    }
    incr() {
        if (this._index < this._getIndexLimit()) {
            this._index++;
        }
    }
    decr() {
        if (this._index > 1) {
            this._index--;
        }
    }
}

class TerminalItemBox extends TerminalBox {
    constructor({ config, childConfig, bgBlur, bgFocus }) {
        super(config);
        this._childConfig = childConfig;
        this._bgBlur = bgBlur;
        this._bgFocus = bgFocus;
        this._focusIndexer = new _FocusIndexer({
            getIndexLimit: this._getNavigationLimit.bind(this)
        });
    }
    _getHeight() {
        // neo-blessed box has two invisible items prepended, so we need '-2'
        return this.box.height - 2;
    }
    _getNavigationLimit() {
        return Math.min(this.box.children.length - 1, this._getHeight());
    }
    _setActiveChildColor(color) {
        const activeChild = this.box.children[this._focusIndexer.get()];
        if (activeChild) {
            activeChild.style.bg = color;
        }
    }
    focus() {
        this._setActiveChildColor(this._bgFocus);
        this.box.focus();
    }
    blur() {
        this._setActiveChildColor(this._bgBlur);
    }
    scroll(scrollKey) {

        if (this.box.children.length === 1) {
            return;
        }
        const unfocusedIndex = this._focusIndexer.get();
        const unfocusedChild = this.box.children[unfocusedIndex];
        unfocusedChild.style.bg = this._bgBlur;
        if (scrollKey === keys.SCROLL_UP) {
            this._focusIndexer.decr();
        }
        else if (scrollKey === keys.SCROLL_DOWN) {
            this._focusIndexer.incr();
        }
        const focusedIndex = this._focusIndexer.get();
        const focusedChild = this.box.children[focusedIndex];
        focusedChild.style.bg = this._bgFocus;
    }
    _createBoxChild() {
        throw new Error('_createBoxChild() method not implemented');
    }
    createBoxChildAndAppend(content) {
        const boxChild = this._createBoxChild(content);
        this.box.append(boxChild);
    }
}
The most important thing to note here is that this class contains child items, which are also neo-blessed boxes. That’s why there are both config and childConfig props passed in the constructor.
Also, the class has a scroll method with which you can navigate the items with the help of and illusion made by different coloring of blurred and focused items. To help keep track of the index of the focused child item, we are using a helper class called FocusIndexer (defined on line 1 and instantiated on line 27).
Lastly, there is a createBoxChildAndAppend method for adding new children. This is not, all but in the interest of time, I will stop here.
The NowPlaying box will have only one item: a song that is currently played. This is how we will implement it:
class NowPlaying extends AbstractClasses.TerminalItemBox {
    _createBoxChild(content) {
        return NeoBlessed.box({
            ...this._childConfig,
            top: 0,
            content: `>>> ${content}`
        });
    }
}
When an instance is created and inserted into the main view, it will look like this:

The Playlist box will be used for storing the list of all the songs from the directory where the app has been run. Almost all of the important features for this are already implemented in the TerminalItemBox class, so we will extend it:
class Playlist extends AbstractClasses.TerminalItemBox {
    /*
    .....
    .....
    */
    _circleChildrenUp() {
        const temp = this.box.children[this.box.children.length - 1].content;
        this.box.children.reduceRight((lowerChild, upperChild) => {
            lowerChild.content = upperChild.content;
            return upperChild;
        });
        this.box.children[1].content = temp;
    }
    _circleChildrenDown() {
        const temp = this.box.children[1].content;
        this.box.children.reduce((upperChild, lowerChild, index) => {
            if (index > 1) {
                upperChild.content = lowerChild.content;
            }
            return lowerChild;
        });
        this.box.children[this.box.children.length - 1].content = temp;
    }
    _circleList(key) {
        if (this._focusIndexer.get() === 1 && key === keys.SCROLL_UP) {
            this._circleChildrenUp();
        }
        else if (
          this._focusIndexer.get() === this._getHeight()
          && key === keys.SCROLL_DOWN
        ) {
            this._circleChildrenDown();
        }
    }
    /*
    .....
    .....
    */
}
The one important thing worth mentioning here is that this class implements the _circleList method, which is used to enable navigating the child items even if they overflow the terminal viewport.
This is how the playlist will look:

Queue is the last box we need to implement. Similar to the Playlist, it will extend the TerminalItemBox class. But this is where the similarities end.
This class will not only be in charge of the view layer, which visually represents all the songs queued up for streaming, but it will also contain all the functionalities for streaming and piping data to all the consumers (i.e., clients). We will cover that in detail in the next section.
For now, here is the implementation, at least the part for the view layer:
class Queue extends AbstractClasses.TerminalItemBox {
    /*
    .....
    .....
    */
    _changeOrderInBoxChildren(key) {
        const index1 = this._focusIndexer.get();
        const child1 = this.box.children[index1];
        child1.style.bg = this._bgBlur;

        if (key === keys.MOVE_UP) {
            this._focusIndexer.decr();
        }
        else if (key === keys.MOVE_DOWN) {
            this._focusIndexer.incr();
        }

        const index2 = this._focusIndexer.get();
        const child2 = this.box.children[index2];
        child2.style.bg = this._bgFocus;

        [
            child1.content,
            child2.content
        ] = [
            `${getFirstWord(child1.content)} ${discardFirstWord(child2.content)}`,
            `${getFirstWord(child2.content)} ${discardFirstWord(child1.content)}`,
        ];

        return { index1, index2 };
    }
}
The only thing worth noting here is the Queue box’s _changeOrderInBoxChildren method. This method allows the user to move the songs up or down in the queue.
Finally, we have the whole view layer ready. Here is the result:
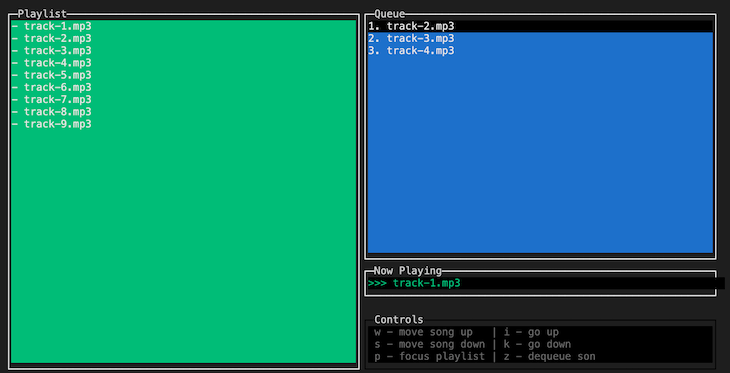
After we instantiate instances of the four classes — i.e., our boxes, which are playlist, queue, nowPlaying, and controls, plus the main view component that was mentioned at the beginning — we need to attach listeners for the keyboard keypress events, so we can enable a user to make actions on the control panel. Here is a part of that code:
const _addPlaylistAndQueueListeners = () => {

    const playlistOnScroll = (scrollKey) => {
        playlist.scroll(scrollKey);
        view.render();
    };
    playlist.box.key(keys.SCROLL_UP, playlistOnScroll);
    playlist.box.key(keys.SCROLL_DOWN, playlistOnScroll);

    playlist.box.key(keys.QUEUE_ADD, () => {
        const focusedSong = playlist.getFocusedSong();
        const formattedSong = Utils.discardFirstWord(focusedSong);
        queue.createAndAppendToQueue(formattedSong);
        view.render();
    });
    playlist.box.key(keys.FOCUS_QUEUE, () => {
        playlist.blur();
        queue.focus();
        controls.setQueueTips();
        view.render();
    });
    /*
    ......
    ......
    */
};playlist.box.key(key, handler) is a method provided by neo-blessed that lets you set key listeners, which is nice and handy.
We have finished making the control panel. We can now, using the defined keyboard shortcuts, browse the songs in the playlist and send the songs we like to the queue.
Stream magic
The songs from the queue should be sent to every consumer that is listening at the moment. This is the next thing we need to implement. As I already mentioned, the Queue class will be in charge of showing the queued up songs in the GUI. On top of that, this class will contain the logic for emitting the songs to the clients.
Since we want to gradually broadcast audio data to the clients, it is somewhat obvious that this will need to be implemented via streams or, in our case, the Node.js Stream API.
Now the first thing to note here is that the Stream API is primarily invented for a one-to-one (unicast) transfer of chunked data in a pull-based manner, meaning the consumer determines the speed of the transfer based on the speed at which it can process the data.

Here, we need to do quite the opposite. We need to have a one-to-many (broadcast) transfer of data, and we need the producer to be in charge of the speed of the transfer in a push-based manner. The reason for this is quite obvious: we want all of the consumers to receive approximately the same part of a song at a single point in time.
Just to mention here: in Node’s Stream API terminology, producer is a readable stream (stream.Readable class) and a consumer is a writable one (stream.Writable class). Of course, one entity can be both a readable and a writable at the same time (stream.Transform class).
The most popular way of consuming a readable stream, among many, is to use the .pipe() method:
  /*
  producer.pipe(consumer);
  */
  readable.pipe(writable);
Having said all of the above, this method is not going to serve our needs since it is meant for a one-to-one transfer, and the speed of the streaming is determined by the writable. So we can’t just have one readable stream and pipe it multiple times, like this:
  // won't work
  readable.pipe(writable1);
  readable.pipe(writable2);
  readable.pipe(writable3);
It won’t work because the readable stream can be consumed only once, and with the .pipe() method, the first attached writable will be in charge of the consuming.
Now in this example, the other writables would receive some or even all of the streaming chunks, but it isn’t guaranteed by this API. Another con is that you cannot stream at all unless you have a writable (i.e., a consumer) present since you have to pipe the readable somewhere.
But no problem, there is a different strategy we can use here. Another way to consume a readable stream is by listening the data event. In the handler for that event, we can manually write the streamed chunk to all the writables, which would look like this:
  const writables = [writable1, writable2, writable3];

  readable.on('data', (chunk) => {
    for (const writable of writables) {
      writable.write(chunk);
    }
  );
This is much better. As soon as a handler is attached to the dataevent, the readable will go to the flowing mode and start streaming the data. We now have an elegant way to achieve one-to-many transfer, i.e., to send the same chunk of data to every registered writable. On top of that, if no writable is present, the readable will continue to stream the data, which is what we need since songs on pretty much every radio must continue playing, even if no one is listening. 
We still haven’t solved all the problems, though. If we only attach the handler, like in the last code snippet, the readable (i.e., the song) would be consumed pretty much in a couple of seconds. We don’t want that; we want to stream the data slowly.
This can be done by using some kind of a throttling mechanism to slow down the streaming of the chunks. In Node.js land, we can implement that with a transform stream (which is both a readable and a writable, as we mentioned already) and a timer function. The goal of this transform stream is to receive chunks from a readable and output the chunks to a writable at a determined rate, which will be handled by a timer function inside the transform stream itself.
Since there are several published packages that already solve this problem, we’re going to use one called [throttle](https://www.npmjs.com/package/throttle) from npm. It is a class you can use to instantiate a new transform stream by passing one argument: a number, representing bytes per second. This transform stream would then limit the streaming of the chunks to be no faster than the bytes per second you provided:
  const Fs = require('fs');
  const Throttle = require('throttle');

  const readable = fs.createReadStream('/location/of/a/song.mp3');
  const throttle = new Throttle(128000 / 8);
  const writables = [writable1, writable2, writable3];

  readable.pipe(throttle).on('data', (chunk) => {
    for (const writable of writables) {
      writable.write(chunk);
    }
  );
With this, the readable would not get consumed in mere seconds. The speed of the streaming would now be closer to how a song would be played in real time. But how to determine what is close to real time? And what is the number passed while creating a new instance of the Throttle class (on line 5)?
Herein lies our last problem. Every audio file has a bitrate property, expressed in bits per second (bps). We need that number to determine at what speed to do the streaming.
In the last code snippet, I defaulted to 128,000bps (128Kbps) since plenty of songs have that bitrate (in the snippet, it is divided by 8 since the Throttle **class received bytes per second instead of bits). But we don’t want to default to a certain value and hope for the best; we must determine the bitrate for every song that we stream.
Luckily, there’s a way we can do that. We will use @dropb/ffprobe**package from npm (this package requires the ffmpeg binary installed on the operating system). With the help of this package, we can determine the bitrate like this:
  const Fs = require('fs');
  const Throttle = require('throttle');
  const { ffprobeSync } = require('@dropb/ffprobe');

  const bitRate = ffprobeSync('/location/of/a/song.mp3').format.bit_rate;
  const readable = fs.createReadStream('/location/of/a/song.mp3');
  const throttle = new Throttle(bitRate / 8);
  const writables = [writable1, writable2, writable3];

  readable.pipe(throttle).on('data', (chunk) => {
    for (const writable of writables) {
      writable.write(chunk);
    }
  );
Finally! A solution that works properly!
If we implement the streaming logic like this, songs will be streamed at a speed that closely matches their playing speed. Of course, whatever we do, we cannot match the precision of pro radio servers like Shoutcast and Icecast. But it is good enough for me.
Let’s just put this stream logic inside our Queue class, like mentioned at the beginning of this section:
class Queue extends AbstractClasses.TerminalItemBox {
    constructor(params) {
        super(params);
        this._sinks = []; // list of active sinks/writables
        this._songs = []; // list of queued up songs
        this._currentSong = null;
        this.stream = new EventEmitter();
    }
    /*
    ......
    ......
    */
    makeResponseSink() {
        const responseSink = PassThrough();
        this._sinks.push(responseSink);
        return responseSink;
    }
    _broadcastToEverySink(chunk) {
        for (const sink of this._sinks) {
            sink.write(chunk);
        }
    }
    _getBitRate(song) {
        const bitRate = ffprobeSync(`${process.cwd()}/${song}`)).format.bit_rate;
        return parseInt(bitRate);
    }
    _playLoop() {
        this._currentSong = this._songs.length
            ? this.removeFromQueue({ fromTop: true })
            : this._currentSong;
        const bitRate = this._getBitRate(this._currentSong);

        const songReadable = Fs.createReadStream(this._currentSong);
        const throttleTransformable = new Throttle(bitRate / 8);
        throttleTransformable
          .on('data', (chunk) => this._broadcastToEverySink(chunk))
          .on('end', () => this._playLoop());

        songReadable.pipe(throttleTransformable);
    }
    startStreaming() {
        this._playLoop();
    }
    // .....
}
We are storing queued up songs in the this._songs array. The songs can be added by navigating the playlist in the terminal GUI and using the keyboard shortcuts we defined in the first section of the article.
Consumers (i.e. writables), to which we must stream the data, will be stored in the this._sinks array, with the help of the this.makeResponseSink() method. I will cover more on how the consumers will be added in the next section.
Queued up songs will be streamed one by one, as we can see in the ‘this._playLoop()‘, and if all of the songs are finished, we will repeat the last one. This way we make sure that the server will never stop streaming.
Server
Now, since we implemented the view layer and the streaming logic, the only thing we need to do is create an HTTP server. We will use Hapi.js, although any server would do just fine.
We will implement an HTTP endpoint that will do two things when a request comes:
- Register the client as a consumer and add it to our queue’s
this._sinksmap (line 6) - Start streaming the data back to the client
In Hapi.js, the route will look something like this:
      server.route({
          method: 'GET',
          path: '/stream',
          handler: (request, h) => {

              const responseSink = queue.makeResponseSink();
              return h.response(responseSink).type('audio/mpeg');
          }
      });
The server also needs to be able to serve static files, so we can provide a handy webpage with some radio controls. Implementing that in Hapi.js is trivial, and I will not show that here. But this is the simple page that will be served:
<!DOCTYPE html>
<html>
<head>
    <title>Node.js Radio</title>
    <link rel="stylesheet" type="text/css" media="screen" href="/index.css" />
    <script src="/index.js"></script>
</head>
<body>
    <div id='main'>
        <h1 id="title">Very Cool Radio</h1>
        <img id="logo" src="/nodejs-logo.png">
        <div id='radio'>
            <audio id="audio" src="/stream" preload="none" controls autoplay></audio>
        </div>
    </div>
</body>
</html>
The audio element (line 13) will make a request to src="/stream" (which is the endpoint to which the browser will automatically make a request) when the page loads.
And here is our simple but nice webpage:

Comments
Post a Comment