here are the following steps to integrate map in angular(V7+) project:
Step 1. Generate Google API key
generate google map API key HERE
Step 2. Install Google Maps
install google map in your angular project by running this code
npm install — save @types/googlemapsStep 3. Add Google API script
in index.html file add the following script into the head tag :
<script src=”https://maps.googleapis.com/maps/api/js?key=YOUR-API-KEY" type=”text/javascript”></script>add your API Key inside of the script tag
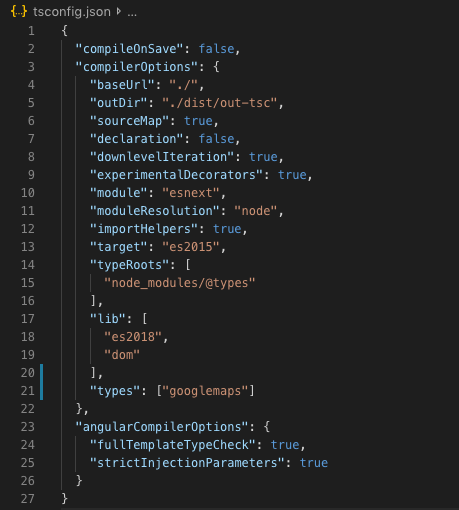
Step 4. Add googlemaps to the types array
in tsconfig.app.json add googlemaps to the types array inside of the compilerOptions object.
“types”: [“googlemaps”]after adding googlemaps, your code may look like this

Step 5. Add HTML element
Inside of your app.component.html add the following code:
<div #gmapContainer id=”map”></div>Step 6. Add CSS
add some CSS to your map. In app.component.css file add the following:
#map { height: 550px; width: 100%; }Step 7. Add typescript code
- In your app.component.ts file your import line at the top of your file should look like this:
import { Component, AfterViewInit, ViewChild, ElementRef } from ‘@angular/core’;- Inside of the same file, import googlemaps and we give the app access to the DOM element we have created with ViewChild
import {} from 'googlemaps';@ViewChild(‘gmapContainer’, {static: false}) gmap: ElementRef;
Where gmapContainer is the name of the map HTML element
- create a file called index.d.ts within your src directory and add the following line
declare module 'googlemaps';- Now create a map variable that contains the Google Maps API inside of your app.component.ts.
map: google.maps.Map;We are able to do this by google map types that we added to the project.
- In the app.component.ts file add the following variables:
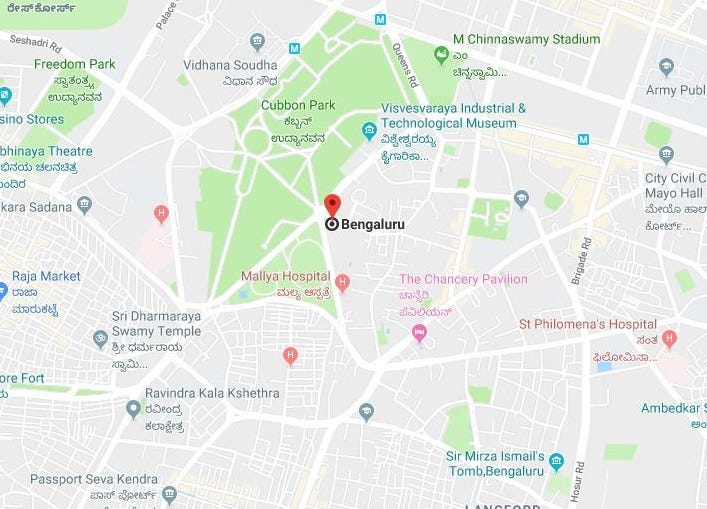
lat = 12.9716; lng = 77.5946;
coordinates = new google.maps.LatLng(this.lat, this.lng);- In the same file, create a mapOptions variable as follow:
mapOptions: google.maps.MapOptions = { center: this.coordinates, zoom: 10, };set a zoom level as per your requirement.
- Inside of your app.component.ts create a mapInitializer() function.
mapInitializer() {
 this.map = new google.maps.Map(this.gmap.nativeElement,
    this.mapOptions);
}- Import AfterViewInit and initialize AfterViewInit function.
export class AppComponent implements AfterViewInit {
       ngAfterViewInit() {}
}- Inside of your ngAfterViewInit add the following line:
ngAfterViewInit() { this.mapInitializer(); }- Create a new variable for google map marker :
marker = new google.maps.Marker({ position: this.coordinates, map: this.map, });- Add the marker to the map, by adding the following line to the mapInitializer() function.
this.marker.setMap(this.map);- your app.component.ts code should look like this:
import {} from 'googlemaps';
export class AppComponent implements AfterViewInit {
    title = 'angular-gmap';
    @ViewChild('mapContainer', { static: false }) gmap: ElementRef;
    map: google.maps.Map;
    lat = 12.9716;
    lng = 77.5946;

    coordinates = new google.maps.LatLng(this.lat, this.lng);

    mapOptions: google.maps.MapOptions = {
     center: this.coordinates,
     zoom: 10
    };

    marker = new google.maps.Marker({
      position: this.coordinates,
      map: this.map,
    });

    ngAfterViewInit() {
      this.mapInitializer();
    }

    mapInitializer() {
      this.map = new google.maps.Map(this.gmap.nativeElement,
      this.mapOptions);
      this.marker.setMap(this.map);
    }
   }
Step 8. Run your app
run app you can see map view in the result.

Comments
Post a Comment