Npm (Node Package Manager) is a package manager for the JavaScript programming language. It is the default package manager for the JavaScript runtime environment Node.js.
A project keeps its package dependency list in package.json. For each installed package, a version is assigned. Typically, a version is made up of three parts: major.minor.patch.
- Major is for the incompatible API changes.
- Minor is for the backward-compatible functionality.
- Patch is for the backward-compatible bug fixes.
By default, npm installs the latest version, and prepends a caret, such as “^15.2.0”. The caret dependency suggests that minimally, 15.2.0 should be installed.
When a higher major version exists, it would be used. If the highest major version at the time being is 15.6.2, this particular version, 15.6.2, will be upgraded to.
If you want to be a little conservative, the tilde dependency, “~15.2.0”, would suggest only a higher patch version would be used. Of course, the plain “15.2.0” would guarantee that only the exact version is used. The details of semantic versioning are defined by SemVer.
So far, so good.
The Problem
As time goes on, the dependencies in your package.json have evolved. You may want to upgrade all packages to catch up with new features or fix vulnerabilities. What should you do?
First, you need to identify what the latest versions are. Here is an example on GitHub.
If you have installed Version Lens on Visual Studio Code, it shows the latest versions for all packages.

Alternatively, you can use the npm command-line interface: npm outdated.


- Current is the currently installed version.
- Wanted is the maximum version of the package that satisfies the SemVer range specified in
package.json. - Latest is the version of the package tagged as latest in the registry.
- Location is where in the dependency tree the package is located.
The package color in the CLI output is an indication regarding the outdated level. Red means there is a newer version matching the SemVer requirements defined in package.json. Yellow means that there is a newer version above the SemVer requirements.
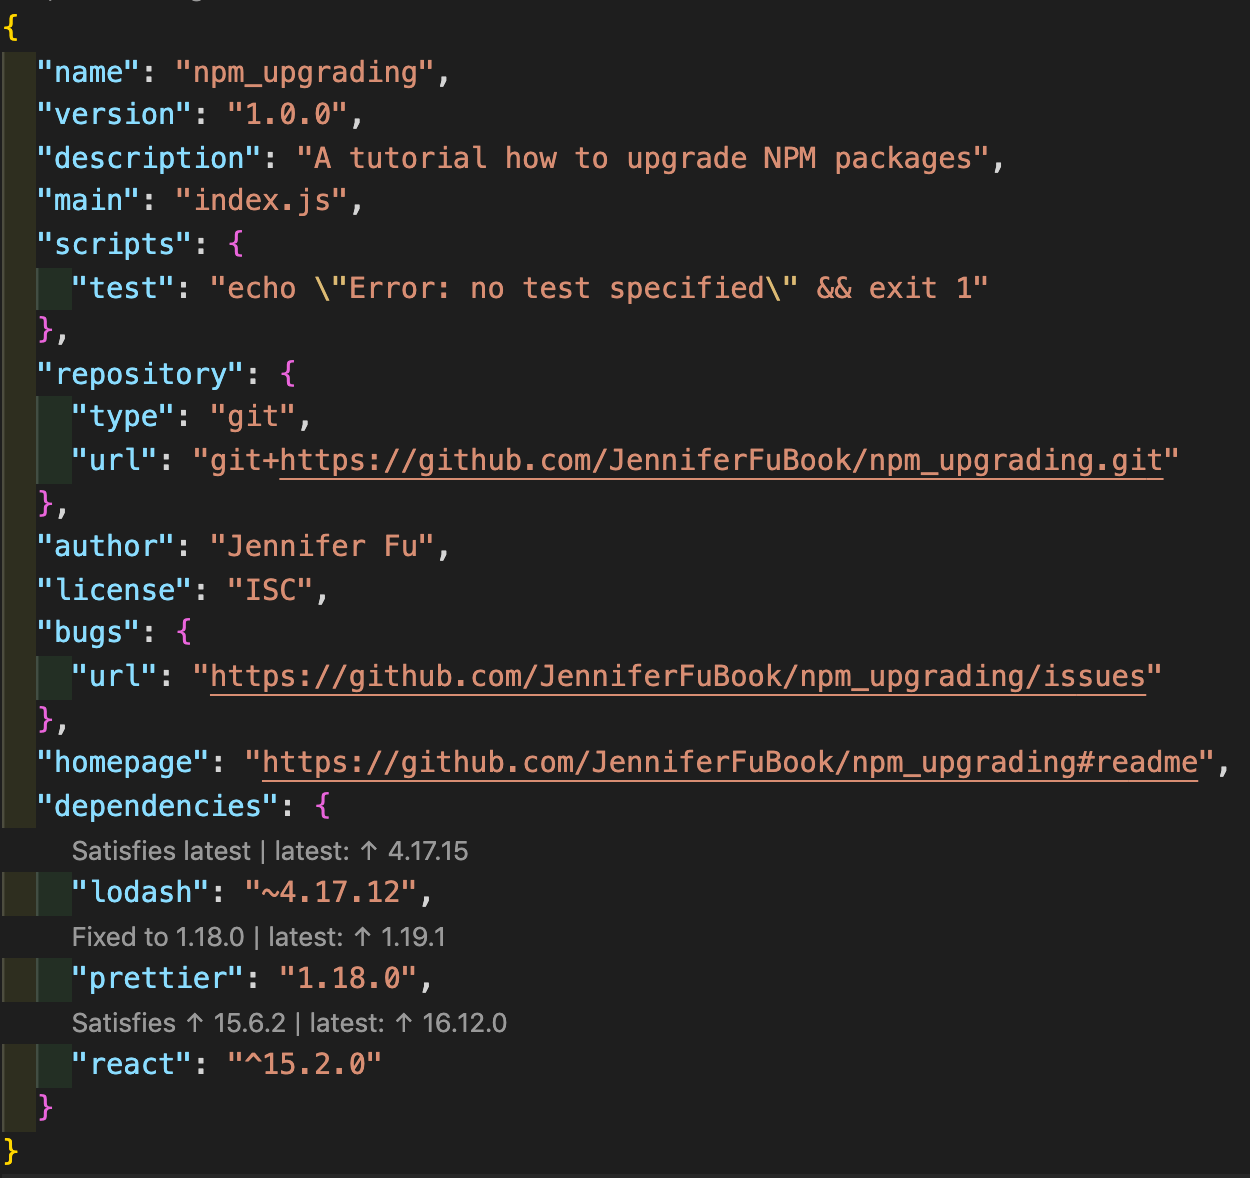
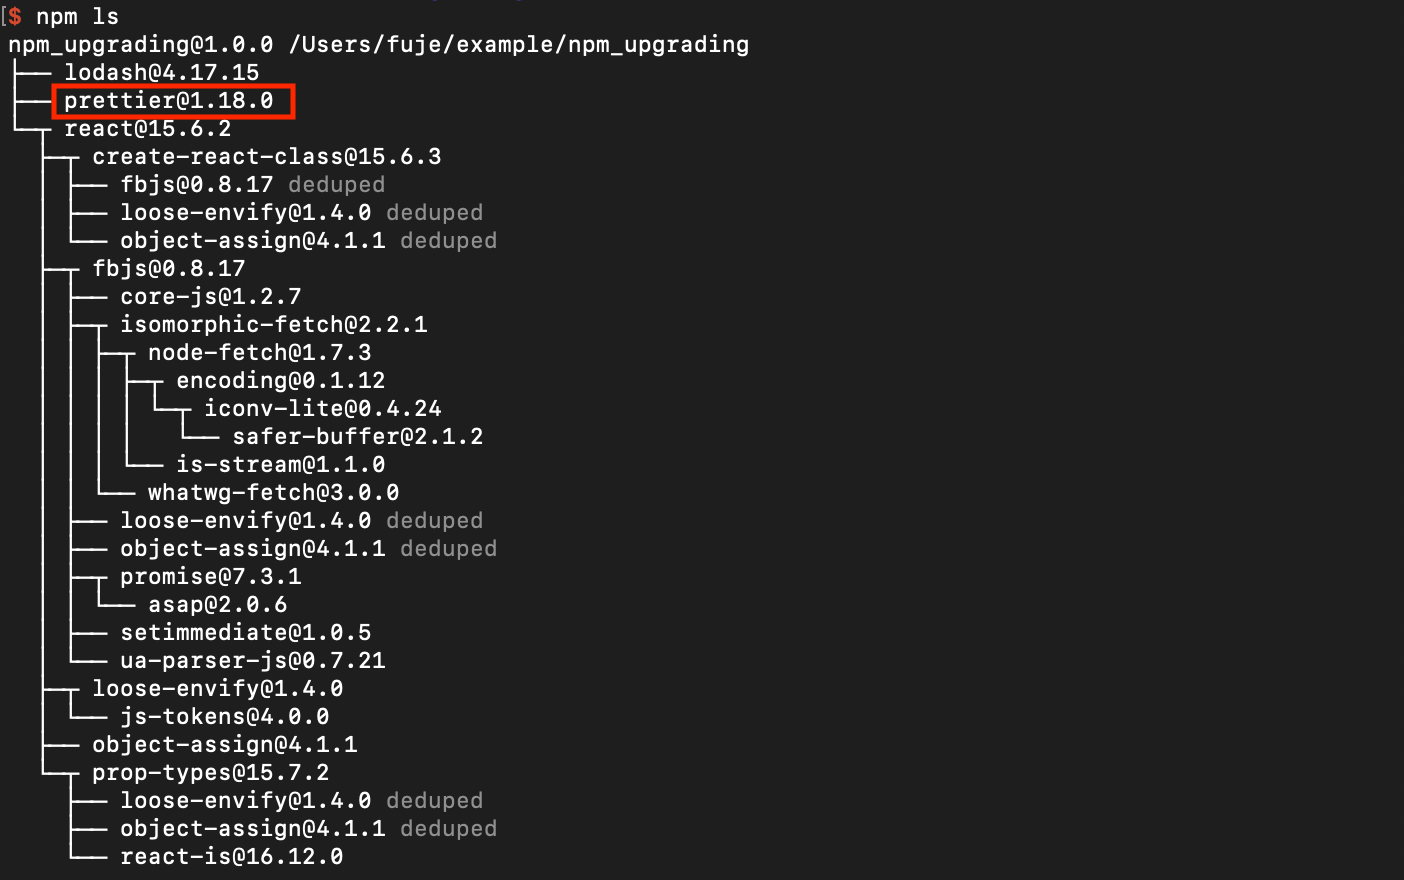
In our example, Lodash is not outdated. Therefore, it is not listed. Meanwhile, Prettieris behind the minor version, and React is behind the major version.
If the dependencies are modified to the following:


The red flags will be flashing for Lodash and Prettier.


The Solution
After identifying the outdated packages, we fix the version specifications in package.json accordingly. Then we can run npm install or npm update to upgrade.
npm installinstalls a package and any packages that it depends on. If the package has a package-lock or shrinkwrap file, the installation of dependencies will be driven by that, with annpm-shrinkwrap.jsontaking precedence if both files exist.npm updateupdates all the packages listed to the latest specified version. It also installs missing packages.
What are the differences between npm install or npm update?
npm installignores an already-installed module with fuzzy versioning whereasnpm updateupdates it.
Also, devDependencies are handled differently:
npm installinstalls or updatesdevDependenciesunless the--production flag is added.npm updatewill ignoredevDependenciesunless the--dev flag is added.
Is it too conceptual? Let’s see an example. In our case, we change Prettier’s version from “1.18.0” to “~1.18.0”:


If we run npm install, Prettier’s version is fuzzy enough to be kept as the original “1.18.0” in package-lock.json.


You can also view it using npm ls.

However, if we run npm update, Prettier’s version is upgraded to “1.8.2” in package-lock.json.


npm ls output is updated too.


In addition, Prettier’s tilde dependency is changed to a caret dependency!


The Powerful Solution
As we have observed, npm update will not upgrade to the latest major version. It makes sense since major releases frequently introduce breaking changes, and it needs to be handled with caution.
Then, how can we upgrade the major versions?
Using Version Lens’ hints in Visual Studio Code, we can manually upgrade packages to major versions. In addition, there is a powerful tool, npm-check-updates, to do it automatically. The npm tool can be installed globally:
npm install -g npm-check-updatesThen, we run this powerful command: ncu -u.


Now, the dependencies in package.jsonare upgraded to the latest ones, including major versions:


The rest is trivial. Run npm install or npm update to accomplish the upgrade.
Just be careful with npm-check-updates: With great power comes great responsibility.
Comments
Post a Comment