Have you ever needed to get and analyze the data from an Excel (.xlsx) Spreadsheet in node.js? If not, if you ever do, here’s a solution.
In this article we will focus on,
- Reading the data from the spreadsheet file.
- Understanding how the data is returned.
- Getting a list (names) of worksheets in a workbook.
- Specifying from which sheet we want data.
Reading The File
Setup
You will of need to have node.js installed.
You can create whatever Excel file you like, a screenshot of the simple file I will use for this article is below. I named the file Data.xlsx.

I will be using Visual Studio Code (VSCode).
- Open your terminal window and type, npm init. You can just accept the defaults which will make our main file index.js as seen in your package.json file.
- In your terminal window, type npm install-excel-file to install the package that makes it all work.
- Create a file named index.js and open it.
Reading The Excel File
We are now ready to read the file.
Add the following code to your index.js file.
const xlsxFile = require('read-excel-file/node');

xlsxFile('./Data.xlsx').then((rows) => {


}
Side Note: In the require statement, we specified /node. This is important as this can also be done with JavaScript in the browser by using,
import xlsxFile from 'read-excel-file'The Code
The first line imports the package.
The second line reads the file, returning a promise. When it is done reading we get arrays.
Each array (the row parameter of the callback function) contains a row in the spreadsheet. Each of these has three arrays corresponding to the three columns of our spreadsheet.
Viewing the Raw Data
Modify your code to verify we are getting the data from the file.
const xlsxFile = require('read-excel-file/node');

xlsxFile('./Data.xlsx').then((rows) => {
 console.log(rows);
 console.table(rows);
})
Run this in debug mode, F5, and then run without debug, Ctrl+F5.
Running in both will help us visualize what we are getting back as well verify the data was read from the file.
F5

CRTL+F5

This gives a a better picture of the array structure.
Getting The Actual Data
Since the data is in arrays, it is easily accessible. Two way’s of getting to the data are below.
forEach Loop
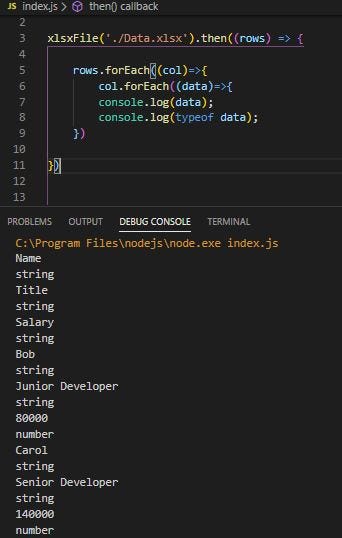
Modify your code as follows to see each piece of data and it’s data type.
The data parameter contains contains the spreadsheet cell entry.
const xlsxFile = require('read-excel-file/node');

xlsxFile('./Data.xlsx').then((rows) => {
rows.forEach((col)=>{
        col.forEach((data)=>{
          console.log(data);
          console.log(typeof data);
    })
})
})
For our purpose the output is just a list, but we have access to the data and can verify its data type.
for..in Loop
Modify your code to use the for…in loop.
const xlsxFile = require('read-excel-file/node');

xlsxFile('./Data.xlsx').then((rows) => {
for (i in rows){
       for (j in rows[i]){
           console.dir(rows[i][j]);
}
   }
})
Similar output when run but this code allows us to see the array structure better and how to access the array elements.
rows[i][j] contains the data in each spreadsheet cell.
Dealing With Multiple Sheets
What if we have two worksheet named Dev and Exec?
By default, when we read, the first sheet is read. However we can,
- Get a list of sheet names
- Specify the Sheet from which we want data.
Modified Excel File
I have modified my Excel file, Data.xlsx, to have two sheets.
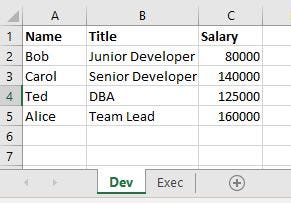
Dev Sheet
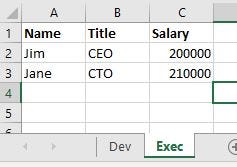
Exec Sheet
Getting A List of Sheet Names
The sheet names are returned as an array of objects. Each object has the structure,
{name : ‘sheetname’}
In our case it would return this array, [{name : ‘Dev’}, {name : ‘Exec’}]
Modify your code as follows to get a list of worksheets.
const xlsxFile = require('read-excel-file/node');

xlsxFile('./Data.xlsx', { getSheets: true }).then((sheets) => {
      sheets.forEach((obj)=>{

           console.log(obj.name);
       })
   })
Here we have passed the object parameter { getSheets: true }.
Then used a forEach loop to loop through the sheets array and access each object’s name property.
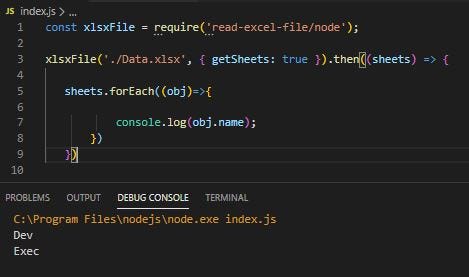
Accessing worksheet names. Dev, Exec.
Specifying The Sheet From Which To Get Data
To specify the desired worksheet we will pass the {sheet : } object parameter. This has two forms. You can specify by sheet number or the sheet name. To access sheet 2, we could use one of the following,
- {sheet : 2 }
- {sheet : ‘Exec’}
Modify you code as follows to access the Exec sheet’s data.
const xlsxFile = require('read-excel-file/node');

xlsxFile('./Data.xlsx', { sheet: 'Exec' }).then((rows) => {
for (i in rows){
        for (j in rows[i]){
            console.log(rows[i][j]);
        }
    }
})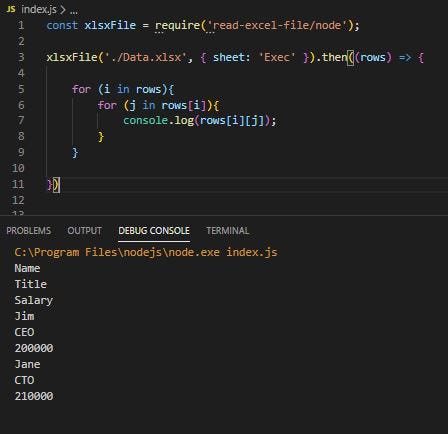
Sheet2, Exec, data
Conclusion
The npm package does all the work of reading the file. The important part is how the data is returned. It is returned as a two-dimensional array.
Knowing this gives us insight in to getting the data and working with it. Knowing we can get worksheet names allows us to process entire workbooks if needed.
Thank you for reading!
Comments
Post a Comment