Understanding NodeJS internally can be a little bit daunting (I know it was for me once). Node is a very powerful language and it can do a lot of things.
Today I wanted to uncover the power of Node’s built-in utility tool called fs (file system)
As per the fs docs:
The fs module provides an API for interacting with the file system in a manner closely modeled around standard POSIX functions.Which is just a fancy way of saying that file system is a way in Node to interact with files for both read and write operations.
Now file system is a humongous utility in NodeJS that has a lot of fancy features. In this article, however I will only discuss 3:
- Getting file information: fs.statSync
- Deleting a file: fs.unlinkSync
- Writing data to a file: fs.writeFileSync
Another thing we will cover in this article is Google Puppeteer which is this really cool, slick tool created by some awesome folks at Google.
So what is puppeteer? Well as per the docs, they say:
Puppeteer is a Node library which provides a high-level API to control headless Chrome or Chromium over the DevTools Protocol. It can also be configured to use full (non-headless) Chrome or Chromium.
So it’s basically a tool that lets you do all the cool browser related things on server. Like getting a website’s screenshots, crawling websites, and generating pre-render content for single page applications. You can even do form submissions via your NodeJS server.
Again puppeteer is a huge tool, so we will cover just a small but a very cool feature of puppeteer. We’ll look at how to generate a nice PDF file based on our generated HTML table file. In the process we’ll learn about puppeteer.launch() and understand a bit about page() & pdf().
So to again give a brief overview, things we will cover:
- Generating stub data (for invoices) using an online tool.
- Creating an HTML table with a little bit of styling with generated data in it, using an automated node script.
- Learning about checking if a file exists or not using fs.statSync
- Learning about deleting a file by using fs.unlinkSync
- Learning about writing a file using fs.writeFileSync
- Creating a PDF file of that HTML file generated using Google puppeteer
- Making them into npm scripts, to be used later ? ?
Let’s get started
Step 1:
In your terminal type in the following:
npm init -yThis will initialize an empty project for you.
Step 2:
Second, in the same folder, create a new file called
data.jsonand have some mocked data in it. You can use the following JSON sample.You can get the mocked JSON stub data from here. For generating this data I have used an awesome tool called https://mockaroo.com/ It is an online data generator tool.
The JSON data I am going with has a structure like this:
[
  {},
  {},
  {
   "invoiceId": 1,
   "createdDate": "3/27/2018",
   "dueDate": "5/24/2019",
   "address": "28058 Hazelcrest Center",
   "companyName": "Eayo",
   "invoiceName": "Carbonated Water - Peach",
   "price": 376
  },
  {
   "invoiceId": 2,
   "createdDate": "6/14/2018",
   "dueDate": "11/14/2018",
   "address": "6205 Shopko Court",
   "companyName": "Ozu",
   "invoiceName": "Pasta - Fusili Tri - Coloured",
   "price": 285
  },
  {},
  {}
]
You can download the complete JSON array for this tutorial from here.
Step 3:
Next create a new file called
buildPaths.jsconst path = require('path'); const buildPaths = { buildPathHtml: path.resolve('./build.html'), buildPathPdf: path.resolve('./build.pdf') }; module.exports = buildPaths;So
path.resolvewill take in a relative path and return us the absolute path of that particular directory.So
path.resolve('./build.html');will for example return something like this:$ C:\\Users\\Adeel\\Desktop\\articles\\tutorial\\build.htmlStep 4:
In the same folder create a file called
createTable.jsand add the following code:const fs = require('fs'); // JSON data const data = require('./data.json'); // Build paths const { buildPathHtml } = require('./buildPaths'); /** * Take an object which has the following model * @param {Object} item * @model * { * "invoiceId": `Number`, * "createdDate": `String`, * "dueDate": `String`, * "address": `String`, * "companyName": `String`, * "invoiceName": `String`, * "price": `Number`, * } * * @returns {String} */ const createRow = (item) => ` <tr> <td>${item.invoiceId}</td> <td>${item.invoiceName}</td> <td>${item.price}</td> <td>${item.createdDate}</td> <td>${item.dueDate}</td> <td>${item.address}</td> <td>${item.companyName}</td> </tr> `; /** * @description Generates an `html` table with all the table rows * @param {String} rows * @returns {String} */ const createTable = (rows) => ` <table> <tr> <th>Invoice Id</td> <th>Invoice Name</td> <th>Price</td> <th>Invoice Created</td> <th>Due Date</td> <th>Vendor Address</td> <th>Vendor Name</td> </tr> ${rows} </table> `; /** * @description Generate an `html` page with a populated table * @param {String} table * @returns {String} */ const createHtml = (table) => ` <html> <head> <style> table { width: 100%; } tr { text-align: left; border: 1px solid black; } th, td { padding: 15px; } tr:nth-child(odd) { background: #CCC } tr:nth-child(even) { background: #FFF } .no-content { background-color: red; } </style> </head> <body> ${table} </body> </html> `; /** * @description this method takes in a path as a string & returns true/false * as to if the specified file path exists in the system or not. * @param {String} filePath * @returns {Boolean} */ const doesFileExist = (filePath) => { try { fs.statSync(filePath); // get information of the specified file path. return true; } catch (error) { return false; } }; try { /* Check if the file for `html` build exists in system or not */ if (doesFileExist(buildPathHtml)) { console.log('Deleting old build file'); /* If the file exists delete the file from system */ fs.unlinkSync(buildPathHtml); } /* generate rows */ const rows = data.map(createRow).join(''); /* generate table */ const table = createTable(rows); /* generate html */ const html = createHtml(table); /* write the generated html to file */ fs.writeFileSync(buildPathHtml, html); console.log('Succesfully created an HTML table'); } catch (error) { console.log('Error generating table', error); }createTable.js script (github gist: https://gist.github.com/adeelibr/70936277d38f3c77d3910e417581e98a#file-createtable-js) I know that is a lot of code, but let’s divide it into chunks and start understanding it piece by piece.
Go to line 106 (github gist)
In our
try/catchblock we first check if the build file for HTML exists in the system or not. This is the path of the file where our NodeJS script will generate our HTML.if (doesFileExist(buildPathHtml){}calls doesFileExist() method which simply returns true/false. For this we usefs.statSync(filePath);This method actually returns information about the file like the size of the file, when the file was created, and so on. However if we provide it an invalid file path, this method returns as a null error. Which we use here to our benefit and wrap the
fs.statSync()method in atry/catch. If Node is successfully able to read the file in our try block, we returntrue— otherwise it throws an error which we get in our catch block and returnsfalse.If the file exists in the system we end up deleting the file using
fs.unlinkSync(filePath); // takes in a file path & deletes itAfter deleting the file, we need to generate rows to put in the table.
Step 5:
So first we import
data.jsonwhich we do at line 3 & then on line 115 we iterate each item using map(). You can read more about Array.prototype.map() here.The map method takes a method
createRowwhich takes in an object through each iteration and returns a string which has content like this:"<tr> <td>invoice id</td> <td>invoice name</td> <td>invoice price</td> <td>invoice created date</td> <td>invoice due date</td> <td>invoice address</td> <td>invoice sender company name</td> </tr>"const row = data.map(createdRow).join('');The
join('')part is important here, because I want to concatenate all of my array into a string.An almost similar principle is used for generating a table on line 117 & then the html table on line 119.
Step 6:
The important part is where we write to our file on line 121:
fs.writeFileSync(buildPathHtml, html);It takes in 2 parameters: one is the build path (string) and the html content (string) and generates a file (if not created; and if it is created, it overwrites the already existing file).
One thing to note here we might not need Step 4, where we check if the file exists & if it does then delete it. This is because writeFileSync does that for us. I just added that in the code for learning purposes.
Step 7:
In your terminal, go in the folder path where you have the
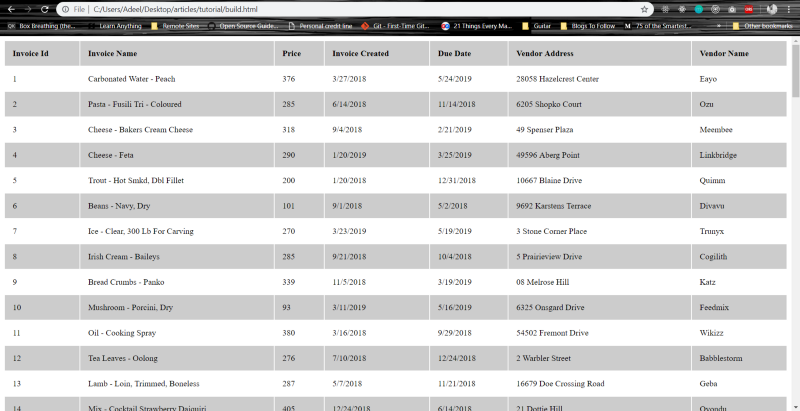
createTable.jsand type$ npm run ./createTable.jsAs soon as you run this script, it will create a new file in the same folder called
build.htmlYou can open that file in your browser and it will look something like this.Generated HTML table. Cool right? So far so good. ?
Also you can add an
npm scriptin your package.json like this:"scripts": { "build:table": "node ./createTable.js" },This way instead of writing
npm run ./createTable.js, you can just type innpm run build:table.Next up: generating a PDF from the generated
HTMLfile.Step 8:
First things first we need to install a fancy tool, so go in your terminal in your application folder and type in
npm install puppeteerStep 9:
In the same folder where you have files
createTable.js,buildPaths.js&data.json, create a new file calledcreatePdf.jsand add content to it like below:const fs = require('fs'); const puppeteer = require('puppeteer'); // Build paths const { buildPathHtml, buildPathPdf } = require('./buildPaths'); const printPdf = async () => { console.log('Starting: Generating PDF Process, Kindly wait ..'); /** Launch a headleass browser */ const browser = await puppeteer.launch(); /* 1- Ccreate a newPage() object. It is created in default browser context. */ const page = await browser.newPage(); /* 2- Will open our generated `.html` file in the new Page instance. */ await page.goto(buildPathHtml, { waitUntil: 'networkidle0' }); /* 3- Take a snapshot of the PDF */ const pdf = await page.pdf({ format: 'A4', margin: { top: '20px', right: '20px', bottom: '20px', left: '20px' } }); /* 4- Cleanup: close browser. */ await browser.close(); console.log('Ending: Generating PDF Process'); return pdf; }; const init = async () => { try { const pdf = await printPdf(); fs.writeFileSync(buildPathPdf, pdf); console.log('Succesfully created an PDF table'); } catch (error) { console.log('Error generating PDF', error); } }; init();createPdf.js github gist As we did with
createTable.jsscript, let’s break this down into chunks and start understanding this script step by step.Let’s start with line 40: here we call a method init() which calls the method on line 30. One thing to focus on is that our init() method is an async method. Read more on this async function.
First in the init() method we call printPdf() method which is again an async method, so we have to wait for its response. The printPdf() method returns us a PDF instance which we then write to a file on line 33.
So what does the
printPdf()method do? Let’s dig deep in it.const browser = await puppeteer.launch(); const page = await browser.newPage(); await page.goto(buildPathHtml, { waitUntil: 'networkidle0' }); const pdf = await page.pdf({ format: 'A4', margin: { top: '20px', right: '20px', bottom: '20px', left: '20px'} }); await browser.close(); return pdf;We first launch a headless browser instance using puppeteer by doing the following:
await puppeteer.launch(); // this returns us headless browserwhich we then use to open a web page:
await browser.newPage(); // open a blank page in headless browserOnce we have a blank page open we can navigate to a page. Since our web page is locally in our system, we simply
page.goto(buildPathHtml, { waitUntil: 'networkidle0' });Here
waitUntil: 'networkidle0;is important, because it tells puppeteer to wait for 500/ms until there are no more network connections.Note: This is why we used path.resolve() to get absolute paths, because in order to open the web page with puppeteer, we need an absolute path.
After we have a web page opened in the headless browser on the server, we save that page as a pdf:
await page.pdf({ });As soon as we have a pdf version of the web page, we need to close the browser instance opened by puppeteer to save resources by doing this:
await browser.close();& then we return the
pdfsaved, which we then write to the file.Step 10:
In your terminal type
$ npm ./createPdf.jsNote: Before running the above script, ensure that you the
build.htmlfile generated bycreateTable.jsscript. This ensures we always have thebuild.htmlprior to running thecreatePdf.jsscript. In yourpackage,jsondo the following."scripts": { "build:table": "node ./createTable.js", "prebuild:pdf": "npm run build:table", "build:pdf": "node ./createPdf.js" },Now if you run
$ npm run build:pdfit will execute thecreateTable.jsscript first and thencreatePdf.jsscript. You can read more on NPM scripts on their official docs.When you run
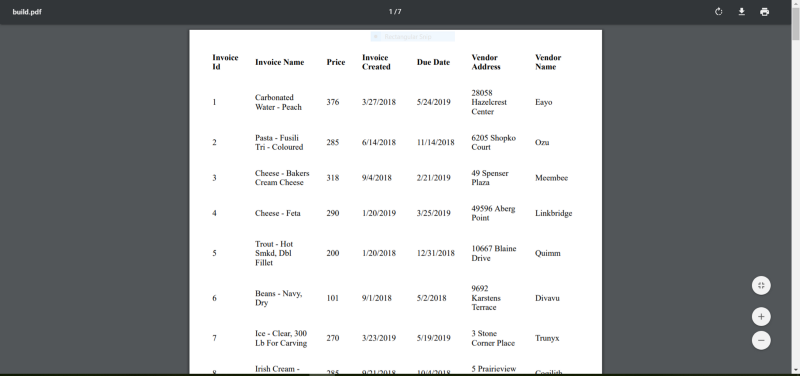
$ npm run build:pdfIt will run and create a
build.pdfwhich will look like this:Generated .pdf file on running createPdf.js script And that is it, we are done.
You have learned the following:
- How to check if a file exists / tet file information (in Node)
- How to delete a file in Node
- How to write to a file
- How to use Google Puppeteer to generate a PDF file
Comments
Post a Comment