
Announcing the Capacitor ngAdd Schematic

Capacitor overview

First off, let’s go over what Capacitor is and how it relates to other cross platform projects out there.

At a glance, Capacitor follows many of the same ideas as Apache Cordova.

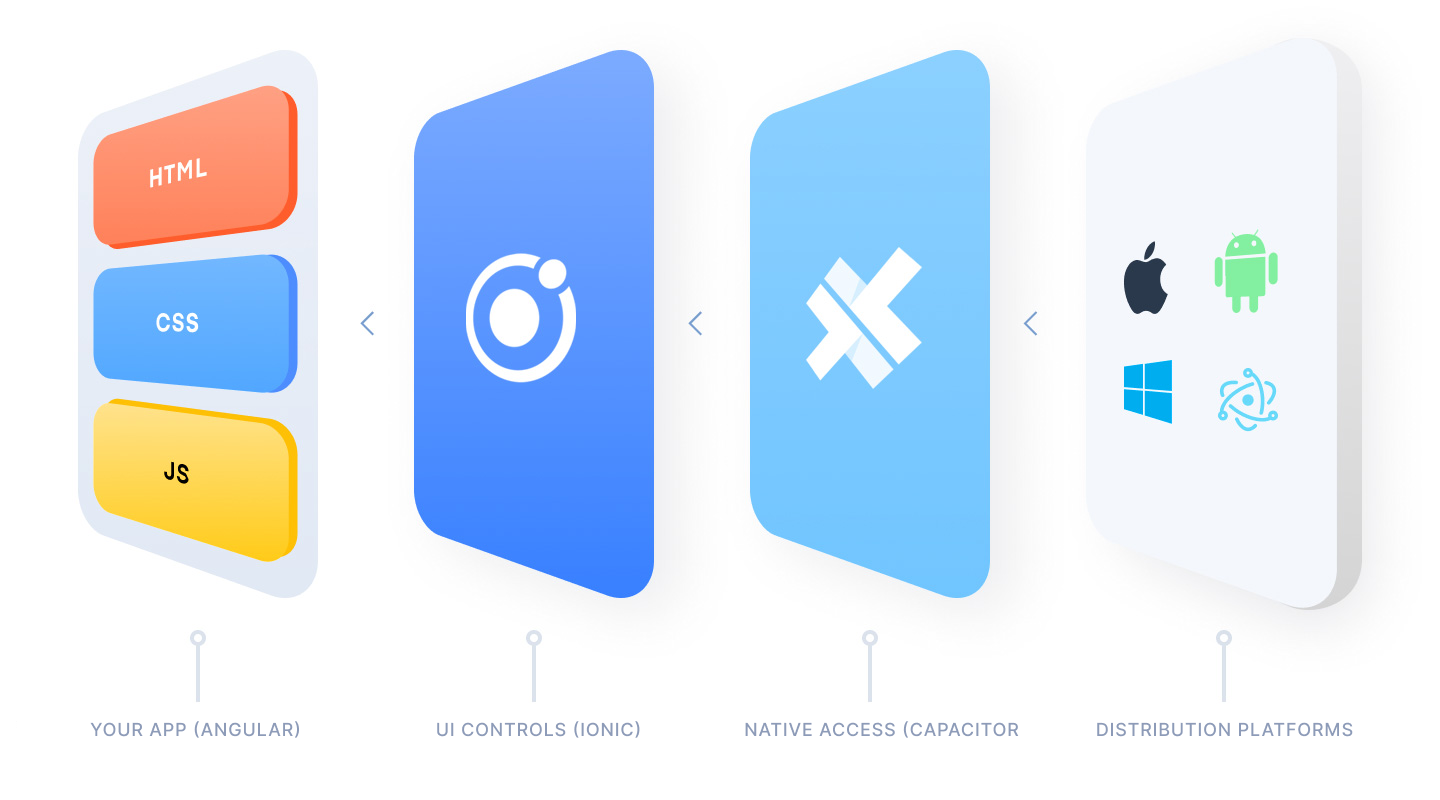
There is a Web layer that renders the app and a native layer that listens for calls to Native APIs. Within those layers are many technical decisions that make the overall developer and user experience much smoother.

  • Unified API that makes cross-platform development easier
  • Native Platforms are not distribution targets, but are committed to version control and can be edited by the developer.
  • Modern native build tools and libraries, such as Cocoapods, Android Libraries, Xcode and Android Studio, provide more visibility into native project changes and better app maintainability.
  • Utilize npm and modern JS tooling to simplify adding core plugins and creating new ones.

These principles bring the best of web development and native development with little to no friction for developers.

Capacitor and Angular integration

Capacitor itself is made up of 2 packages, the core functionality (@capacitor/core) and the CLI (@capacitor/cli). To add Capacitor to your project, let’s start with a simple Angular App from the Angular CLI.

ng new capApp --routing --style css
cd capApp

With the app created, let’s add Capacitor to our project.

ng add 

With this, developers can add Capacitor to their project with ease.

When the schematic is done running, developers should build our app, and run npx cap add <ios,android> or yarn cap add <ios, android> and our Xcode or Android Studio projects will be created!

ng run capApp:build
npx cap add ios

Pulling back the curtain

So what is the schematic actually doing behind the scenes?

  • Installing Capacitor Dependencies

First, it adds Capacitor dependencies to the package.json: Core and CLI.

  • Installs dependencies

This will just do a quick npm (or yarn) install then make sure we have the Core and CLI packages for Capacitor.

  • Run Capacitor CLI’s init script and create the scaffolding needed.

To make sure that the Capacitor project understands your Angular project, the schematic infers a lot of data based on your angular.json. It will read your app's name and use that when creating the iOS and Android projects, as well as read the build folder so it knows where to copy your web code when preparing the native projects. This means that your Capacitor project will feel like a natural extension of your Angular project.

Once added, we do a build of our app, and deploy to either iOS, Android, web, or Electron. For building to iOS or Android, you’ll need to have the native SDKs and tools installed. For a detailed guide on this, see this guide for  and this guide for 

Comments

Popular posts from this blog

How to use Ngx-Charts in Angular ?

Charts helps us to visualize large amount of data in an easy to understand and interactive way. This helps businesses to grow more by taking important decisions from the data. For example, e-commerce can have charts or reports for product sales, with various categories like product type, year, etc. In angular, we have various charting libraries to create charts.  Ngx-charts  is one of them. Check out the list of  best angular chart libraries .  In this article, we will see data visualization with ngx-charts and how to use ngx-charts in angular application ? We will see, How to install ngx-charts in angular ? Create a vertical bar chart Create a pie chart, advanced pie chart and pie chart grid Introduction ngx-charts  is an open-source and declarative charting framework for angular2+. It is maintained by  Swimlane . It is using Angular to render and animate the SVG elements with all of its binding and speed goodness and uses d3 for the excellent math functio...

Understand Angular’s forRoot and forChild

  forRoot   /   forChild   is a pattern for singleton services that most of us know from routing. Routing is actually the main use case for it and as it is not commonly used outside of it, I wouldn’t be surprised if most Angular developers haven’t given it a second thought. However, as the official Angular documentation puts it: “Understanding how  forRoot()  works to make sure a service is a singleton will inform your development at a deeper level.” So let’s go. Providers & Injectors Angular comes with a dependency injection (DI) mechanism. When a component depends on a service, you don’t manually create an instance of the service. You  inject  the service and the dependency injection system takes care of providing an instance. import { Component, OnInit } from '@angular/core'; import { TestService } from 'src/app/services/test.service'; @Component({ selector: 'app-test', templateUrl: './test.component.html', styleUrls: ['./test.compon...

How to solve Puppeteer TimeoutError: Navigation timeout of 30000 ms exceeded

During the automation of multiple tasks on my job and personal projects, i decided to move on  Puppeteer  instead of the old school PhantomJS. One of the most usual problems with pages that contain a lot of content, because of the ads, images etc. is the load time, an exception is thrown (specifically the TimeoutError) after a page takes more than 30000ms (30 seconds) to load totally. To solve this problem, you will have 2 options, either to increase this timeout in the configuration or remove it at all. Personally, i prefer to remove the limit as i know that the pages that i work with will end up loading someday. In this article, i'll explain you briefly 2 ways to bypass this limitation. A. Globally on the tab The option that i prefer, as i browse multiple pages in the same tab, is to remove the timeout limit on the tab that i use to browse. For example, to remove the limit you should add: await page . setDefaultNavigationTimeout ( 0 ) ;  COPY SNIPPET The setDefaultNav...