Explaining how to configure a proxy for backend API calls with an example.
In the Angular app, We often talk to backend servers in the development phase, we will explore all the scenarios in this article. Here are the topics we cover.
- What is proxying
- Example Project
- proxy.config.json options
- Proxy Setup with Angular CLI
- Different Ways to configure
- Rewrite the Path URL
- Multiple app entries to one API endpoint
- Multiple app entries with multiple endpoints
- Summary
What is proxying
In general, A proxy or proxy server serves as a gateway between your app and the internet. It’s an intermediate server between client and servers by forwarding client requests to resources.
In Angular, we often use this proxying in the development environment. Angular uses webpack dev server to serve the app in development mode. If we look at the following diagram, app UI is running on port 4200 and backend server is running on port 3700. All the calls start with */api *will be redirected to the backend server and rest all fall back to the same port.
In subsequent sections, we will see how we can accomplish this and other options as well.

proxying all URLs start with /api
Example Project
Let’s follow these commands for the example project and you are ready for angular CLI proxy setup.
//clone the project
git clone https://github.com/bbachi/angular-proxy-example
// install dependencies for node server
npm install
//cd to ui
cd appui
// install app ui dependencies
np install
Once you install all the dependencies, you can start both Angular app and node js server on 4200 and 3070 respectively.
You can start the Angular app with these commands npm start or ng serve and here is the Angular app running on 4200.

The angular app runs on 4200
Let’s start the server with this command npm start and test this API on port 3070.

API running on port 3070
proxy.config.json options
target: This is where we need to define the backend URL.
pathRewrite: We need to use this option to edit or rewrite the path
changeOrigin: If your backend API is not running on localhost, we need to make this flag true.
*logLevel: *If you want to check whether proxy configuration working properly or not, this flag should be debug.
bypass: Sometimes we have to bypass the proxy, we can define a function with this. But it should define in proxy.config.js instead of proxy.config.json.
Proxy Setup with Angular CLI
Now app and server running on different ports. Let’s set up a proxy for communication between these.
First thing you need is this proxy.config.json. We are defining the target for all the URLs starts with /api here.
{
"/api/*": {
"target": "http://localhost:3070",
"secure": false,
"logLevel": "debug",
"changeOrigin": true
}
}
Second thing is to let Angular know we have this proxy.config.json in place. We can do that by adding the proxy-config flag while starting the app like below. Once started, we can see the message indicating all the URLs starting with /api will be redirecting to nodejs server running on port 3070.

npm start script

Now we can test the app and see the settings from the server

settings coming from the server
Different Ways to configure
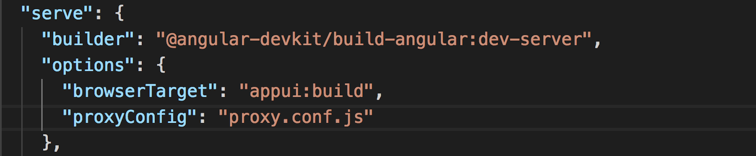
Another way to configure proxy config in the Angular project is defining in angular.json.

proxyConfig in angular.json
Let’s summarize the ways here
- Add this
ng serve — proxy-config proxy.conf.jsonto the start script in package.json - Define in angular.json under serve section like above.
Rewrite the Path URL
Whenever there is a change in the URLs, we often rewrite the path of the backend servers endpoints. We can do that with the pathRewrite.
Let’s understand the pathRewrite option. For instance, our backend URL /api/settings is changed to /api/app/settings and we want to test in development before it goes to production. We can achieve this with the option *pathRewrite *like below.
{
"/api/*": {
"target": "http://localhost:3070",
"secure": false,
"logLevel": "debug",
"changeOrigin": true,
"pathRewrite": {
"^/api/settings": "/api/app/settings",
"^/api": ""
}
}
}
app.get('/api/app/settings', (req,res) => {
console.log('--settings---');
res.json(settings)
})
app.get('/users', (req,res) => {
console.log('--users---');
res.json({users:[]})
})
So, we are rewriting /api/setting to /api/app/settings and /api/users to /users.
Here is the console output while starting the app.

angular proxy rewriting URL paths
Multiple app entries to one API endpoint
Sometimes we have multiple modules with services in our app. We might have a scenario where multiple entries or services will call the same API endpoint.
In that case, we need to define proxy.config.js instead of proxy.config.json. Don’t forget to add that to angular.json.
const PROXY_CONFIG = [
{
context: [
"/userapi",
"/settingsapi",
"/productapi",
],
target: "http://localhost:3070",
secure: false
}
]
module.exports = PROXY_CONFIG;
proxy.config.js
angular.json
Multiple app entries with multiple endpoints
We have seen how to define multiple entries to the same endpoint. Let’s look at multiple entries to multiple endpoints scenario.
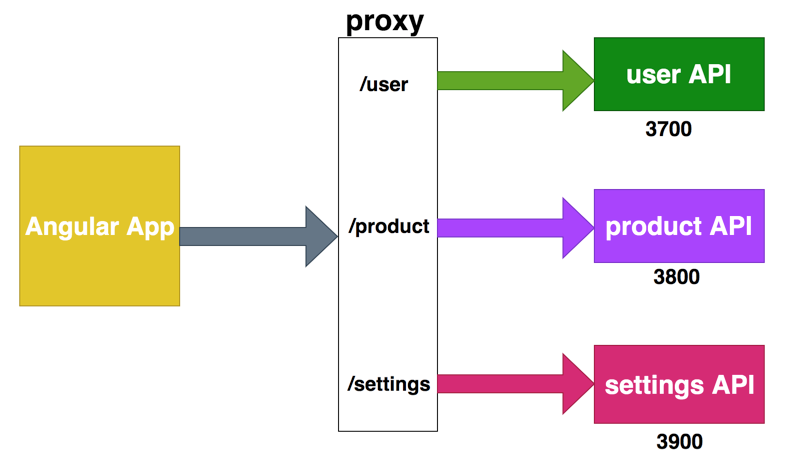
proxy for multiple APIs
For instance, we have three APIs running on ports 3700, 3800 and 3900 and your APP should talk to these APIs.
All we need to add multiple entries to the proxy.config.json. Here is the configuration for that setup and we have to make sure all APIs are running on these ports for successful communication.
proxy.config.js
angular.json
Multiple app entries with multiple endpoints
We have seen how to define multiple entries to the same endpoint. Let’s look at multiple entries to multiple endpoints scenario.
proxy for multiple APIs
For instance, we have three APIs running on ports 3700, 3800 and 3900 and your APP should talk to these APIs.
All we need to add multiple entries to the proxy.config.json. Here is the configuration for that setup and we have to make sure all APIs are running on these ports for successful communication.
Summary
- In Angular, the proxy is used mostly in the development environment to facilitate the communication between server and UI.
- We need to have a backend server and UI running on different ports.
- Proxy.config.json is the file which holds all the information regarding backend API URLs.
- We need to make sure the Angular App and Backends are running on different ports for successful communication.
- There are two ways to configure one is to add in the angular.json and another is adding a proxy-config flag to the start script.
- We can rewrite the path with the option pathRewrite.
- We can proxy multiple entries to one backend API with the proxy.config.js.
- We can proxy multiple entries to multiple backends as well.
Comments
Post a Comment