What is Continuous Integration(CI) ?
Continuous Integration is a development practice that requires developers to integrate code to a shared repository several times a day.
All developers are writing functions and developing new feature, service, etc. on their individual workstation and then they will commit and send the Pull Request(PR’s) to the mainstream. This happens on a regular basis and as there’s no time frame when the changes are being merge into the master repository, its painful, every single time manual build is cumbersome and time consuming process. A version control system is being monitored. When a commit is detected, a build will be triggered automatically. If anything failed during the process, the system will notify and send alert to the admin and the respective developer of the feature. With continuous CI process, you could be able to detect problems, bugs, dependency issues, in the earlier phase of development life cycle.
Each Integration is verified by an automated build to detect integration errors as quickly as possible. This approach leads to significantly reduced integration problems and allow the team to build the robust software more rapidly. The steps for achieving CI server process is shown in the below diagram. Note that there are many other ways to achieved CI into your system. This is one which I felt best and good for beginners to easily understand.

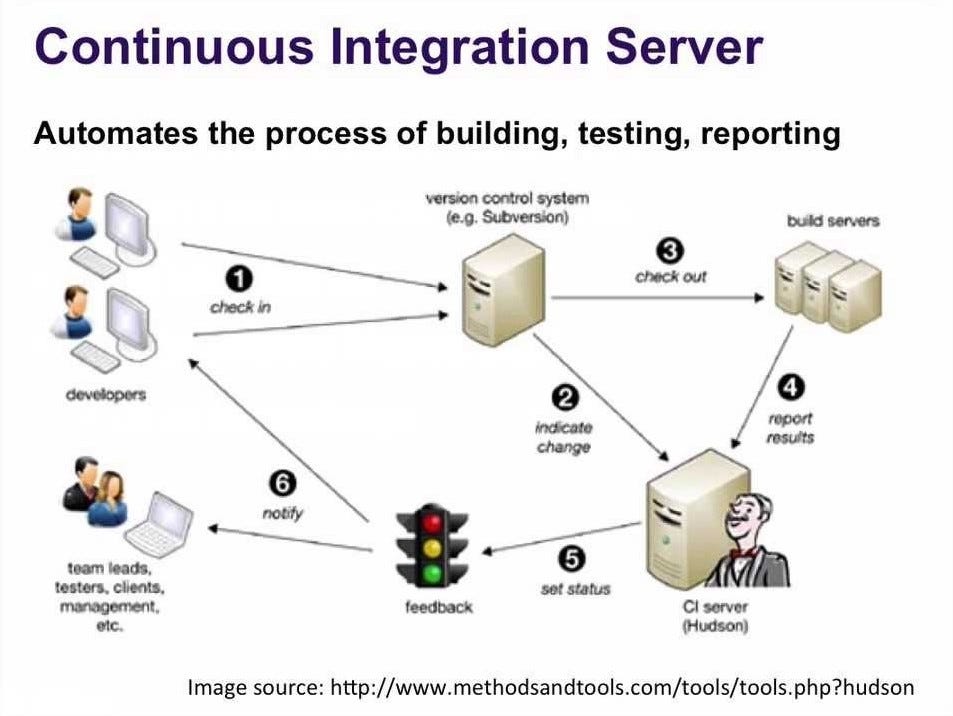
Automate the process of building, testing and reporting:
- All Developers working on their own feature branch check-in and sends a Pull Request(PR) to the upstream several times a day.
- Version Control System(VCS) receives all the PR’s by the individual developer and merge it once it’s verified by the maintainer. It also indicates the CI server so it will start the process of Build server.
- Build server starts building your project after the integration of above merge and check if everything works as expected which includes continuous testing process.
- The above build reports the status of the build along with detail results. You can check the logs of build process and confirm if it meets the desired state.
- Each integration should have feedback. The feedback will be provided based on the result in the above step.
- Notify the admin and respective developers of the project regarding the feedback so that they will take appropriate action to resolve it.
What is Continuous Delivery(CD) ?
Continuous Delivery(CD) is a software engineering approach in which teams keep producing valuable software in a short cycle and ensure that the software can be reliably released at any time.
The vary environment, system dependencies cause a problem and new bugs arise while building the system which became difficult to maintain. Some problems we face into the process as, maintaining different environments, package versions, repositories, rollbacks, etc.
Developers used to throw their code over the metaphorical wall, and operators were responsible for keeping that code running in production. Developers were concerned with shipping code, while operators were concerned with reliability. This misalignment is filled by the continuous DevOps process.


As shown in the above diagram, Continuous Delivery process consist of the our SDLC phases with automation at each phase. With this we can deliver the changes to your customers quickly in a reliable way and achieve continuous end-to-end automation i.e. one click deployment, quick release, etc. So, no specific schedule is needed to deploy new things. And, you could easily manage, debug and deploy micro-services. Your code must be robust, which should cover all the edge test cases which will make the standardized system workflow. This solves the complex problems at deploying stage and make the process seamless. You can release more often, thus accelerating the feedback loop with your customers.
The continuous delivery automates the entire software delivery process. Every commit will trigger the automated build, test and deploy to the respective environments. The deployment to production can be manual to validate the desired state while pushing to production. It focuses on reducing the application lifecycle while delivering values faster with best strategy to production with-in a quick succession.
Comments
Post a Comment