
Building backend APIs comes with many hassles. One of which is user input validation. It’s important to add an extra layer of validation to incoming data because you can never rely on the users’ input alone. There are many ways of carrying out input validation in Node.js. For simplicity purposes, we will consider validatorJS — a validation library inspired by the Laravel framework’s validator.
In this tutorial, we will learn how to handle data validation in Node using validatorJS.
Prerequisites
This tutorial uses the following:
- Basic knowledge of Node.js
- Yarn or NPM installed (we’ll be using yarn)
- Basic knowledge of mongo is nice to have
- A system running node version 10.5.0 or higher
Installation
Let’s launch the following commands to initialize the project directory:
$ git clone -b boilerplate https://github.com/enkaypeter/validatorjs-tutorial
$ cd validatorjs-tutorial && yarn
Packages installed:
- Express: A lightweight Node.js web framework for spinning up RESTful APIs. We will use this to handle routing in our backend API
- body-parser: A middleware to parse incoming request inputs into our
req.bodyobject - mongoose: An object modeling tool for MongoDB. This will help create and query our
Userschema - morgan: HTTP request logger middleware for Node.js. This will help us debug our API while in development
- validatorJS: A validation library for handling input data validation
Basic usage
In this section, we will learn how to carry out basic input validation and how to set up our Node project. To get started, we are going to write a simple validation middleware to validate user inputs on sign up:
// src/helpers/validate.js

const Validator = require('validatorjs');
const validator = (body, rules, customMessages, callback) => {
    const validation = new Validator(body, rules, customMessages);
    validation.passes(() => callback(null, true));
    validation.fails(() => callback(validation.errors, false));
};

module.exports = validator;
The snippet above shows how to initialize the valdiatorJS package in AMD format. This will help simplify our code when writing multiple validation middlewares.
// src/middleware/validation-middleware.js

const validator = require('../helpers/validate');

const signup = (req, res, next) => {
    const validationRule = {
        "email": "required|email",
        "username": "required|string",
        "phone": "required|string",
        "password": "required|string|min:6|confirmed",
        "gender": "string"
    }
    validator(req.body, validationRule, {}, (err, status) => {
        if (!status) {
            res.status(412)
                .send({
                    success: false,
                    message: 'Validation failed',
                    data: err
                });
        } else {
            next();
        }
    });
}

module.exports = {
  signup
}
In the snippet above, we’re defining a signup function that contains our validation rules.
The validator function which extends the library’s validator constructor (as seen in
src/helpers/validate.js above) accepts four arguments — data to be validated, the validation rule, custom error messages (if any), and a callback method.
To apply validation rules to our request body ( i.e
req.body), object key names have to be the same.
For instance, the email fields validation rule will look something like this:
"email": "required|email"
Let’s go over some of the validation rules used in the snippet above and what they mean:
- required: This means the said field must have a length > 0
- string: This means the said field must be a string
- email: The field under validation must be in an email format ( i.e
johndoe@domain.com) - min:6: This means the said field string length must be >= 6
- confirmed: The field under validation must have a matching field
foo_confirmationwith matching values. This is commonly used for password confirmation fields
Since we know our validation rules and what they mean, let’s go over to our
baseController and define our signup logic.// src/controllers/base-controller.js
const { User } = require("../models");
module.exports = {
...
signup: (req, res) => {
const { email, gender, username, password, phone} = req.body;
const newUserObj = { email, gender, username, password, phone};
const newUser = new User(newUserObj);
newUser.save((saveErr) => {
if(saveErr) {
return res.status(412).send({
success: false,
message: saveErr
})
}
return res.status(200).json({
success: true,
message: "signup successful"
});
});
}
}
The snippet above shows how we save to the database which, in this case, is MongoDB. The
signup() executes if the req.bodyobject passes validation.// src/routes/index.js
const express = require('express');
const router = express();
const baseController = require("../controllers/base-controller");
const validationMiddleware = require('../middleware/validation-middleware');
router.get("/", baseController.index);
router.post("/signup", validation.signup, baseController.signup)
module.exports = router;
In this snippet, we attach the signup validation middleware to the
/signup route as well as the signup() from our baseController.
A sample request can be seen below:
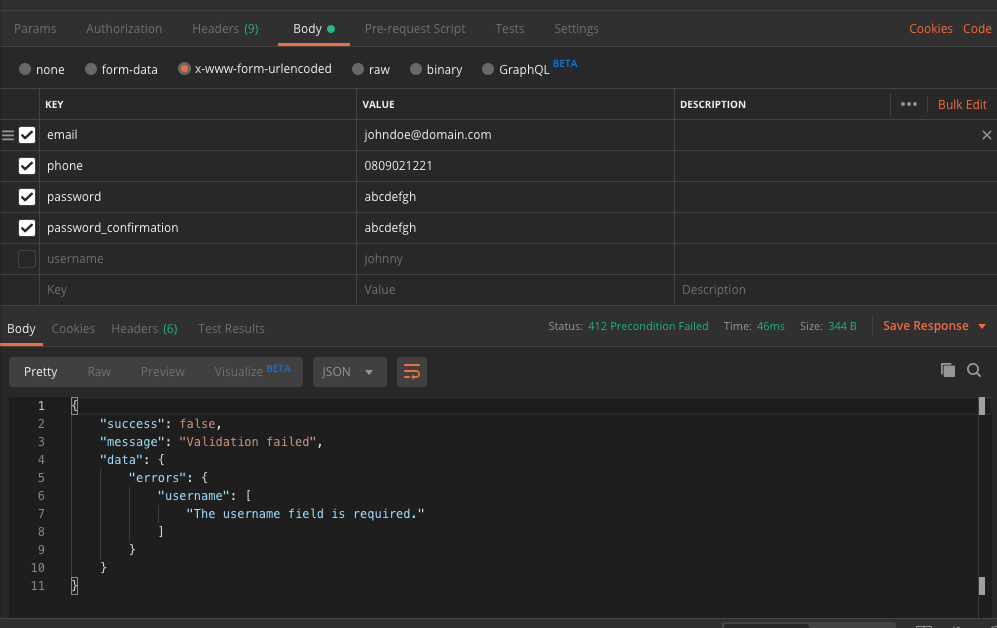
With the
username key checked we should see a response that looks like this:{
"success": true,
"message": "signup successful"
}
Advanced usage
In this section, we will learn how to write custom validation rules for these use cases:
- Implementing strict password policies
- The email/username attribute already exists in the database
To get started with the first use case, we will edit
src/helpers/validate.js like so:// src/helpers/validate.js
const Validator = require('validatorjs');
...
const passwordRegex = /^(?=.*[a-z])(?=.*[A-Z])(?=.*\d)[a-zA-Z\d]/;
// Tighten password policy
Validator.register('strict', value => passwordRegex.test(value),
'password must contain at least one uppercase letter, one lowercase letter and one number');
This snippet above uses regex to validate incoming values for an input field with the
strict validation rule.
We will add this new rule to our
validationRule object like this:// src/middleware/validation-middleware.js
...
const validationRule = {
"email": "required|email",
"username": "required|string",
"phone": "required|string",
"password": "required|string|min:6|confirmed|strict",
"gender": "string"
}
...
A sample request and response for a failed validation will look something like this:

For the second use case, where we want to check if the email/username attribute already exists, we’ll make an asynchronous call to our database to check if said value (email, username, etc) exists in our database and return an error accordingly. We will be using
Validator.registerAsync() this will enable us to make a non-blocking call to our database and also validate other fields simultaneously:// src/helpers/validate.js
const Validator = require('validatorjs');
const Models = require("../models");
...
/**
* Checks if incoming value already exist for unique and non-unique fields in the database
* e.g email: required|email|exists:User,email
*/
Validator.registerAsync('exist', function(value, attribute, req, passes) {
if (!attribute) throw new Error('Specify Requirements i.e fieldName: exist:table,column');
//split table and column
let attArr = attribute.split(",");
if (attArr.length !== 2) throw new Error(`Invalid format for validation rule on ${attribute}`);
//assign array index 0 and 1 to table and column respectively
const { 0: table, 1: column } = attArr;
//define custom error message
let msg = (column == "username") ? `${column} has already been taken `: `${column} already in use`
//check if incoming value already exists in the database
Models[table].valueExists({ [column]: value })
.then((result) => {
if(result){
passes(false, msg); // return false if value exists
return;
}
passes();
})
});
The snippet above accepts table and column names as attributes and uses these values to query the database for values already existing in the specified table and column.
This validation rule can be added to our
signup validation middleware like so:// src/middleware/validation-middleware.js
...
const validationRule = {
"email": "required|email|exist:User,email",
"username": "required|string|exist:User,username",
"phone": "required|string",
"password": "required|string|min:6|confirmed|strict",
"gender": "string"
}
...
The snippet above checks if the values for email and username already exists in the database. A sample request and response for a failed validation are in the image below:

Conclusion
In this tutorial, we have learned how to put basic input validation in place with validatorJS. We also learned how to define custom validation rules for two use cases. ValidatorJS has more predefined
Comments
Post a Comment