MongoDB has come a long way. Even though there are many NoSQL databases out there, MongoDB is the first database that comes to mind when talking about NoSQL databases.
Although there always has been a bit of heat between people who like SQL and people who prefer NoSQL, the truth is, databases like MongoDB solve a different problem.
And they can be really handy when handing unstructured data where manipulating the shape of data quickly and efficiently (and turning it into relevant knowledge) is more helpful than the rock-solid performance provided by old school SQL databases.
MongoDB comes with a powerful framework for doing this – that is, manipulating data right onto the server: the Aggregation Framework. Let's get into it and cover some quick points about it, what it is, and why it is important.
What is the Aggregation Framework?
The Aggregation framework is just a way to query documents in a collection in MongoDB. This framework exists because when you start working with and manipulating data, you often need to crunch collections together, modify them, pluck out fields, rename fields, concat them together, group documents by field, explode array of fields in different documents and so on.
This cannot be done by the traditional querying system which MongoDB comes with (that is, the find query or update query, or any other query you might have used).
The simple query set in MongoDB only allows you to retrieve full or parts of individual documents. They don't really allow you to manipulate the documents on the server and then return them to your application.
This is where the aggregation framework from MongoDB comes in. It's nothing external, as aggregation comes baked into MongoDB. You can learn to work with the MongoDB aggregation framework using this free YouTube playlist I made.
Pipeline
The Aggregation framework relies on the pipeline concept. Let's see an image which explains it in a better way:
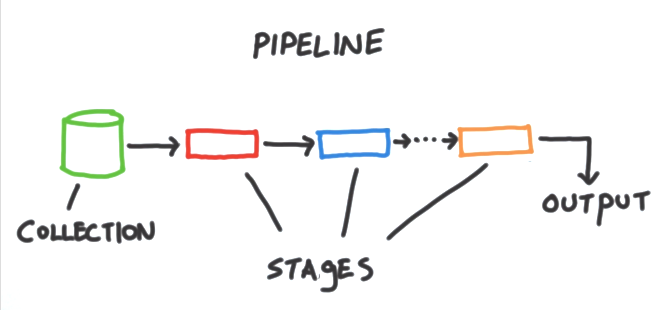
Here, as you can see, we pick up a collection and pass it through a pipeline. This pipeline consists of certain stages where certain operators modify the documents in the collection using various techniques. Finally, the output is returned to the application calling the query.
Compare it with a simple query, like find. Sure, it works in most ways, but it is not really useful when you want to modify the data as well while retrieving it.
Either you'll need to fetch the documents and modify them accordingly in the application on the server, or worse, you'll send them to the client and let the frontend code modify it for you.
In both cases, you're wasting resources and bandwidth. Thus, the aggregation framework neatly addresses this problem. Let's see how it does that with the operators.
Pipeline operators
In MongoDB, the pipeline is an array consisting of various operators, which take in a bunch of documents and spit out modified documents according to the rules specified by the programmer. The next operator takes in the documents spat out by the previous operator, hence, it's called a pipeline.
You can have many operators in a pipeline, and these operators can be repeated as well, unlike regular MongoDB queries.
Let's take a look at some common pipeline operators in MongoDB.
$group
This operator allows you to group a bunch of documents together on the basis of a certain field in documents. It can also be used to group the various fields in the documents together.
I'm a big believer in the saying that a picture is worth a 1000 words. A video is worth a 1000 pictures (well, technically a lot more pictures, but okay), so let's see a quick video on that:
$match
The match pipeline operator works very similarly to how the regular find operator works. The good thing about this, however, is that it can be used multiple times because you're in a pipeline environment! This makes it powerful.
Let's see how it is used on a collection:
$limit
The $skip pipeline operator skips the first N documents and passes the rest of the documents to the next operator. Let's see a quick example:
$skip
The $skip pipeline operator skips the first N documents and passes rest of the documents to the next operator. Let's see a quick example:
$unwind
This operator is personally my favorite. $unwind takes in an array field and explodes it into multiple N sub-documents with the i-th document containing the i-th particular value of array as the value of the field name.
Combined with other operators like $group and $match, this becomes very powerful for data processing. Sounds confusing? Let's look at a simple example:
$project
The project operator allows you to pluck out a bunch of fields from every document and discard the rest. Not only that, but you can also rename the plucked fields, concat strings, take out substrings and much more!
Let's see how this works in a nutshell:
Best Practices for using the Aggregation Framework
With great power comes great responsibility. You can easily exploit the aggregation framework for doing simple queries too, so it's important to make sure that you're not writing poor database queries.
To begin with, keep the following points in mind:
- MongoDB will reject any operator that takes more than 100MB of RAM and will throw an error. So make sure you trim down your data as soon as possible as a single operator should not take up more than 100MB memory.
- Order matters! Putting $match first will reduce the number of documents passed to the rest of the pipeline. Putting $project next will then further reduce the size of an individual document by getting rid of fields.
- Finally, make sure you do all the work which requires the use of indexed fields (sorting, matching, etc.) before you use operators like $project or $unwind. This is because these operators create new documents that do not have the indexes from the original document.
Conclusion
MongoDB is a great database tool and can be really helpful for small startups and businesses that want to iterate quickly. This is in part due to its loose restrictions and forgiving nature.
Comments
Post a Comment