
What is NgRx?
NgRx is a framework for building reactive applications using Angular, which provides state management, isolation of side effects, router bindings etc. that enhance developers experience during the development of different types of applications in it.
What is Reactive Programming?
Reactive programming is a term that you hear a lot these days, but what does it really mean?Reactive programming is a way to handle events and data flow in your application. In reactive programming, you design your components and other pieces of your software in order to react to those changes instead of asking for changes.Instead of pushing data directly to the component or service, in reactive programming, it is the component or service that reacts to data changes.
Life-cycle of NgRx

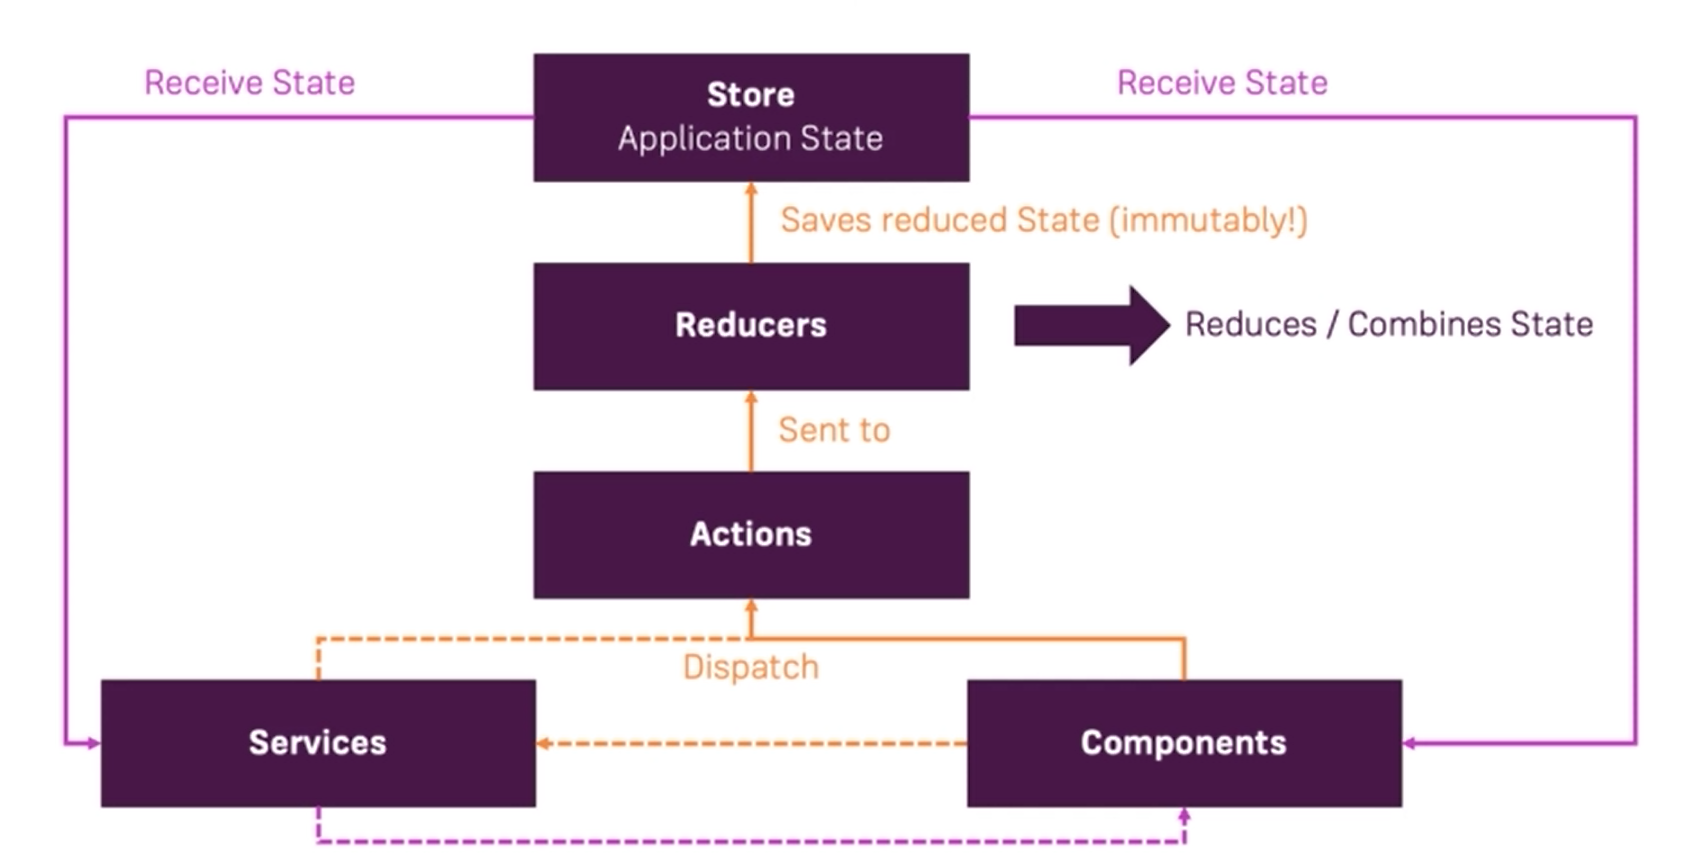
1. Store: Store has responsibility of holding the state and applying changes to it when they are told to do so (when an action is dispatched). State is handled only in one object and in one place, so debugging or adding changes becomes way easier.You are never going to change the state directly instead you are going to dispatch actions. These actions describe what’s happening (can be things like getting, adding, removing, updating the state).2. Actions: Actions are objects that extend the NgRx Action class with a ‘type’ property. They have an optional ‘payload’ property (naming is up to you but the standard is to name it ‘payload’) for sending in data to the effect/reducer and are dispatched by the store to either run an effect or change state in a reducer.3. Reducers: Reducers are pure functions which produce the same output for a given input. It takes the latest ‘Action’ dispatched, the current state, and determines whether to return a newly modified state or the original state.
Let’s Create An Example!
Here I will create a basic CRUD example, using Visual Studio Code, which is recommended editor to build client side applications with its powerful features.1. Install Node Package Modules, by running below command in package console manager.
npm install --save
2. Install NgRx store.
npm install @ngrx/store --save
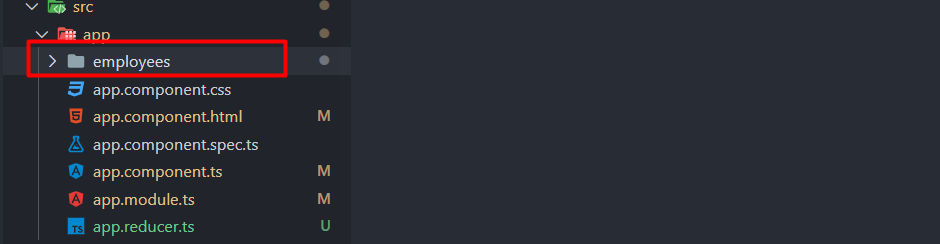
3. Add new folder employee in src/appfolder (like below) in your application.

4. Add new files (as shown below) insrc/app/employee’s folder.


5. Add new file app.reducer.ts in src/appfolder.


6. Add below lines of code intoapp/employee/employee.model.ts file. This is employee data structure which defines what type of data/properties we needed in this application.
export class Employee {constructor(public id: string, public name: string, public profile: string) {}}
7. Add below lines of code intoapp/employee/employee.action.ts file.Here each action has its own unique identifier. ‘type’ property for each action is mandatory to define, so that store will able to identify what type of action it needs to dispatch.On the other hand, ‘payload’ property defines the data which needs to be pass at the time of action dispatching. Although, it is optional and it is not mandatory to have same name of this property. You can name it anything, but preferable is ‘payload’.
import { Action } from "@ngrx/store";import { Employee } from "./employee.model";export const ADD_EMPLOYEE = "[Employee] Add Employee";export const UPDATE_EMPLOYEE = "[Employee] Update Employee";export const DELETE_EMPLOYEE = "[Employee] Delete Employee";export class AddEmployee implements Action {readonly type = ADD_EMPLOYEE;constructor(public payload: Employee) {}}export class UpdateEmployee implements Action {readonly type = UPDATE_EMPLOYEE;constructor(public payload: { id: string; empName: string; empProfile: string }) {}}export class DeleteEmployee implements Action {readonly type = DELETE_EMPLOYEE;constructor(public payload: string) {}}export type EmployeeActions =| AddEmployee| UpdateEmployee| DeleteEmployee
8. Add below lines of code intoapp/employee/employee.reducer.ts file.
We define our state or state data in reducer. In employeeReducer function we set our state with initial state value and action as EmployeeActions type (which we have created in app/employee/employee.actions.ts file).
When any action get dispatched, the action will pass into the second argument of reducer by store itself and reducer then will call appropriate action method on the basis of its (currently dispatched action) type and perform following functionality.It then returns update the state and send the modified state to the store by itself.
import {EmployeeActions,ADD_EMPLOYEE,UPDATE_EMPLOYEE,DELETE_EMPLOYEE,} from "./employee.actions";import { Employee } from "./employee.model";export interface empState {employees: Employee[];}const intialState: empState = {employees: [new Employee(`EMP-${1}`, "Employee 1", "Dot Net Developer"),new Employee(`EMP-${2}`, "Employee 2", "Java Developer"),new Employee(`EMP-${3}`, "Employee 3", "Python Developer"),],};export function employeeReducer(state: empState = intialState,action: EmployeeActions) {switch (action.type) {case ADD_EMPLOYEE:return { ...state, employees: [...state.employees, action.payload] };case UPDATE_EMPLOYEE:return {...state,employees: state.employees.map((x) => {if (x.id == action.payload.id) {return {id: x.id,name: action.payload.empName,profile: action.payload.empProfile,};} else {return x;}}),};case DELETE_EMPLOYEE:return {...state,employees: state.employees.filter((x) => x.id !== action.payload),};default:return state;}}
9. Add below lines of code intoapp/app.reducer.ts file.In here, we have defined our AppState. It tells us how our state will look like, when will fetch data from store.
import { ActionReducerMap } from "@ngrx/store";import { employeeReducer, empState } from "./employees/employees.reducer";export interface AppState {employeesState: empState;}export const AppReducer: ActionReducerMap<AppState> = {employeesState: employeeReducer};
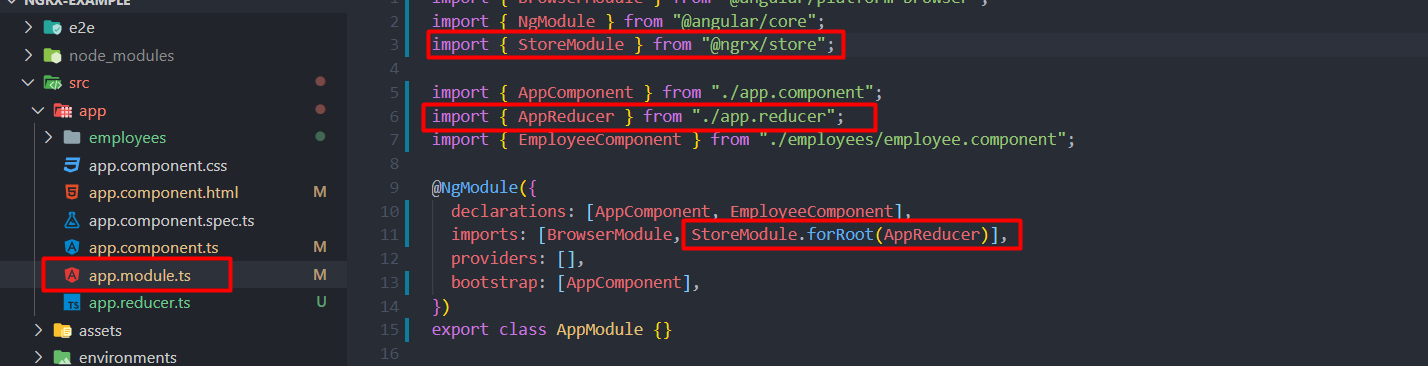
10. Add StoreModule from @ngrx/store and add into imports array. Also import AppReducer and set it inside the forRootmethod of StoreModule.StoreModule’s here will set our state, which we defined in app reducer in previous step. Hereby, we have set our NgRx basic structure for our application.

11. Now, go toapp/employee/employee.component.htmlfile and below html code.In *ngFor, we are using async pipe on employees and then looping through the array to bind employees data.While selecting state from store, the store will return an observable type state which further needed to fetch actual type of state in which our data is being stored.
So async pipe will allow to wait to fetch actual type of state from store to bind employees data. In detail about observables, click here.
<div class="container"><div class="row"><div class="col-xs-10"><hr /><div class="form-group"><input class="form-control" placeholder="Enter Employee's Name"type="text" #empName /></div><div class="form-group"><input class="form-control" placeholder="Enter Employee's Profile"type="text" #empProfile /></div><button class="btn btn-primary" title="add new employee"(click)="isEdit ? updateEmployee() : addEmployee()">{{ !isEdit ? "Add New Employee" : "Update Employee" }}</button><button *ngIf="isEdit" class="btn btn-default"(click)="onCancelEmployee()">Cancel</button><button class="btn btn-warning" (click)="fetchEmployees()">Fetch Employees</button></div></div><div class="row"><div class="col-xs-10"><hr /><table class="table table-hover"><thead><tr><th scope="col">#</th><th scope="col">Employee ID</th><th scope="col">Employee Name</th><th scope="col">Employee Profile</th><th scope="col">Actions</th></tr></thead><tbody><tr*ngFor="let employee of (employees | async).employees;let i = index"class="table-row-hover"><th scope="row">{{ i + 1 }}</th><td>{{ employee.id }}</td><td>{{ employee.name }}</td><td>{{ employee.profile }}</td><td><button class="btn btn-info" (click)="editEmployee(employee)">Edit</button>|<button class="btn btn-danger" (click)="onDelete(employee.id)">Delete</button></td></tr></tbody></table><hr /> </div> </div> </div>
12. Add below lines of code intoapp/employee/employee.component.ts file.Initialize store in constructor, and set it with state which is type AppState in our application. Now select ‘employeeState’ type from store which is actual state of application in which we are managing our employees data.
While selecting state from store, it will return an observable. So will take a property with same observable’s type and using it in html to bind employees data.
import { Component, OnInit, ViewChild, ElementRef } from "@angular/core";import { Store } from "@ngrx/store";import { AppState } from "../app.reducer";import { Employee } from "../employees/employee.model";import { Observable } from "rxjs";import {AddEmployee,DeleteEmployee,UpdateEmployee,FetchEmployees,} from "../employees/employee.actions";@Component({selector: "app-employee",templateUrl: "./employee.component.html",styleUrls: ["./employee.component.css"],})export class EmployeeComponent implements OnInit {employees: Observable<{ employees: Employee[] }>; //employeeState: {employees: Employee[]}@ViewChild("empName") empname: ElementRef;@ViewChild("empProfile") empProfile: ElementRef;isEdit: boolean = false;currentEmpId: string;constructor(private store: Store<AppState>) {}ngOnInit() {this.employees = this.store.select("employeesState"); // employeeState: {employees: Employee[]}}addEmployee() {this.store.dispatch(new AddEmployee( new Employee( `EMP-${Math.floor(Math.random() * 1001)}`, this.empname.nativeElement.value, this.empProfile.nativeElement.value)));this.onCancelEmployee();}onDelete(id: string) {this.store.dispatch(new DeleteEmployee(id)); this.onCancelEmployee();}editEmployee(emp: Employee) {this.empname.nativeElement.value = emp.name;this.empProfile.nativeElement.value = emp.profile;this.isEdit = true;this.currentEmpId = emp.id;}onCancelEmployee() {this.empname.nativeElement.value = ""; this.empProfile.nativeElement.value = ""; this.isEdit = false; this.currentEmpId = ""; }updateEmployee() {
this.store.dispatch(new UpdateEmployee({id: this.currentEmpId, empName: this.empname.nativeElement.value, empProfile: this.empProfile.nativeElement.value, }));this.onCancelEmployee();}fetchEmployees() {// will talk about this later in effects}}
13. Add below css code intoapp/employee/employee.component.cssfile.
.table-row-hover {cursor: pointer;}
14. Run below command in package console
manager to start the application.
ng serve --open
15. It will start your application in browser and you can perform operations with such a clean and understandable structure of NgRx.


Effects in NgRx
In above example, if you have run this code, you will see that there is a button Fetch Employees, which is currently doing nothing while clicking on it.Here, what we are going to learn one more important feature provided by NgRx is Effects.
Now what are Effects?
Effects are long-running services that listen to an observable of every action dispatched from the store.A typical effect uses the Actions Observable as its source and uses the ofType operator to perform its side effect when the corresponding action is dispatched.Let’s make it more clear by creating our own effect into same application.1. First of all add new file employee.effects.tsin app/employee folder.


2. Replaceapp/employee/employee.actions.ts with below lines of code.
import { Action } from "@ngrx/store";import { Employee } from "./employee.model";export const ADD_EMPLOYEE = "[Employee] Add Employee";export const UPDATE_EMPLOYEE = "[Employee] Update Employee";export const DELETE_EMPLOYEE = "[Employee] Delete Employee";export const SET_EMPLOYEES = "[Employee] Set Employee";export const FETCH_EMPLOYEES = "[Employee] Fetch Employees";export class AddEmployee implements Action {readonly type = ADD_EMPLOYEE;constructor(public payload: Employee) {}}export class UpdateEmployee implements Action {readonly type = UPDATE_EMPLOYEE;constructor(public payload: { id: string; empName: string; empProfile: string }) {}}export class DeleteEmployee implements Action {readonly type = DELETE_EMPLOYEE;constructor(public payload: string) {}}export class FetchEmployees implements Action {readonly type = FETCH_EMPLOYEES;}export class SetEmployees implements Action {readonly type = SET_EMPLOYEES;constructor(public payload: Employee[]) {}}export type EmployeeActions =| AddEmployee| UpdateEmployee| DeleteEmployee| FetchEmployees| SetEmployees;
3. Replaceapp/employee/employee.reducer.ts with below lines of code.Here, remove the static initialization of employees and set it as an empty array.Will now fetch employees data using http service by implementing NgRx Effects.
import {EmployeeActions,ADD_EMPLOYEE,UPDATE_EMPLOYEE,DELETE_EMPLOYEE,SET_EMPLOYEES,} from "./employee.actions";import { Employee } from "./employee.model";export interface empState {employees: Employee[];}const intialState: empState = {// employees: [// new Employee(`EMP-${1}`, "Employee 1", "Dot Net Developer"),// new Employee(`EMP-${2}`, "Employee 2", "Java Developer"),// new Employee(`EMP-${3}`, "Employee 3", "Python Developer"),// ],employees: [],};export function employeeReducer(state: empState = intialState,action: EmployeeActions) {switch (action.type) {case ADD_EMPLOYEE:return { ...state, employees: [...state.employees, action.payload] };case UPDATE_EMPLOYEE:return {...state,employees: state.employees.map((x) => {if (x.id == action.payload.id) {return {id: x.id,name: action.payload.empName,profile: action.payload.empProfile,};} else {return x;}}),};case DELETE_EMPLOYEE:return {...state,employees: state.employees.filter((x) => x.id !== action.payload),};case SET_EMPLOYEES:return {...state,employees: action.payload,};default:return state;}}
4. Add below lines of code inapp/employee/employee.effects.ts file.Here, fetchEmployees is an effect. The effect listens to every action that gets dispatched and when it retrieves an action with the action type FETCH_EMPLOYEES, it will make an HTTP request. Depending on the response the effect will either dispatch a SetEmployees action.
import { Effect, Actions, ofType } from "@ngrx/effects";import { Injectable } from "@angular/core";import { HttpClient } from "@angular/common/http";import { FETCH_EMPLOYEES, SetEmployees } from "./employee.actions";import { switchMap, map } from "rxjs/operators";import { Employee } from "./employee.model";@Injectable()export class EmployeeEffects {constructor(private http: HttpClient, private actions: Actions) {}@Effect()fetchEmployees = this.actions.pipe(ofType(FETCH_EMPLOYEES),switchMap(() => {return this.http.get<Employee[]>("https://ngrx-example-65f01.firebaseio.com/employees.json");}),map((employees) => {return new SetEmployees(employees);}));
}
5. Now add below lines of code inside the function fetchEmployees inapp/employee/employee.component.ts file.
this.store.dispatch(new FetchEmployees());


6. Run it using command ng serve — open in package console manager.
Now we are familiar with the NgRx life-cycle. We also know that what is the role of effects while creating such reactive applications using NgRx structure.Let’s take a look for other interesting features provided by NgRx.
Store-DevTools in NgRx
The NgRx DevTools are browser extension that includes a UI for inspecting and interacting with a NgRx based application.
Features/ benefits of Store-DevTools
1. The key benefit of the DevTools is that it provides us visual feedback about what the application is doing at all times, making it much easier to understand what is going on.2. Gives us a great understanding of how the application works, and what parts of application are triggering which Actions.3. A State inspector, allows us to easily inspect the in-memory store state.
Installation of Store-DevTools
1. Run below command in package console manager to install store-devtools package in your application.
npm install @ngrx/store-devtools --save
2. Go to src/app/app.module.ts file.Import StoreDevtoolsModule from@ngrx/store-devtools and set it into importsarray.Now call instrument method, which takes an object, in which we are going to define our configurations for DevTools.For an example, here I have set logOnlyproperty set to true for production build, which means it disables all extension features for production environment.


3. Now search for Redux DevTools extension and install it into your browser.4. After successfully installing it, run your application and open developer tools in browser. You will now able to access all features of NgRx in there.


Router-Store in NgRx
NgRx Router Store provides binding which connects Angular router to Store. If you are working on some bigger reactive applications in which routing is also implemented. Here what NgRx Router Store comes with, without doing any extra efforts.It simply uses the existing router navigation cycle and listens for changes router’s state, for each dispatched action, during this router navigation cycle.
Installation of Router-Store
1. Run below command in package console manager to install router-store in your application.
npm install @ngrx/router-store --save
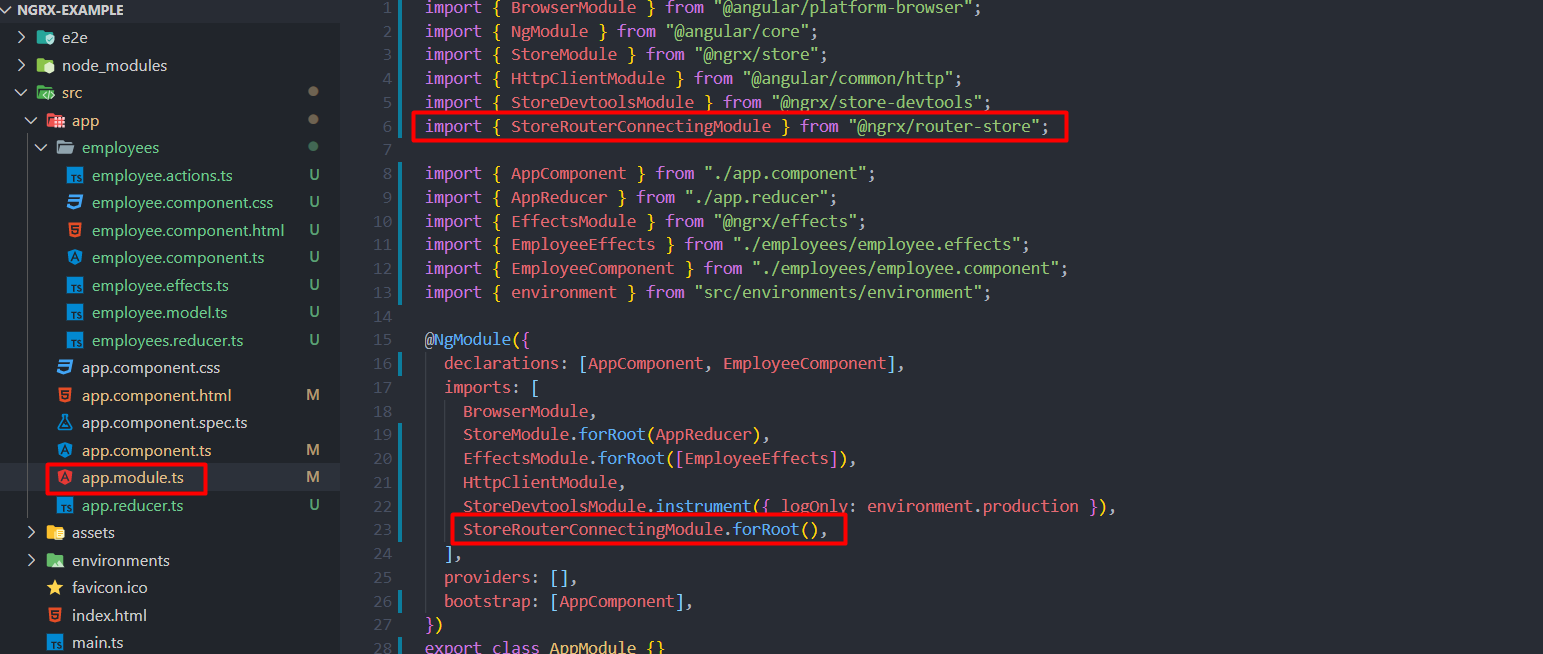
2. Now go to src/app/app.module.ts file and import StoreRouterConnectingModule from @ngrx/router-store.
Then, set into imports array and call forRootmethod. That’s it, its hereby will automatically connects your existing Angular router to Store.

Error Handling
A very basic and most important part of our application is error handling. Error handling is something when some lines of code get would get break or some http service gets failed.Here we will learn that how do we handle such exceptions using NgRx observables.Let’s take an example with our application, where we will handle exception while our http service gets failed.1. Add new action HANDLE_ERROR inapp/employees/employee.action.ts file. And create new action class to define this action.


2. Now add a new case inapp/employees/employees.reducer.ts file.You can define your own error display logic. Here I am simply showing error message in alert box and returning the original state.


3. Add catchError (import from rxjs/operators) just like below, in app/employees/employee.effects.ts file.catchError will return an observable and dispatch HandleError action to log or display the actual error.


This is it!So now we have learnt that how do we build reactive applications in Angular by implementing NgRx structure. Although, this is an short example just to understood that how NgRx life-cycle works, we can use this structure in bigger applications where we need state management on client side and perform other operations with our data and store back into a state.
Wrap Up
- We have learnt about the state management in NgRx.
- Understood the life-cycle of NgRx and what is the role of store, reducers and actions in complete life-cycle.
- We discussed about NgRx Effects, Store-DevTools and Router-Store, which are great tools/ features provided by NgRx.
- Last but not least, we have learnt about the error handling in NgRx Effects which will be really very helpful to manage our application and display meaningful error messages on UI.
Comments
Post a Comment