This post explains how to load-balance a gRPC application across many GKE clusters in different regions to increase performance and availability.
Context
Kaggle’s Backend team is responsible for making Kaggle Notebooks, a hosted data science environment, fast and reliable. It provides a few thousands notebooks concurrently.
Over the past year, the team has been working to re-architect the full stack. The goal was to allow the product to keep scaling with better performance and reliability.
The new architecture is composed of micro-services using gRPC as the main communication mechanism. They are deployed on Google Kubernetes Engine (GKE).

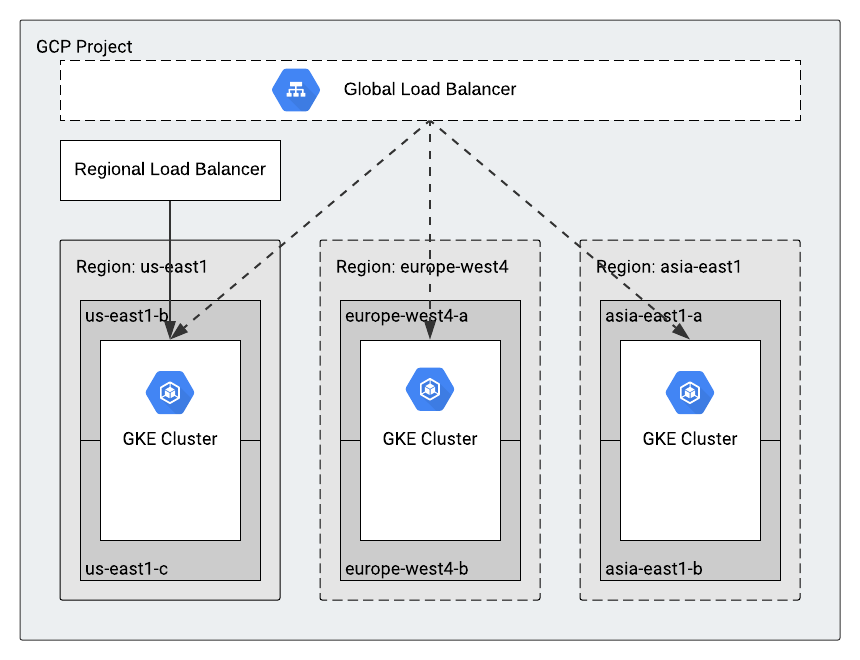
Originally, we used a single GKE cluster, but we’re now expanding to use multiple clusters in many regions of the world. This effort will further help our users to get better performance and enable our product to have better availability.
The rest of this post explains how we took our main API (Scheduler, which schedules new Kaggle Notebooks on user request) from a single cluster to a multi-cluster.
Setup for a single cluster
We’re going to start by reviewing a few components we need to set up the Scheduler API for a single cluster: Cloud Endpoints and Health Check.
Cloud Endpoints
Cloud Endpoints is a product to help deploy, protect, and monitor APIs.
We use it mainly for its authentication feature. It also provides monitoring, logging, and quota management with no additional setup.

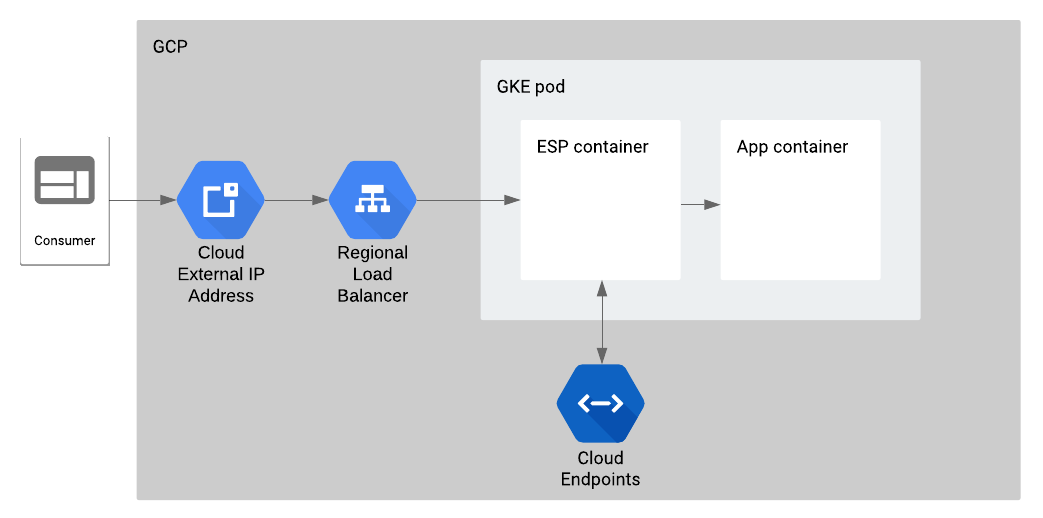
Technically, the Extensible Service Proxy (ESP) container handles incoming requests and forwards the authenticated ones to the main application container. Cloud Endpoints manages the ESP configuration.
Let’s set aside the Cloud Endpoints configuration for the single cluster setup (we’ll come back to this in the multi-cluster setup) and focus on the Kubernetes deployment configuration for this pod.
spec:
  containers:
  - name: esp
    image: gcr.io/endpoints-release/endpoints-runtime:1
    args: [
      "--ssl_port=443",
      "--service=SERVICE_NAME.endpoints.PROJECT_ID.cloud.goog",
      "--rollout_strategy=managed",
      "--backend=grpc://127.0.0.1:8091"
    ]
    ports:
    - containerPort: 443
    volumeMounts:
    - mountPath: /etc/nginx/ssl
      name: nginx-ssl
      readOnly: true
  - name: session-scheduler
    image: gcr.io/PROJECT_ID/session-scheduler:ENV
    ports:
    - containerPort: 8091
  volumes:
  - name: nginx-ssl
    secret:
      secretName: nginx-ssl
There are two containers in this setup: the ESP container and the main application container. The ESP container accepts requests on the `ssl_port` and then forwards the authenticated requests to the main application container (
backend). The volume contains the SSL key and certificate from the Kubernetes secret.
Follow this tutorial to set up Cloud Endpoints for gRPC on GKE for a single cluster. For a single region cluster, pick a service of type LoadBalancer.
Health Check
With the single-cluster setup, you need to make sure the application serves traffic properly before letting the Load Balancer pick this pod.
To achieve this, we first integrated the gRPC Health Checking Protocol into the protobuf and implemented it in our application.
Second, we modified the Cloud Endpoints configuration to transcode HTTP to gRPC. The key things we’re doing here are adding the Health API, transcoding this API using the http rule, and allowing unregistered calls for the health check endpoint.
type: google.api.Service
config_version: 3
name: SERVICE_NAME
title: Kaggle Session Scheduler
endpoints:
- name: SERVICE_NAME
  target: IP_ADDRESS
apis:
- name: APPLICATION_API
- name: grpc.health.v1.Health
usage:
  rules:
  - selector: "*"
    allow_unregistered_calls: false
  - selector: "grpc.health.v1.Health.Check"
    allow_unregistered_calls: true
authentication:
  providers:
  - id: customer
    issuer: SERVICE_ACCOUNT
    jwks_uri: https://www.googleapis.com/robot/v1/metadata/x509/SERVICE_ACCOUNT
  rules:
  - selector: "*"
    requirements:
      - provider_id: customer
  - selector: grpc.health.v1.Health.Check
    allow_without_credential: true
http:
  rules:
  - selector: grpc.health.v1.Health.Check
    get: /v1/health
Finally, we configured the readiness and liveness probes for the ESP container. The
http_port is opened for this purpose.spec:
containers:
- name: esp
image: gcr.io/endpoints-release/endpoints-runtime:1
args: [
"--ssl_port=443",
"--http_port=9000",
"--service=SERVICE_NAME.endpoints.PROJECT_ID.cloud.goog",
"--rollout_strategy=managed",
"--backend=grpc://127.0.0.1:8091"
]
ports:
- containerPort: 443
- containerPort: 9000
livenessProbe:
httpGet:
path: /v1/health
port: 9000
readinessProbe:
httpGet:
path: /v1/health
port: 9000
volumeMounts:
- mountPath: /etc/nginx/ssl
name: nginx-ssl
readOnly: true
With this configuration, the probes not only check that the ESP container is serving traffic, but also that the application container is responding.
Note that the probes should also check
SERVING status, or make sure that the health check endpoint responds with an error status.Setup for multiple clusters
Let’s get down to the nitty-gritty of this post: deploying this application across many clusters.


This will improve :
- Availability: by increasing the probability that there is always a cluster / GCP region able to serve requests
- Performance: by serving requests closer to the consumer
Ingress for Anthos
Google Cloud recently released “Ingress for Anthos” (beta), a cloud-hosted multi-cluster ingress controller for GKE clusters. This provides us with a single HTTP load balancer with multiple GKE clusters in different regions as LB backends. It’s all controlled through MultiClusterIngress and MultiClusterService resources which deploy and manage GCP load balancers.
The team starts by setting up and registering the clusters, then enabling the API in the Ingress Config Cluster. The Config Cluster is a centralized place to deploy Ingress constructs globally.

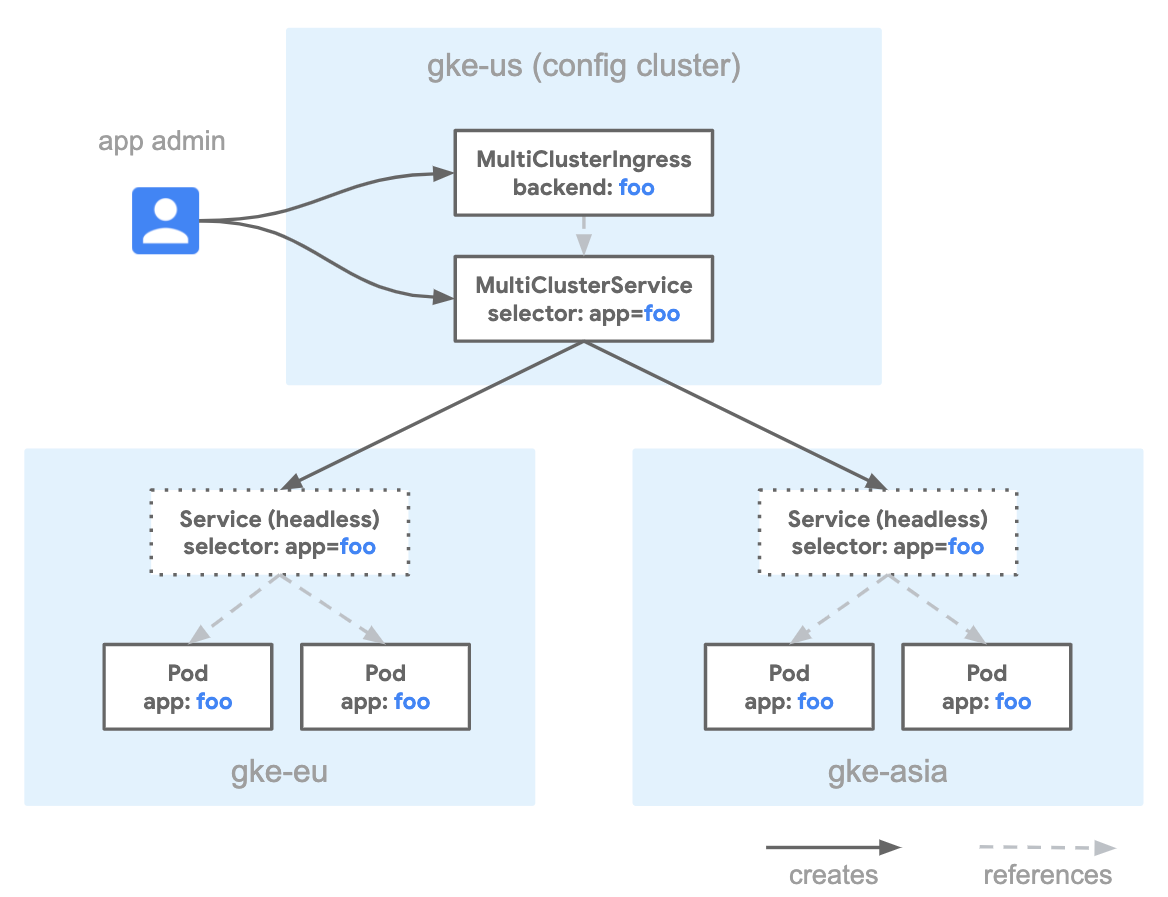
The first construct is the MultiClusterIngress, which defines the protocol termination and the global IP address to use.
apiVersion: networking.gke.io/v1beta1
kind: MultiClusterIngress
metadata:
  name: session-scheduler-mci
  annotations:
    networking.gke.io/static-ip: GLOBAL_IP_ADDRESS
spec:
  template:
    spec:
      backend:
        serviceName: session-scheduler-svc
        servicePort: 443
      tls:
      - secretName: session-scheduler-tls
The MultiClusterService defines the Service to be created in the Kubernetes clusters. The important parts are:
HTTP2 application protocol and the definition for the BackendConfig. The target port is the ssl_port of the ESP container.apiVersion: networking.gke.io/v1beta1
kind: MultiClusterService
metadata:
name: session-scheduler-svc
annotations:
beta.cloud.google.com/backend-config: '{"ports": {"ssl":"session-scheduler-svc-backend"}}'
networking.gke.io/app-protocols: '{"ssl":"HTTP2"}'
spec:
template:
spec:
selector:
app: session-scheduler
ports:
- name: ssl
protocol: TCP
port: 443
targetPort: 443
The BackendConfig is used to define the health check endpoint. Note that we use the
HTTPS endpoint of the ESP container, which serves both gRPC and the transcoded HTTP Health endpoint.apiVersion: cloud.google.com/v1beta1
kind: BackendConfig
metadata:
name: session-scheduler-svc-backend
spec:
healthCheck:
requestPath: /v1/health
type: HTTPS
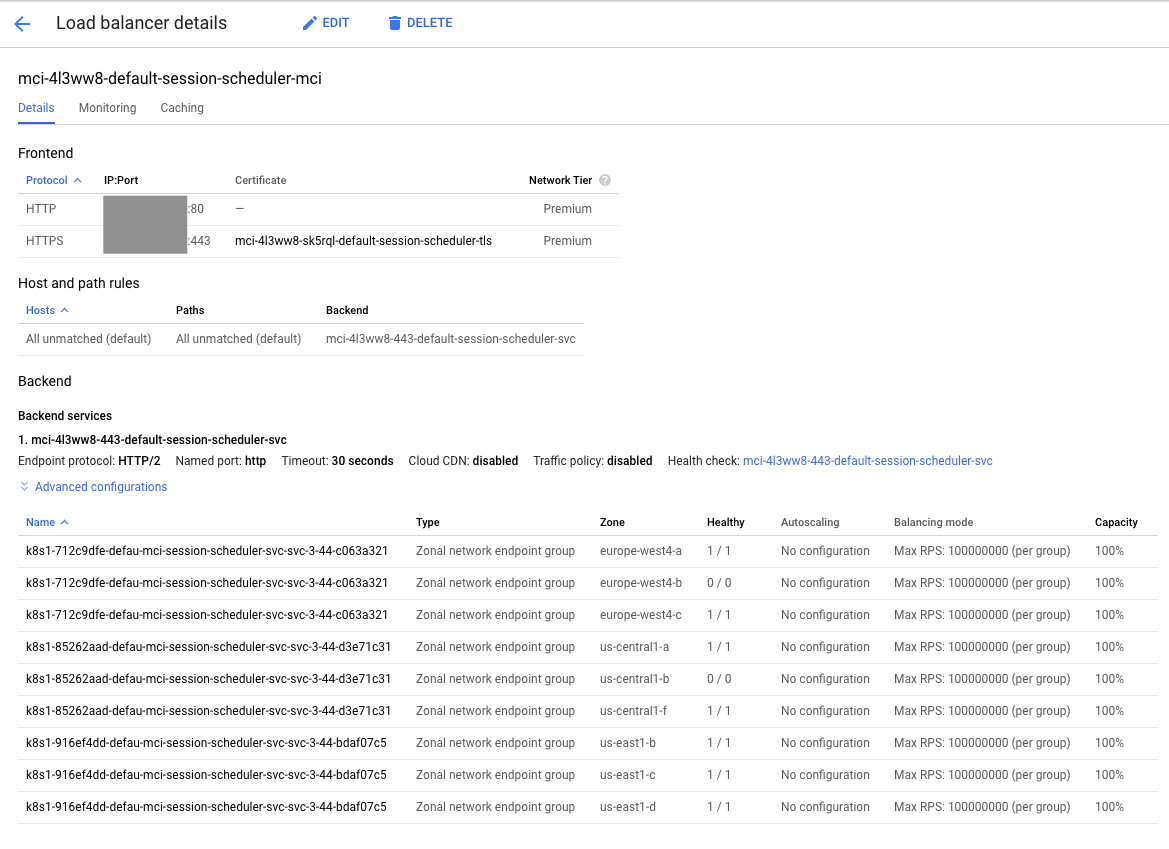
After applying these two constructs in the Golden Cluster, check the status until the load balancer is created.

Conclusions
In the early stages of your application, using a single GKE Cluster in a specific region is probably sufficient. But when you need to increase performance and/or availability of your service, you should consider expanding to many clusters and regions.
Ingress for Anthos product makes this move pretty straightforward after you figure out the Health Check strategy for gRPC. The trick is to use the
ssl_port of the ESP container.
Comments
Post a Comment