Amazon Simple Storage Service (Amazon S3) is object storage built to store and retrieve any amount of data from web or mobile. Amazon S3 is designed to make web-scale computing easier for developers. In this tutorial, we’re gonna create an Angular 7 Application that can upload files to Amazon S3 Bucket.
Set up Amazon S3
Create an IAM user
We need to provide access permission bucket. So follow these step to create an IAM user and get Access key ID and Secret access key:
Go to https://console.aws.amazon.com/iam/
In the navigation pane, choose Users and then choose Add user.
Go to https://console.aws.amazon.com/iam/
In the navigation pane, choose Users and then choose Add user.


Input User name, choose Programmatic access for Access type


Press Next: Permissions button -> go to Set permissions for jsa-user screen.
Now, choose Attach existing policies directly -> filter policy type s3, then check AmazonS3FullAccess
Now, choose Attach existing policies directly -> filter policy type s3, then check AmazonS3FullAccess

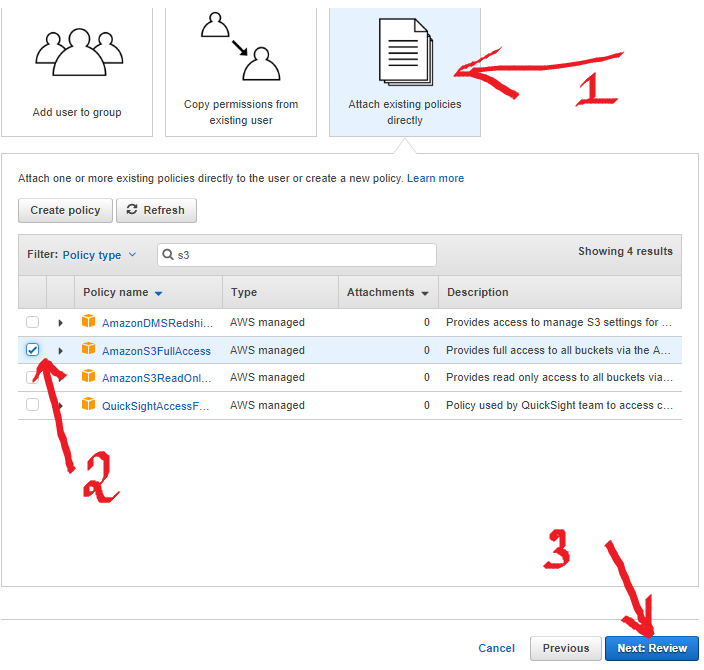
Press Next: Review


Press Create user


Press Download .csv for {Access key ID, Secret access key}.
Create Amazon S3 Bucket
e.aws.amazon.com/s3, click on Create bucket

Input information for creating bucket, then click on Create


Configure CORS for Bucket
Click on the Bucket we have just created


Choose Permission tab, then CORS Configuration


<?xml version=”1.0" encoding=”UTF-8"?>
<CORSConfiguration xmlns=”http://s3.amazonaws.com/doc/2006-03-01/">
<CORSRule>
<AllowedOrigin>*</AllowedOrigin>
<AllowedMethod>HEAD</AllowedMethod>
<AllowedMethod>GET</AllowedMethod>
<AllowedMethod>PUT</AllowedMethod>
<AllowedMethod>POST</AllowedMethod>
<AllowedMethod>DELETE</AllowedMethod>
<ExposeHeader>ETag</ExposeHeader>
<AllowedHeader>*</AllowedHeader>
</CORSRule>
</CORSConfiguration>
Configure CORS for Bucket, then click on Save button.
Create Project
Create a new angular 7 project using the following CLI command
ng new ng7aws
Install AWS SDK
install the AWS SDK using the following npm command
npm install aws-sdk --save
Create a service
Create a service for handling file upload using the following CLI command
ng g s ./services/upload
next, import the following dependencies in UploadService class file
import * as AWS from 'aws-sdk/global';
import * as S3 from 'aws-sdk/clients/s3';
Create a method for upload a file. Here is the complete code of the upload method.
uploadFile(file) {
    const contentType = file.type;
    const bucket = new S3(
          {
              accessKeyId: 'YOUR-ACCESS-KEY-ID',
              secretAccessKey: 'YOUR-SECRET-ACCESS-KEY',
              region: 'YOUR-REGION'
          }
      );
      const params = {
          Bucket: 'YOUR-BUCKET-NAME',
          Key: this.FOLDER + file.name,
          Body: file,
          ACL: 'public-read',
          ContentType: contentType
      };
      bucket.upload(params, function (err, data) {
          if (err) {
              console.log('There was an error uploading your file: ', err);
              return false;
          }
          console.log('Successfully uploaded file.', data);
          return true;
      });//for upload progress
/*bucket.upload(params).on('httpUploadProgress', function (evt) {
          console.log(evt.loaded + ' of ' + evt.total + ' Bytes');
      }).send(function (err, data) {
          if (err) {
              console.log('There was an error uploading your file: ', err);
              return false;
          }
          console.log('Successfully uploaded file.', data);
          return true;
      });*/
}
configure your bucket like this
const bucket = new S3(
          {
              accessKeyId: 'YOUR-ACCESS-KEY-ID',
              secretAccessKey: 'YOUR-SECRET-ACCESS-KEY',
              region: 'YOUR-REGION'
          }
      );
create upload parameters like this
const params = {
          Bucket: 'YOUR-BUCKET-NAME',
          Key: this.FOLDER + file.name,
          Body: file,
          ACL: 'public-read',
          ContentType: contentType
      };
upload your file using this code
bucket.upload(params, function (err, data) {
          if (err) {
              console.log('There was an error uploading your file: ', err);
              return false;
          }
          console.log('Successfully uploaded file.', data);
          return true;
      });
Your app.component.html file like this
<label class="btn btn-default">
  <input type="file" (change)="selectFile($event)">
</label>

<button class="btn btn-success" [disabled]="!selectedFiles" (click)="upload()">Upload</button>
Here is the code of app.component.ts file
import { Component, OnInit } from '@angular/core';
import { UploadFileService } from '../upload-file.service';

@Component({
selector: 'app-form-upload',
templateUrl: './form-upload.component.html',
styleUrls: ['./form-upload.component.css']
})
export class FormUploadComponent implements OnInit {

selectedFiles: FileList;

constructor(private uploadService: UploadFileService) { }

ngOnInit() {
}

upload() {
const file = this.selectedFiles.item(0);
this.uploadService.uploadfile(file);
}

selectFile(event) {
this.selectedFiles = event.target.files;
}
  }
run this project using the following command
After uploading the file you have check the console log.


Then your bucket like this


Comments
Post a Comment